I know a lot of us have builder-grade bifold doors in our homes, and honestly, I’m not a fan. I decided to create a barn door using the original bifold doors for our laundry room, and the result was amazing! Here’s exactly what we did to create a bifold barn door.
I have wanted to share this post with you for almost 2 years (procrastinate much?), but it took forever to get the finishing touches done on this project. Let’s go WAY back. I had just made over our laundry room for $85, and I was in love with the results. Let’s take a quick look at the before and after…
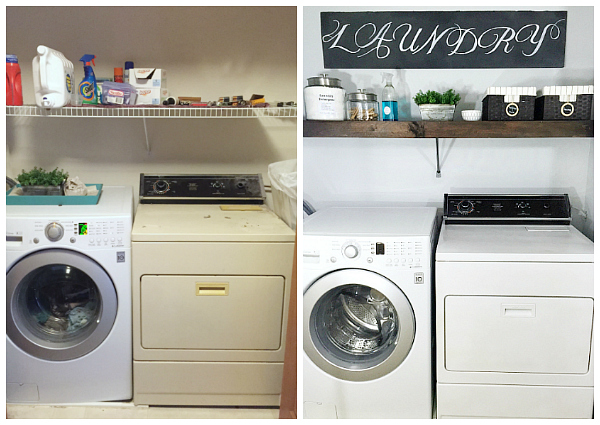
I really wanted to replace the bifold doors with a barn door, but there was no room, as this laundry closet takes up the entire wall. So for months I left the doors off so we could admire our new space. Fast forward to about 18 months… I finally figured out what I wanted to do. (Yay!) I decided to create faux barn doors using the bifold doors we already had! No really. Just wait.
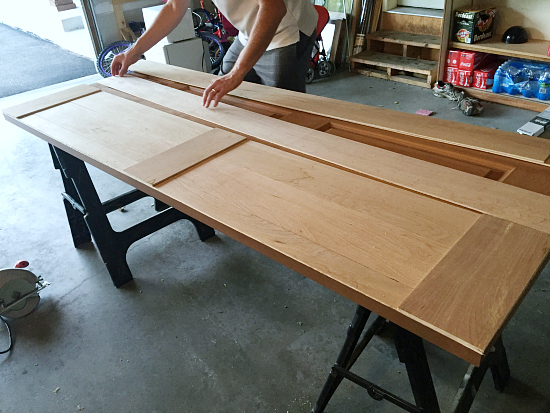
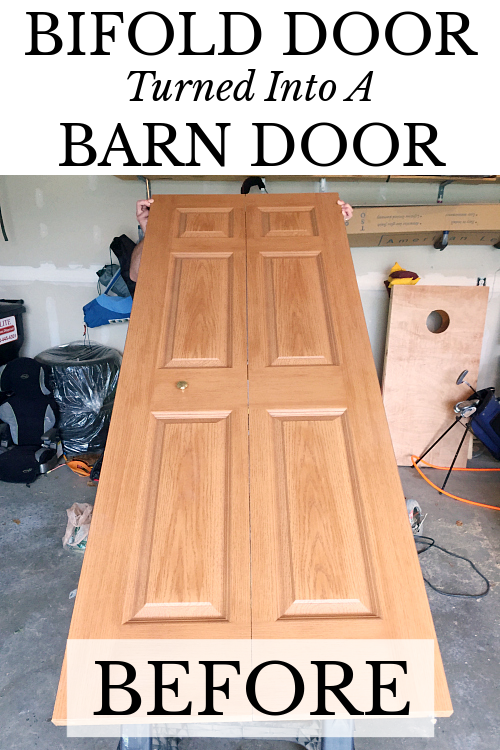
I started by taking the doors out to the garage. Here’s a picture of what they looked like when we started (at least this is half of the door 🙂 )
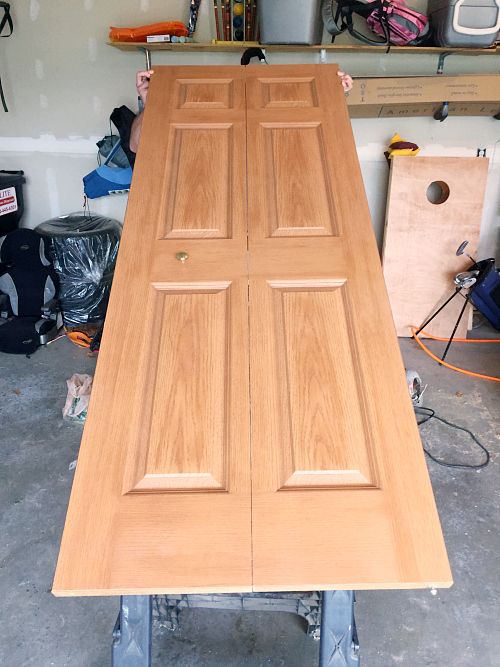
They are your average builder-grade, hollow-core, bi-fold doors. Kinda blah. Kinda boring. A little ugly.
What You Need to Make A Barn Door from Bifold Doors
Affiliate links may be used. Please see our advertising disclosure for more information.
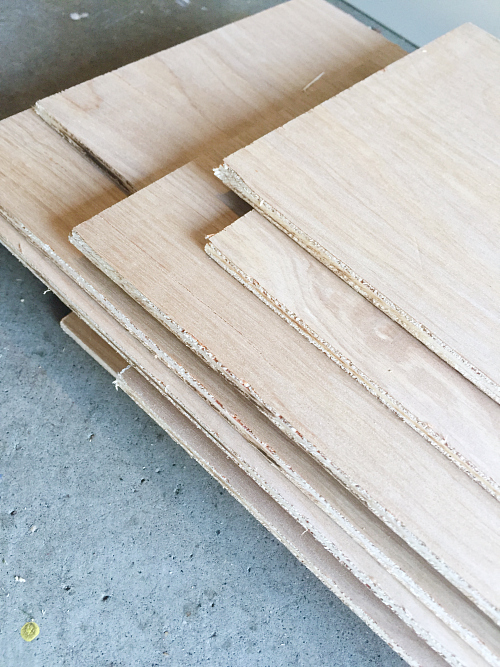
- Underlayment– This is a thin wood sheet that you can find at your local hardware store.
- Table Saw
- Liquid Nails
- Hammer & Nails
- Wood Stain– I used the color Kona
- Knobs (Optional)- You can certainly reuse the knobs are on the original bifold door, but we bought new ones to match the style.
- Drill
UPDATE: Some readers have expressed concern about the original track and hardware not being able to hold the added weight of the underlayment. While we didn’t run into this issue, there are tracks and hardware for “heavy duty use” that hold up to 125 pounds per panel. Be sure to check the width of your door prior to ordering to make sure the hardware with work with your particular door.
How to Turn A Bifold Door into a Barn Door
Start by cutting the underlayment into strips using a table saw. You can choose whatever width you’d like, whether wide or narrow, but the height should be that of the original bifold door.
Then cut other pieces of the underlayment to create the “barn door design”. Once cut, lay them out on the door in an arrangement you like. Remember not to cover the part of the door that folds out or the door won’t open! 🙂
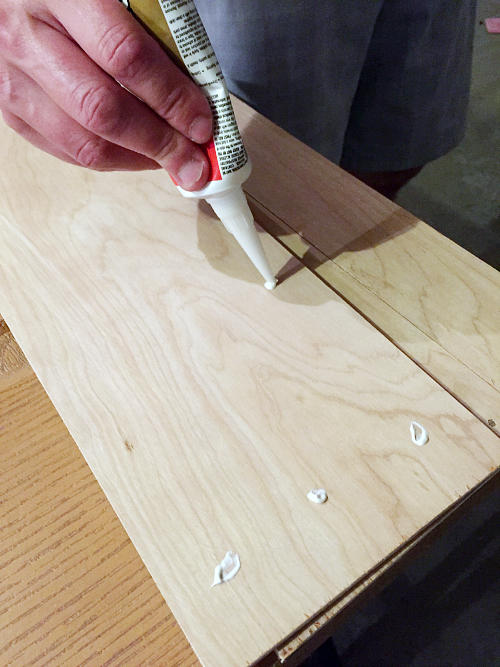
The next step is to apply liquid nails to the back of the strips of underlayment and adhere them to the door.
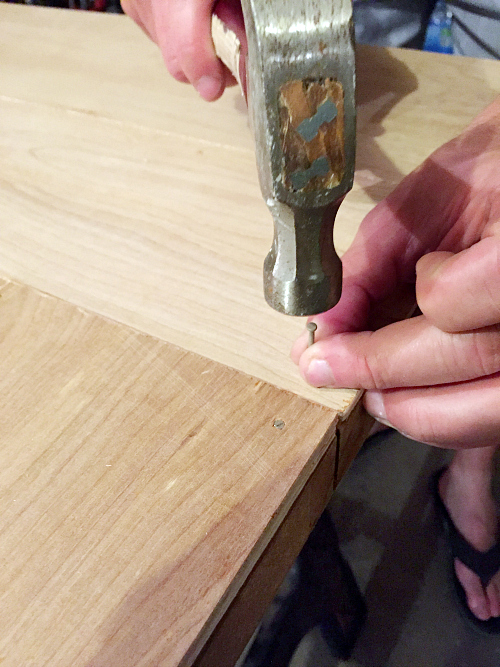
To add a little authenticity (and security), pound in a few nails as well.
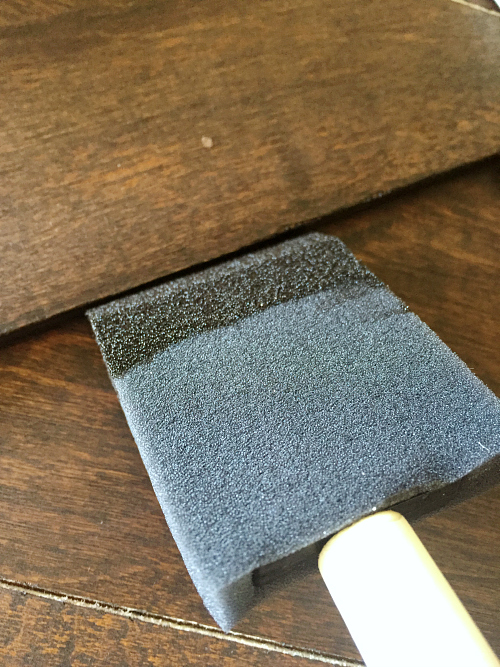
After all the underlayment as been secured, go ahead and stain the doors. As mentioned, I used Kona colored stain.

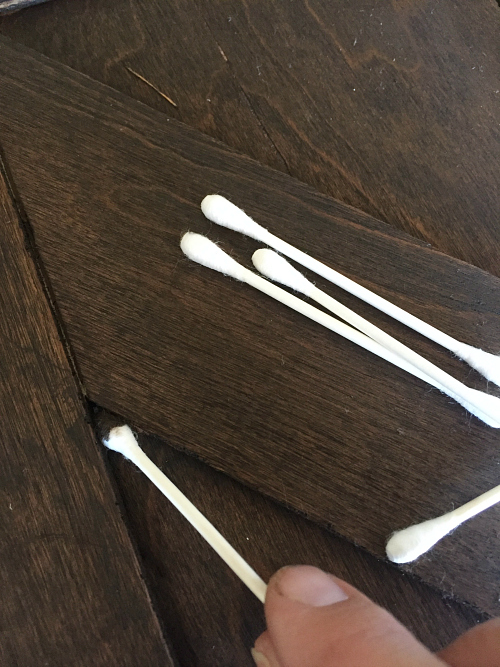
UPDATE: If I were to do this again, I would stain all the pieces before applying them to the door. Some of the little crevasses were hard to get to, so I grabbed a sponge brush and some cotton swabs to get the stain to cover those little areas.
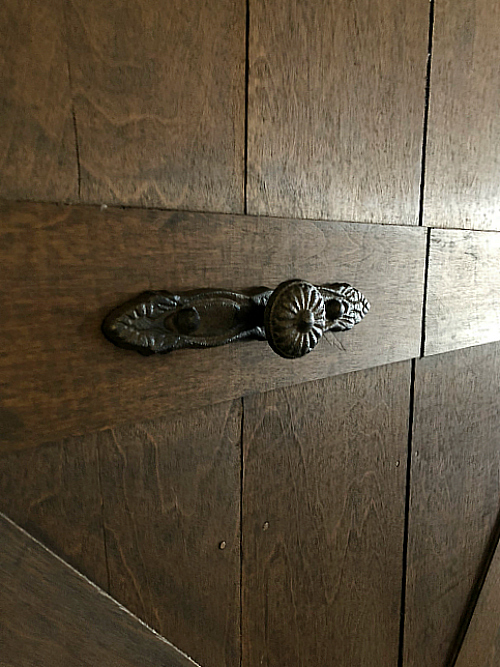
Once the stain has dried, hang the doors back on the track.
To add knobs to the door, drill a hole all the way through the door where you want the knob placed. You may need to purchase longer screws since the ones that come with drawer knobs tend to be too short.
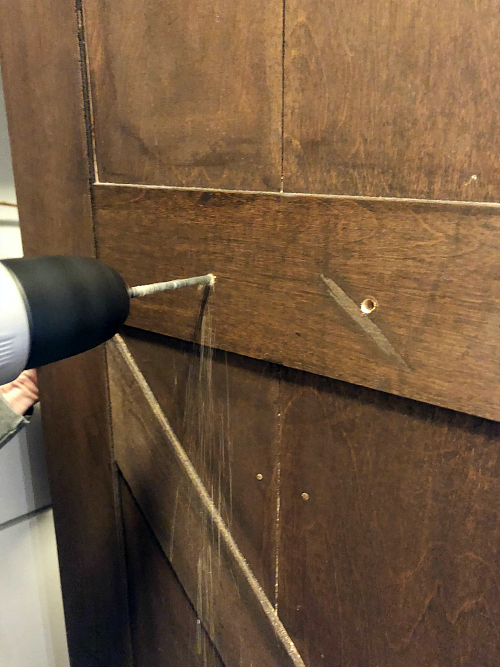
(No idea why it looks like there’s a huge scratch under the right hole, as it is not like that in real life 🙂 )
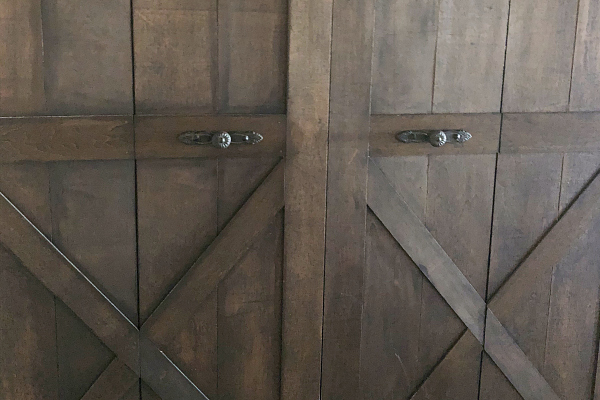
If you want the trim around the door to match, cut strips of wood to size, stain them, and use a brad nailer to adhere them to the wall… and this is how the space looks now!
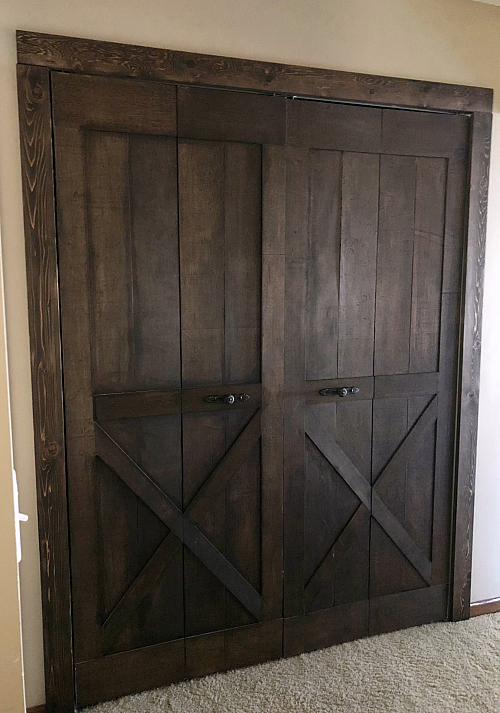
How fun is that?! And the total cost for this project was probably around $30-40 (I wish I could remember how much we spent so I could be more precise 🙂 )

We think you might also love these ideas!
DIY Wood Overlay to Hide Wire Shelving | Budget-Friendly Accent Wall Ideas | How to Update A Tub Surround

Love it? Pin it!
Does it still open as a bi-fold door does?
Yes. As you add the wood slats, you need to make sure not to place them over the seam where the bifold door would open as the door will function in the same way.
Really love this idea. We have been looking to buy a rustic looking bifold and can’t locate anything locally.
Just curious if you recall the specific thickness and type of underlayment you used? From what I understand, it’s basically very thin plywood, with one good side.
If it is plywood, do you notice the plies when looking at the panels from the side (thinking of the cross pieces)
You are right in saying that underlayment is essentially as very thin plywood. I believe it’s 5mm thick. While you can see a little of the “roughness” on the sides, it’s not that noticeable with the darker stain we used. Hope that helps.
Pierre,
JUST FYI: you might find this “underlayment” also called LUAN.
You have given me the perfect idea to re-purpose doors in the basement bathroom. It has been a nightmare trying to find an update for the space as it is not a traditional opening, glass and barn door options are out of the question. I think this might solve my problem, going to give it a try, fingers crossed they look as good as yours. I do have a concern about adding to the thickness of the doors, did you move the tracks to accommodate the added depth. Did you have to make any adjustments to the hardware or opening when you rehung the doors, just so i can prepare.. thanks
I did not need to make any adjustments, however, everyone’s home is different, so moving the track may need to be done in order to accommodate the extra width. And I did provide some links to heavy-duty hardware if you feel the additional weight is too much for your current track. Hope that helps 🙂
We ran into the problem that the finished doors were too wide to fit in the same space. This totally baffles us. Also, with the extra thickness the doors wound open all the way. Any suggestions? Thanks
Hmmm… It’s hard for me to answer this questions without seeing the door. I (like you) am baffled by the added width, as adding the underlayment shouldn’t affect the width in any way. It should be the exact width of the original door. As for the added thickness not allowing the door to fully open, I would have to actually see the door to understand what might be happening. My guess is that the door frame itself is too narrow to accept the added width.
I absolutely love this!! Thanks for this tutorial. I have 3 sets of bifold doors in my house that could really use an update!
Hi,
Did you do anything to finish/change the sides or backs of the doors? The ones I’m trying to redo are painted so I’m trying to figure out if I need to paint the front as well but I would rather stain the wood. Thanks!
Can you tell me what kind of wood you used for the underlayment on the barn door? We have bifold doors and would like to do the same project for our Washer and dryer project.
Underlayment frequently has a finish veneer made of lauan which has a grain similar to mahogany. The closeup pictures herein show the typical grain of lauan. By the way, if at all possible, you would want to purchase 4 x 8 sheets of lauan underlayment and rip to size using a table saw or circular saw with an edge guide.
Hi! Love this idea! One question…how did you account for the edges once you put on the underlayment? It adds bulk so I don’t think the door would close? Did you move the track at the top back so it had more room to close?
Thanks!!
The hinges on bi-fold doors are on the back of the door. So if strips of underlayment are added to the front while the doors are flat, there should not be any issues with opening and closing the door. However, depending on how your doors are positioned in the opening (front to back), you may need to either move the track and the bottom pivot bracket back in the opening. Hope this helps!
I will definitely be doing this idea to my current bifold doors on my laundry room. Thank you!
I’ve started this and ran into a problem with the track not holding the extra weight of the doors. Is there a heavy duty track or another option to replace this?
While we didn’t encounter this issue, it does appear that you can buy “heavy duty” bifold door tracks. When searching Amazon, here is what I found, however, hardware stores may also have heavy-duty tracks available as well. Amazon (affiliate link): https://amzn.to/2JKEgpn
I have installed bi-fold doors that were hollow core (lightweight) and solid pine (heavier) and have not noticed any difference in the track or the bottom pivot brackets. By the way, the track that comes with bi-fold doors is supposed to be installed above the doors. So I’m confused by the statement “the track not holding the extra weight of the doors”.
Because I used the original bifold door (and therefore the original bifold door tracking), the added weight of the underlayment could be an issue. Because these are not actual barn doors, no track is used above the door like you would use with a real barn door. Hope that makes sense.
Great job. Love the doors. I will try to do this because I love barn doors and have no space where I want to place them.
Thank you
This is brilliant. I love barn doors but have no room for the slide or hardware. Thank you so much for sharing the project. I will be trying it but will probably paint the doors white. My project won’t start until March but I will send you photos.
Do you have photos??
Thank you so much for your detailed “how-to” on converting an old bi-fold door into a beautiful barn door! My wife came across your website and asked “do you know how to make a barn door?” I said “I’m sure I can come up with something” to which she replied “it’s all right here!”
Needless to say it was easy and cheap! Wish I could post pictures.
Did you have to make any adjustments for clearance when you open the doors? I’m so excited to try this project!
OMG! That is truly amazing! So gonna do this, is the wood you used just luan or type of paneling?
Hello.
I love what you did with your laundry bi-fold doors. I’ve been trying now fir over a month to try and find someone to do this for me under $700-800!!! It’s crazy considering it only cost you less than $100. I live in Naples Fl. I cannot seem to get this done from anyone. Please help!! ?
Lisa
Love this and did it but now door wont close together..any ideas?
I fell in love with these…. So adorable …I am going to try and do this on my own… Wish me luck
Did it cause any problems with the different weight and thickness of the doors when they were rehung?
I’m wondering if you remember what type of wood (or at least the thickness) that you used to trim out the doors (not the part actually on the doors)? We are in the process of an almost exact re-do or our pantry doors.
How was your laundry closet ventilated? I’d love to do this but mine came with louverd doors. I’m afraid not having the ventilation would cause my dryer to run very inefficient.
Maybe just leave the door open when the dryer’s running?
Looks great! It totally changes the look of the door.
Could you do this with solid bifold doors ?
I don’t see why it wouldn’t work. Many have asked about the added weight when applying the layer of underlayment; while I had no problem with it, I would think having a solid door with the extra weight might be the only concern, as the door is already going to be heavier than my hollow-core door.
You inspired me! I have had my husband make me some! Not exactly like yours but kind of! Question, did you put a varnish or polyurethane over the stain? I can’t remember if we did. Ours was 21 years old! Thank you! Yours are beautiful!!
What a fabulous update and DIY tutorial!
Thank you so much… and thank you for sharing on Facebook today!
LOVE the door make over (and the laundry room, too!) I made the door today, but it seems to heavy for the hardware that came with it! did you notice your doors being to heavy? Did you have to get heavy duty hardware?
We didn’t have any problems with the added weight. We simply used the same hardware that had been original to the door.
I am in love with this idea and want to try it for our pantry doors in our new kitchen. Did you have any problems on the very outer edges opening and closing the doors with the added depth of the underlayment on top? Did you have to trim the doors down at all? I hope this makes sense…
We didn’t have any difficulty with the added underlayment, nor did we have to trim the door. Our door did have some spacing around it already, however. I would take a close look at whether an added 1/4″, or so, would inhibit your ability to properly open and close your pantry door.
I definitely like this, but how did you get it to be flush with wall. I may just have to try it.
Thanks
Joan
Hi did you use two pieces of board to get the raised trim? If that makes sense ?
Yes. We put the strips down first (over the whole door) and then added another layer to create the trim.
I am so happy with the way they turned out thank you so much for the great share. They look great in my kitchen.
What looks like a scratch is probably the sawdust falling from the drill. Great job on the doors. I want to try this! I absolutely love the color too
Can you show a picture of the doors open?
We actually moved out of this house last month, sorry.
Did the underpayment make the doors very heavy?
It definitely added some weight to the door, but didn’t affect its ability to be hung properly.
Love the doors! I am going to attempt however I have a few questions. How wide are are the horizontal boards at the top and bottom of the doors? The width of the boards that creates the X pattern? The boards that create the design on the doors are on top of the vertical boards so in some areas there are two thicknesses of board? Thank you!
We literally JUST moved and had to leave this door behind, so I don’t have the exact measurements of each piece. I think we’ll be doing this again in the future, and I’ll be sure to share all our measurements when we do. I can tell you with certainty, however, that there were areas in which there were two pieces of underlayment on top of each other (two thick).
This is awesome! What width did you cut the strips for the first layer, and then for the design pieces? Great job!…so LOVE this!
We JUST moved, and sadly had to leave this door behind, so I can’t give you the exact measurements for the first layer strips, but if I had to guess, I would say they were between 6-8″ wide. Truthfully though, you could make them whatever width works well for your door (and preference) 🙂
Where did you get the knobs? I’m in love. 🙂
Hi Kassandra-
I got the knobs at Hobby Lobby. It was quite awhile ago now, but they may still have them (or something similar) 🙂
The door looks nice. But actually, it would be cheaper to buy one than to hire the labor to do this work, since the average person doesn’t have the skill, the tools, and the time to do it.
This is a DIY page???
Love it and hoping to get more detailed info on pieces put on but I have made a door for shelves in my bathroom that looks like a varn door but have one more cross piece to put on. Love your diy page
I love it but wondering how you got the extra thickness to fit in the door opening? I looked at mine and if I add any thickness at all my doors won’t work.
Our door came down from the track a bit, so it didn’t impact the performance once we rehung it. Perhaps different bifold doors are made differently…
This is exactly what I’ve been looking for! What width did you use for that first layer of underlayment?
Honestly, I’m not sure if underlayment comes in different widths. If I had to guess I would say it was probably only 1/8″ thick.
Love this idea! I’m looking to upgrade a couple of folding closet doors.
These look fantastic! Much more stylish.
How did you attach the door back on the frame/track?
Because we simply created the look using the original bifold door, we reattached it using the original hardware.
I dont understand what kind of wood you used. What is underlayment?
Underlayment is a very thin sheet of wood (may 1/4″ thick at most). It is often used under flooring, and you can find it at any hardware store.
Most amazing DIY I’ve seen lately!!
Oh my goodness! Thank you!!!
These are gorgeous. How are they holding up though? Bifolds have such a horrible habit of coming off track and I was curious if the extra weight on them affected that at all. Thanks – and beautiful job!
I totally know what you mean about the doors coming off track. This has happened with almost ALL of our bifold doors around the house. We have had these hung for over a year (despite just finishing them off now), and we have had NO problem with them coming off track, despite the added weight. Hope that helps 🙂
This is incredible!! It looks so good!
What a great idea and update, it looks perfect! All the people with standard bi-fold doors are going to run out and get their supplies 🙂
Ha! It certainly was a fun project and such a great way to update those boring doors 🙂
Wow! This is an awesome transformation Erin. Love it!
Thanks Gabby… Might be one of my favorites 🙂
great look, i want to steel this.
Steal away 🙂
Holy cow! That’s a huge transformation. Maybe procrastination was a good thing here. It really looks awesome. When I added mdf strips to my boring by-pass doors, there was a noticable weight difference. Did you run into any issues with this?
The doors are definitely heavier, but they still open and close easily, so I don’t mind it 🙂
Love it! I have a door to the our basement located off the kitchen, but in the entry way, that I would love to make into a barn door but a dutch barn door. One that opens in half, like the top is open, and bottom closed.
This would be SO cute as a dutch door!
Wow, huge improvement! I am so not a fan of bifolds, we put them (8 sets) in a house we remodeled several years ago & I have hated them since. We had no choice but to put them in our entry way closets but I had my hubby take the hinges off & switch them around to make them open in the middle if that makes sense. I am happy with the results. Your solution is perfect, you can hardly tell they are bifolds! & for cheap too. Good job!
Thank you Kathy! I feel like bifold doors are just kinda boring, so this DIY definitely made them look better… and I was pleasantly surprised at how easy and cheap it was 🙂
Hi Erin! I came across your post while searching for ideas to change out my bifolding plantation style doors that hide my laundry ‘area’, which looks a lot like the one in your photos. Do you think I could do the same with the plantation style bifolding doors? I am so excited to see your post! Thank you for posting!
Sharon