Anyone else dealing with an outdated laundry room? Not a lot of money to spend making it over? No worries. This laundry room makeover was done for a mere $85 and I’m sharing all the details below.
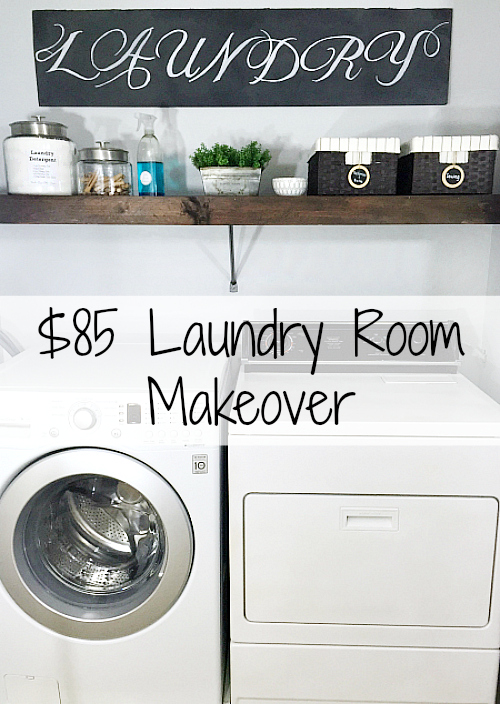
It’s reveal day!!! Before we get started with all the after pictures of my laundry room… (ahem)… closet, I would like to thank Linda at Calling It Home for hosting this fun event. Remember, there are more than 150 bloggers that have taken on the challenge of transforming their spaces in just 6 weeks, so if room makeovers are your thing, head on over and check them out!
Are you ready? Let’s start with a before shot of this space so we know just how far it has come…
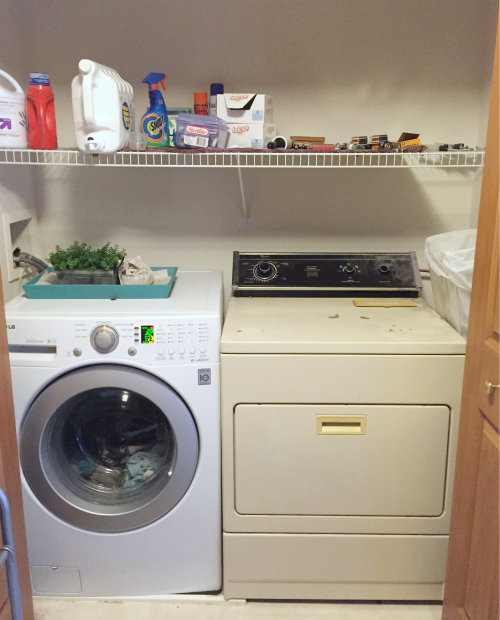
I had a list of goals, as you may recall from this post.
- Clean the space
- Paint the walls
- Create some sort of overlay to hide the wire shelving and make it more functional
- Storage Bins (Because batteries and lightbulbs strewn about does not make for great décor)
- … and speaking of décor, I needed some major help in this area. I had washing instructions taped to the wall and a huge, oversized trash can as my “décor”… Ummm… no.
- Paint the dryer to match the washing machine… because mismatched appliances aren’t really that pretty.
…and do it all for $100 or less!!!
I am happy to report that all the things on my “to do list” have been checked off, and you can see my budget at the end of this post to see how I stayed on track!
$85 Laundry Room Makeover
Clean the Space
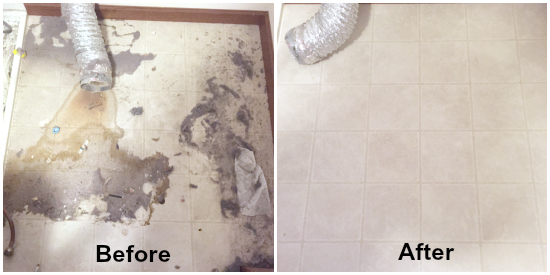
I started by saying goodbye to my carpet of lint (no tears shed). I also did a thorough cleaning of my dryer (inside and out). This before and after gives you just a glimpse into the grossness that was lurking in my laundry room.
Paint the Walls. Paint the Dryer.
After cleaning up the dryer, it was hauled downstairs for some painting, because a mismatched washer and dryer aren’t really the “in thing” right now… or ever. (If you want to learn more about the painting appliances, you can read about it HERE).
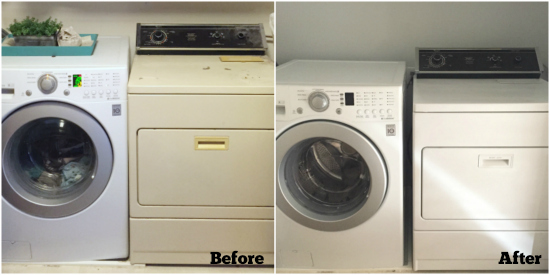
I painted the walls using a mixture of white and blue paint I already had on hand. You can (sort of) see the difference in the picture above.
That was all the boring stuff… but it made a world of difference in the space.
Now onto the fun stuff…
Create A Wood Overlay to Cover the Wire Shelf
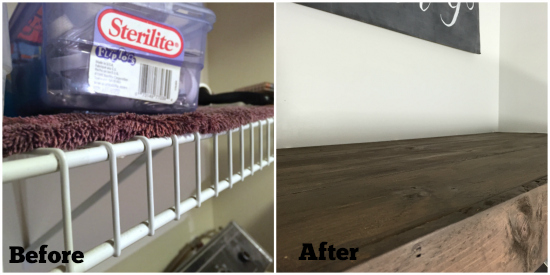
My husband helped me create a wood overlay for the wire shelving using cedar picket fence posts. I so appreciate his willingness to help me out! I know some people like wire shelving, and that’s perfectly fine. I am just not one of those people. As you may recall, I had a towel laid across the wire shelving as a way to prevent items from slipping through the cracks. Here’s what it looks like now! I just love it!!!
Add Décor
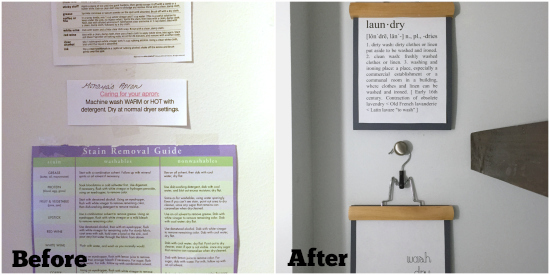
Gone are my taped-to-the-wall washing instructions. They have been replaced with these cute printables hung from wooden pants hangers. I used knobs to hang the hangers on the wall. You can find that tutorial here.
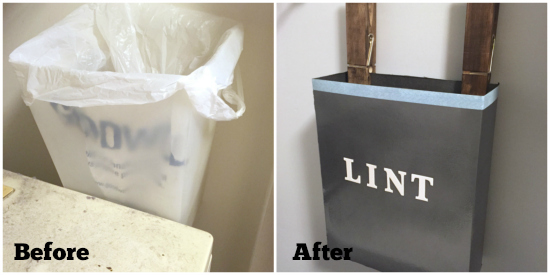
My over-sized trash can has been replaced with this DIY lint box (that actually started off as a cereal box).
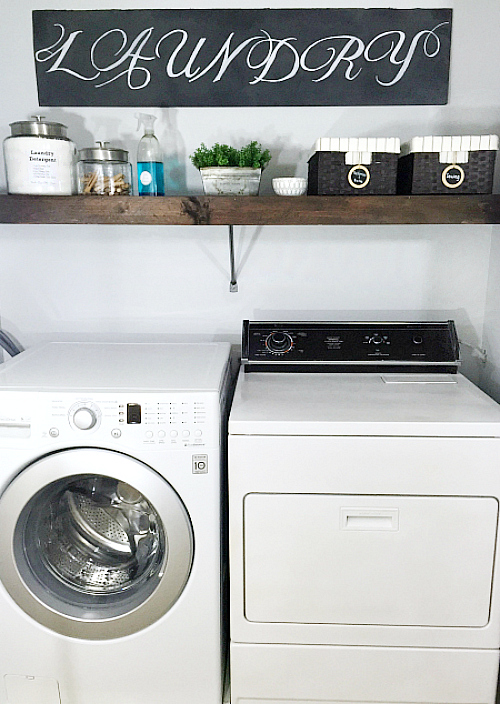
I decided I needed something for the wall above the shelf. I headed to Michael’s, hoping to get some wood letters I could paint and hang, but when I got there, they were too much for my budget. In the same aisle as the letters were a bunch of framed chalkboards. A lightbulb went off, right there in the Michael’s wooden letter/chalkboard aisle. I drove home, hoping I had a piece of cardboard big enough to fit my vision. Thank goodness I hadn’t headed to the recycle center, because we had JUST what I needed at the bottom of the cardboard pile. Here’s what I made. (Yes. Yes, that started out as a piece of dusty cardboard.)
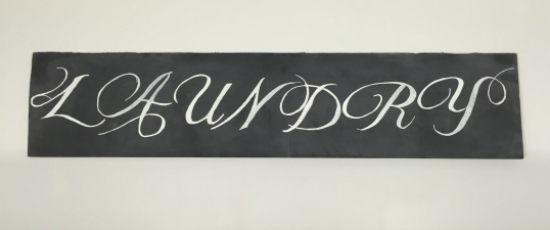
Here’s the tutorial on how I made the sign and did the lettering. (Hint: I really don’t have perfect penmanship 🙂 )
Add Storage
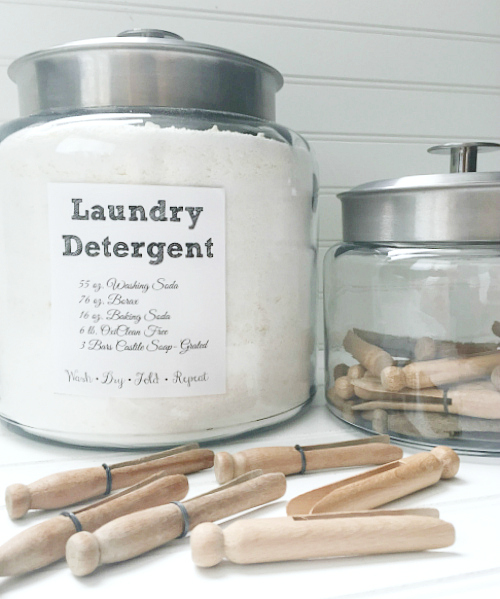
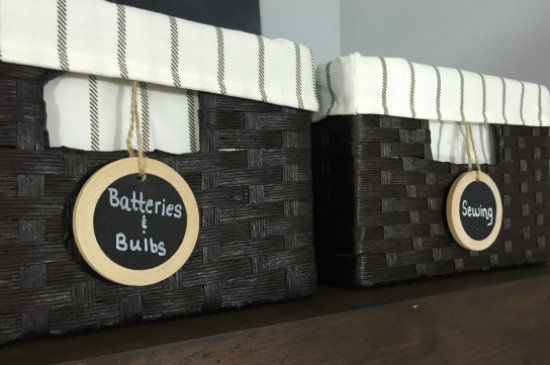
I bought some jars for my DIY laundry detergent and old clothpins. I also bought some baskets for my battery/lightbulb dilemma (Complete with labels).
… And Here’s the $85 Laundry Room Makeover Turned Out
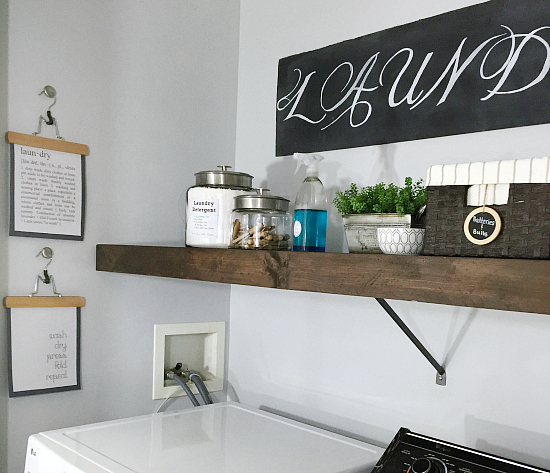
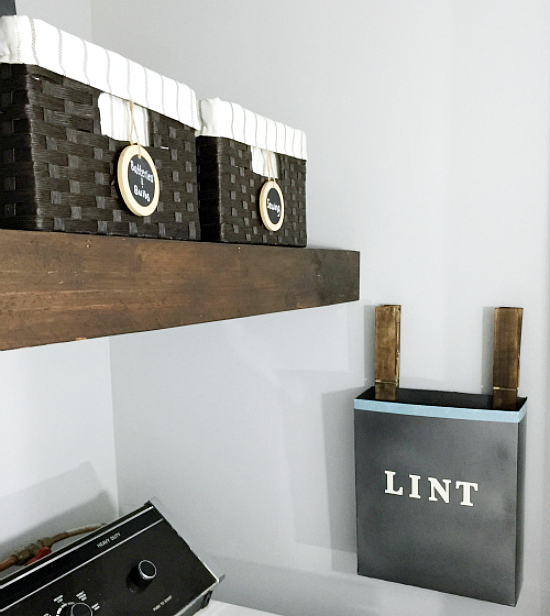
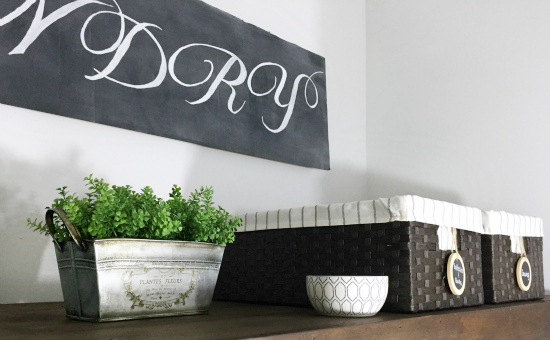
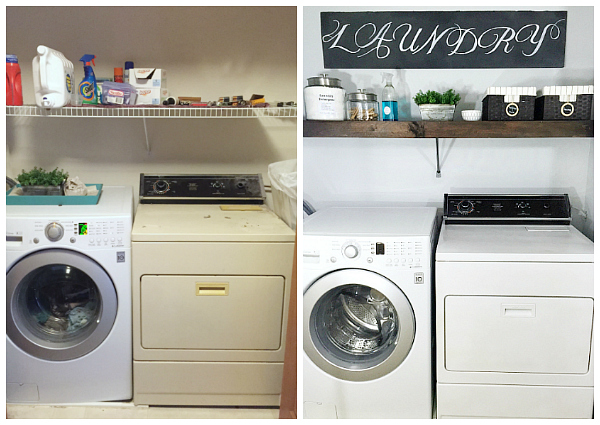
I was going for fresh, clean, and crisp, and while I think I achieved some of those elements, a little farmhouse got in there too. (I realize you can still see some hoses going to the washer and the gas line for the dryer, but apparently they are necessary to actually get clean laundry, so…)
The Budget
Last week we left off with me having spent $38.27. Here’s what I spent in this final week.
Baskets- $20.25
- Baskets x2: $19.30 (They are $12.79 each, but I used my Target Redcard and got 5% off, so $12.15 each; plus they were running a promotion: buy $25 worth of storage, get $5 off.)
- Labels for the baskets: 95¢ (Used my Target Redcard to save 5%)
Glass Jars for Laundry Detergent & Clothespins– $22.50
Finger Bowl (for loose change): Free (I already had this. I just didn’t know what to do with it until now.)
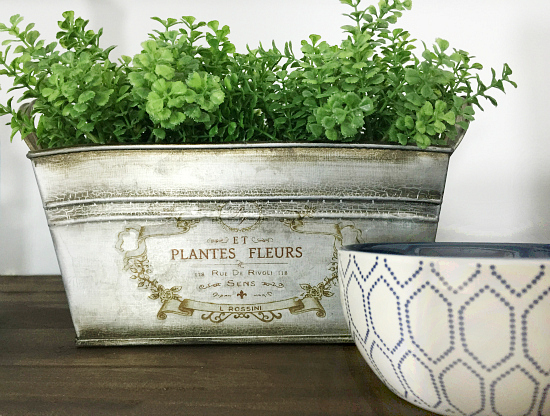
Plant in Tin: Free (Another item I already had that needed a home)
Paint for Walls– $4.77 (While this was done much earlier, I hadn’t factored in the cost yet)
- Paint- FREE (Mixed two samples I had with some white paint I already had)
- Paint Supplies- $4.77
Total Spent on the Laundry Room Closet= $85.79!!! ($14.21 under budget!)
I’m grabbing a cup several cups of coffee and checking out all the rooms that were made over these past few weeks. I’ll be sharing all my favorites next Wednesday (which means I’ve got to get through all of them before then!) To see all the rooms from this season’s challenge, head here for the professionals and here for the linking participants.
Wanna Catch Up?
Week 1 // Week 2 // Week 3 // Week 4 // Week 5 // Week 6
Love it? Pin it!

I love how you made the mix-matched appliances work together. It’s so different and pleasant now. Proof that it just takes some ingenuity and effort.
I am on the fence about wire shelving I am old and remember the wood shelving and the wire still looks fresh to me. But yours does look better.
OMG! Your reveal was beautiful and very inspiring. It made me do my own laundry room make over. 🙂 I covered both of the wiring shelves with stained plywood, added baskets, used glass jars for the laundry detergent and country style wall decals. I used curtain tie rods on a piece of stained wood to hold the iron board and I even made the lint box. We love how it cam out. Thank you so much!!!
I love it!!! You made my day. So happy to offer up some inspiration. If you are willing to email me a picture, I’d love to see it! (There’s no way to attach images in the comments, unfortunately). [email protected]
Ahhhhhhh this is so amazing. So much inspiration!
Thanks Lea!
Looks great. Here is a trick for the lint hose….put a knee high nylon on the end to catch all the lint. Its easy on and off for cleaning.
My mom used to do this. I, however, have no idea where that hose even is on my dryer. Great tips though 🙂
Never ever use script font in all caps when making a sign…..ever!
Why Not? It made her happy and it looks cute
That’s what “comments” are for…..it’s not negative, it’s her opinion and provides feedback.
I think the sign is an awesome idea but had trouble reading it at first glance. It would probably be better to not use the script.
Overall, the transformation is really nice. Kudos on the work it took to paint the washer. That alone is a huge effort and looks great!
I love what you’ve done – it looks so much more open and spacious even though it’s the same small space! Joanna Gaines would be proud 🙂
You just made my day! If you believe Joanna Gaines would be proud, that’s all I need 🙂
Hi… I absolutely love this makeover & especially the budget. Like you said a limited budget forces creativity! My family & I are currently in a rental, so I can’t do anything really permanent. We have a wire shelf, like the one that you used in your coat closet… It has the lower bar rack for hanging separate from the actual shelf. Where did you get the wood that you used for that? Also, where did you get the wood for the laundry room shelf overhang? I am trying to consider all of my options….
And is it possible to go into more description about the dowels & wood glue connecting part? LOL, sorry I am a newbie to actual building things. I am usually repurposing, not putting together. But I really love this and want to give it a try!
Thanks so much for any info & the awesome post!
In the laundry room we used cedar picket fence posts to to create the shelf, and found these at Home Depot. The issue with the fence posts is they can only make a shelf that’s about 71″ long, so if yours is longer, you’ll need to buy common board (which is what we did in the coat closet). My husband is the one that did the dowels and gluing, but if you look in this post: https://www.lemonslavenderandlaundry.com/diy-wood-overlay-for-wire-shelving/
you can see a tool in the upper left corner of the “image collage”. It allows you to drill a hole the proper circumference and depth to insert the dowels on one side of the wood, and line it up with a hole you’d make on the other side. You would want to glue the edges with wood glue and clamp them together while they dry. I know that isn’t real in depth, so if you would like a better explanation, I am more than happy to ask my husband for more specific instructions. I wouldn’t be able to do anything without him 🙂
Really love this new makeover. I especially love the little lint container. I hate having to walk across the laundry room just to throw it away each time. Thanks for sharing!
Thanks for you kind words Crystal! I am so happy with how this laundry room turned out. And that lint container is a life-saver. So much better than that over-sized trash can. Enjoy your weekend!
I usually toss all and any lint build up out doors the local birds love it they use it to reinforce their nests helps hold the twigs together for nests.
What? I was shocked to read that you covered up the wire shelving with wood! That’s such a great idea and something I need to do with our laundry room wire shelving! The room looks great!
Thanks Katie! That is, by far, my favorite thing we did in this room. I don’t really understand wire shelving. I always feel like things fall through the cracks or tilt to the side. This option was easy to make and so much more functional!
There are so many things that I find amazing in your laundry room, the shelving cover, the painted dryer, and the lint box to name a few! Great job!
Thanks Kathy! This was SO fun to do. I love trying to find cost-effective ways to make a space look good. Enjoy your evening!
That looks GREAT! I’m really impressed with how you made the shelf cover, that’s just genius! Why mess with taking down a perfectly sturdy shelf when you can just cover it up?!
Tania
I completely agree! I didn’t want to have to fill a ton of hole in the wall and figure out new mounting and brackets, so this was a perfect solution.
I love how you always manage to think of all the little details in your space Erin! Well done!
Thanks Vel!
Love your make over!!! What a difference paint can make, right?! Very very nice look; neat and fresh! Great job!!
Thanks Carol!
Your laundry room turned out great! Love the shelves.
Thanks Pamela!
WOW!!! What an amazing transformation for under $100. I LOVE the fact that you painted your dryer! How practical and thrifty is that!!! Love the shelf! I wish my laundry room looked this good!
Thanks for your kind words Debi! I can’t really believe how much it changed over the course of 6 weeks!
Great job! It looks like you spent way more than $85! The painted dryer looks so good. It looks like you bought a whole new dryer! Love the wall color too!
Thank you so much! I didn’t realize how much painting the dryer would help the look of this space, but it made such a huge difference. Thanks for stopping by! Enjoy your day!
Great job! I love the shelf overlay! And it totally looks more expensive than $85! Love it!
Thanks Danielle!
This looks so great! So many great ideas…I had no idea you could paint a dryer! That wire shelf overlay is just fantastic. I originally tried to do my boys’ room for $100, but I went way over (still under $200, though). Can’t wait to see your next $100 project!
Hey, under $200 is still great for a room makeover! Thank you for all your kind words.
I am amazed at what you could do with $85. Great job.
Thanks Linda! And thank you so much for hosting this fun event! It has been such a pleasure both times I’ve participated.
Fantastic job! I really enjoyed reading your weekly posts on this project. You have a way with words that had me laughing as I related to the problems at hand! Bet you can’t wait to do some laundry!
I actually have never minded DOING the laundry, but somehow after it’s washed and dried, it just sits in the laundry baskets waiting to be folded and put away… for days. Maybe I need some sort of folding space/counter in here??? Thanks for following along. I appreciate your kind words.
Wow Erin great job! I love that you turned the wire shelf into a wood shelf. It add so much warmth to the room/closet :-). Laundry room sign great last minute touch. I work best last minute most of the time. Also love the lint box and large clothes pins. Hoping I can still snag some of those at Michaels. Congrats!
Thanks Tiffany! I’m pretty sure the shelf is my favorite part of the room, and doesn’t last minute pressure just make us so much better… and more stressed out?
Wow, this looks awesome! Seriously impressive that you did this on less than $100 – how inspiring! I love the simple printed text art, and painting that dryer was brilliant. Great job!
Thank you so much Kelly. I seriously think that, without a tight budget, I could’ve spent 3-4 times the amount I did, and it would have looked very similar to what I have now. A small budget forces me to get creative, and I love that!
Hi Erin…….This totally looks like a different room….It looks so clean and organized. Love how you did the shelf. Great job!
Thank you so much! I’m caught off guard every time I walk by the laundry room, I forget that it actually doesn’t look completely terrible anymore 🙂
That’s incredible! Your laundry closet is better than my frigid laundry in the detached garage situation. Youve done an epic job with the budget. Such a fun challenge! Don’t know if I could do it!
Thank you so much for your kind words! I have come to love redoing rooms on a small budget (I guess I’ve only done two so far, but I love it none-the-less!). Thanks for stopping by… enjoy the rest of your weekend!
I love it Erin! That was just brilliant, the idea to cover up those pesky wire shelves :-). I’m sure you’ve inspired a lot of us to do the same. I love how crisp and clean your laundry room looks now.
Thanks Delia! I love how that shelf turned out too! So much better than the wire shelving!
Erin this post was really inspiring! Your cardboard sign looks awesome and I’m loving the wood overlay on the shelves. You’ve got me think that is something I can do in our apartment where we really can’t take out the wire shelves. I’m not a fan of how things slip through the cracks or won’t stand upright on them either! 😉 Great job!
Thank you Whitney! You could totally do this in a rental. The shelf slips on and off the wire shelf pretty easily. I never even needed to take the wire shelving out (well, not to do the shelf… I did take it out when I painted.) I should have the tutorial up soon (like this week) so you can see if it’s something you want to tackle.
Amazing job transforming your laundry room, and well within budget! I thought thrifty decor ideas and you did a fabulous job using those ideas in your space. Awesome idea to cover the wire shelving!!
Thanks Jenny! I’m so happy with how this all turned out, and for $85, I’m REALLY happy. Thanks for stopping over. Enjoy the rest of your weekend!
LOVE this!!! Your laundry room set up is just like mine and I have the same annoying wire shelf. How were you able to paint the brackets to the shelf, did you remove from wall then rehang, or just put cardboard behind while you spray painted? I can’t wait for your tutorial on the overhang as I’m definitely going to try this out.
So glad you like it! For the bracket, I did remove it from the wall to spray paint it. I thought a white bracket would look weird. Spray paint is my new best friend: Big change with minimal effort. I know you’re not the only one looking for the shelving tutorial (someone else requested I tag them on Facebook when it’s up too), so I’ll try my best to get it up on Monday. Enjoy your weekend!
Great job on this super budget-friendly laundry room transformation!!! Our new laundry space is also in a closet…so lots of inspiration here. 🙂
While I wish I had a huge laundry room, I’m pretty excited with my little closet. Probably will keep the doors open more often now 🙂
What a great transformation! It looks awesome! And for less than $100! – a girl after my own heart! Great job!!
I think a tight budget makes one think creatively, and I love that. Thanks for stopping over.
I love it, it looks so pretty and refreshing. Thank you for sharing. I remodeled our laundry Room as well and boy did I learn a whole lot.
I think whenever you redo a space, there’s always a ton to learn 🙂 I’m hoping to get through ALL the ORC this week so I can share my favorites, I’ll head over and check out your laundry room. So fun to see what others did with the same type of space. Thanks for stopping by!
You did a great job Erin! Especially painting the dryer! It’ll be fun to do laundry in such a pretty space!
Thanks Kendra! I didn’t think painting the dryer would make such a big impact, but it really did. I sure hope a pretty space make laundry more fun. Jury’s still out on that one 🙂
I love that you completed this laundry room for $85!!! It looks fantastic & I can’t get over the painted dryer. Well Done!
Thanks Hollie! Who knew a little spray paint would make such a huge difference in the space. Kudos to my hubby who thought we really needed to get the appliances the same color. Can’t wait to head over and see what you did with your space as well!
Way to go on a $100 budget! I like the lint box–I need one of those!
Thanks Rachel! The lint box was so easy to make, and was so much better looking than the trash can I had 🙂
What a fantastic update! I am loving the wire shelf redo- gotta try that! Bravo on keeping it under -budget!
Thanks Joy! I was so excited for how the wood overlay turned out. It made such a huge difference in the space, and now nothing is falling through the cracks. Yay! I’ll have a tutorial up next week on how we made it. It was a pretty easy process. Thanks for stopping over. I’ll be checking out your space soon!
I am in awe of your creative (and cute) organizing abilities/solutions, and your ability to stretch a dollar. Not many people would have thought to paint the dryer, but look what a difference that made. Huge impact. I wish you lived around here so I could have you do my laundry room!
Thanks Kelly! It keeps me thinking when I have to work with such a small budget, and I love the challenge. I actually checked out your “Manbrary” last night, and it’s ah-mazing! I didn’t comment yet because I was on my phone, and my comments never seem to work right on there. Enjoy your day and your gorgeous space!
Great job, and congrats on staying under budget! The new shelf looks wonderful; way to find a creative solution!
Thank you so much! I am so happy with how the shelf turned out too. So much better than the wire, in my opinion! I’ll be stopping over to see your space soon. Have a wonderful day!
Your space looks amazing. I love the layout of your reveal and your shelving looks great!
Thank you Jessica! I cannot get over how much the shelf changed the space. I like it SO much better.
So cute! Great job working with a small budget – and even coming in under! Well done.
Thanks Lindsey! I’m pretty excited that I was able to do so much with such a small budget. It’s nice that I already had a lot of the stuff I used. Funny that half my budget was spent on glass jars and baskets 🙂
Awesome job and all for $100, nice!! My favorite is the wood overlay on the shelf, it looks amazing!
Thanks Mindi! I love how that shelf turned out as well. So much better than the white wire!
This is lovely! Kudos to you on doing in with such a small budget too. I’m all about being under budget. Congrats on the new space! 🙂
Thanks Amy!!!
This turned out amazing, I LOVE that you did it on a tiny budget!! Very inspiring!
Thanks Roxanne! Working with such a small budget sure does inspire me to think creatively. I would never think of half the things I did in here if I had given myself so little spend. Thanks for stopping by. Can’t wait to stop by and see your space!
Erin, that $100 sure does look good in your laundry room! It’s one to inspire many, I’m sure of it!
Thank you so much! And your laundry room is SO gorgeous!!! It was fun to see similar spaces transform.
YES, girl! It looks great – and I love that you came in under budget. You’re incredibly inspiring, Erin!
Thanks for your kind words Heather!
Beautiful transformation Erin!! And that budget?! Amazing! I did not stay under $100, lol. The space looks great 🙂
Thanks Lindi! I think I’m in the minority with the $100 budget. Can’t wait to stop over and see your room! (Gotta get the kiddos off to school first).
What a great space done on a budget!!
Thanks!
This looks amazing! I can’t believe the wood shelf is an overlay. It looks like a floating shelf. I love it! The printables are too cute and I love the Laundry signs:) You did such a great job!!
Thanks Teresa! I think the shelf might be my favorite thing. I’m so glad it actually looks like a floating shelf since that’s what I was going for 🙂 Thank you SO much for following along with this challenge. Can’t wait to see your nursery!
Wow, $85! Crazy beans. Also, I didn’t even know you could paint a washer/dryer. What a great change! Great job.
I didn’t actually realize you could paint appliances either until I saw someone paint their refrigerator (on Pinterest… of course). So glad that was an option because it sure saved me a whole lot of money. Thanks for stopping by Ashley! Enjoy your day!
Wow, Erin! Only $85! It looks fantastic and much more expensive than that! I love the big chunky shelf and the color you stained it is gorgeous. The dryer looks so much better now. I don’t know who thought almond colored appliances was a good thing, lol. Great job!
By the looks of the dryer, I’d say almond was “in” around 1970 🙂 The dryer was here when we moved in, so certainly not my choice. I was so excited that I ended up under budget… does that ever happen? Thanks for stopping over Sarah! Have a wonderful day!
I can’t believe you did this for $85!!! That’s truly amazing and what a transformation. So briliant to paint the machine- wowzers! And I love all your details- great job!!!
Thank you so much Christine! Not sure it’s going to make me any more excited about doing laundry, but it sure is easier on the eyes 🙂
No way! Boy this is a great lesson on saving money and giving yourself a challenge. I love how you pulled this space together and it’s something anyone can do! Great job Erin!
Thanks Sherry! That is my whole point in redoing spaces for $100. There is SO much you can do; you just have to think creatively. Thanks for stopping over!
Amazing! I love that you came in under budget (wish I’d done that) and that you injected so much style into what is essentially a closet. Maybe I’ll give our laundry nook a makeover! Way to go!
Thanks Sarah! There is so much you can do without breaking the bank. Cannot wait to stop over and see your bathroom reveal!
looks great! so much more organized – must feel great!
It feels SO much better. I’ll be stopping over later to see your bedroom (can’t wait)… Gotta get the kiddos off to school and then I get to lounge and look at beautiful room transformations for awhile… the dishes and laundry can wait, right?
Erin this turned out so great!! I love all the finishing touches you added to the room. The “laundry” sign is soooo great! I love your transformation!
Thanks Ruthie! I am so glad that last minute sign actually turned out the way I envisioned. That doesn’t always happen for me… Thanks for following along!
Love this less than $100 makeover! Congrats on completing this project, Erin! That lint box is ingenious (way to upcycle)! That that laundry sign too.
Thanks! Who knew my recycle bin held so much potential? Thanks for following along. Enjoy your day!
Erin I am so impressed with your skills and for keeping this in $100 budget to makeover! I need to get the tutorial on the shelf! What a difference that shelf, fresh paint, and some organization make! BRAVO! XOXO, Sarah
Thanks Sarah! The tutorial for the shelf should be coming up sometime next week. I can’t believe how easy it was to do. Thanks for stopping by! Have an amazing day enjoying your living room 🙂
Wow, Erin! I’m really impressed with how beautiful the room looks and even more so considering the budget you set for yourself. It looks like you spent ten times that much! Well done!
Thanks Sharon! I am just grateful our recycling bin had so many great finds I could upcycle. Thanks for following along. So fun doing another ORC with you!
It turned out a-maz-ing! Awesome job! Painting your dryer made such a huge difference! Love the details and that lint box!
Thank you Samantha! I’m pretty excited about the space. The dryer really does look SO much better. I can’t believe the difference a little spray paint makes. Thanks for stopping over. Have a great day!
That looks awesome!!! I love how you reuse old things and make them into something fabulous. You did a great job and I’m super impressed that you were able to stay under budget! I wish I had the attention span to knock out a room from start to finish in six weeks 🙂
It certainly helps to have a strict deadline, otherwise who knows when I would have gotten this done. Thank you for your kind words regarding the room. It feels so much better to have this space completed 🙂
Wow!!! Just amazing and so beautiful, not to mention budget friendly! Wonderful work! I yanked the wire shelf out of our laundry room a few years ago and replaced it with a smaller shelf. I really wish I would have just made an overlay like you did. It looks fantastic and it offers just as much storage without the giant holes in the walls like I had. Such a great transformation! It has been fun to watch you as you went through the process. I may need to jump on one of these one room challenges at some point. Goodness knows I have plenty of rooms that could use some attention!
Thanks Stephanie! I could not be more happy with how the shelf turned out. If I wasn’t trying to be “budget conscience” I probably never would have thought of an overlay (I just knew I couldn’t afford a whole new shelf).
You should join the next One Room Challenge in the spring. So much fun to find encouragement and support from others while creating a great space for yourself. Enjoy your evening!
This turned out great! I love the wall art with the hangers, and the lint container. It is pretty and functional! The 6 weeks are done and you have a great laundry room!
Thanks Emily! I cannot wait to stop over and see your boys’ room. I caught a sneak peek (now I can’t remember if it was on Facebook or Instagram). Looks amazing!