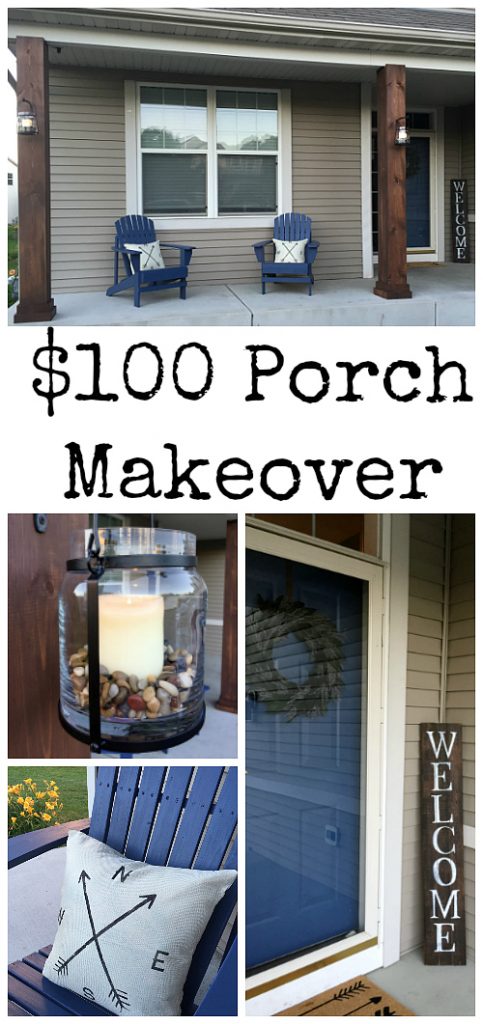
A porch is the first thing people see when visiting your home, so it’s nice to find a few ways to keep it warm and welcoming. Today I’m sharing our budget-friendly porch makeover… done for just $100!
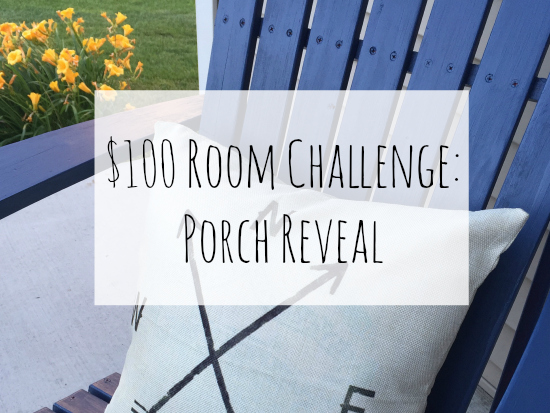
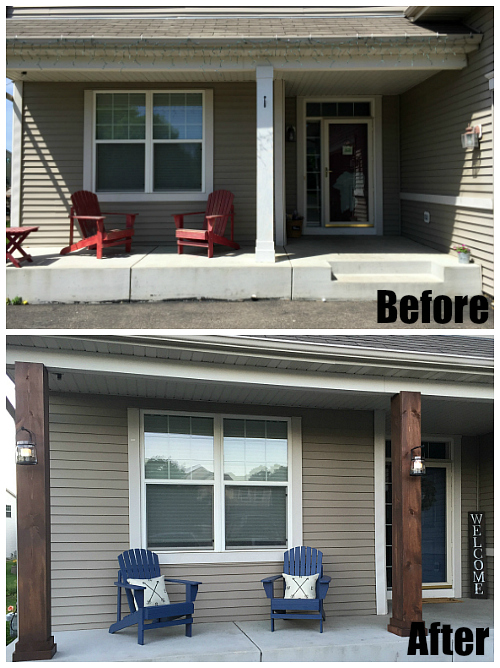
Woohoo! It’s reveal day! Another $100 Room Challenge is on the books. This month I took on our front porch, which was in desperate need of some TLC. We had paint peeling off our front door and chipping off the Adirondack chairs. It was definitely not a space that felt warm and welcoming. Let’s take a look back at where we started…

Goals for Our Budget-Friendly Porch Makeover
If you take a look back at week 1, here were the goals I had for this space:
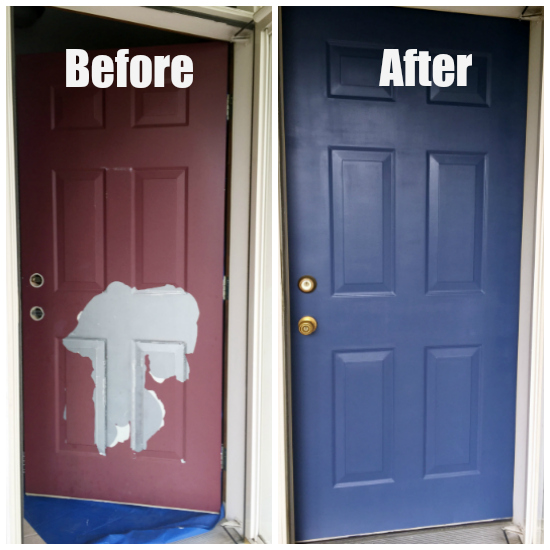
Goal 1: Paint the Front Door
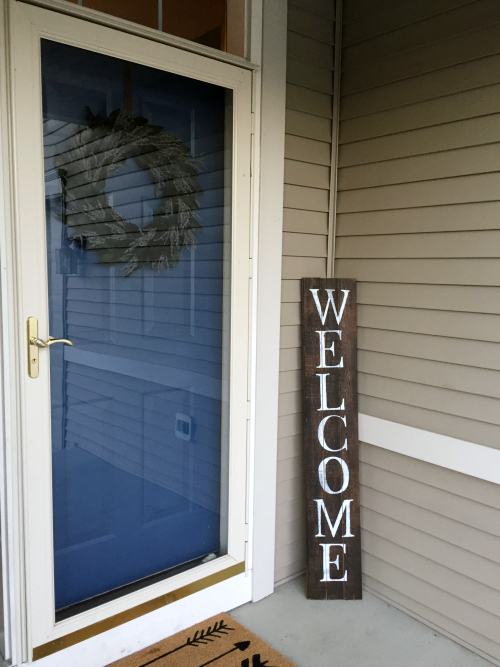
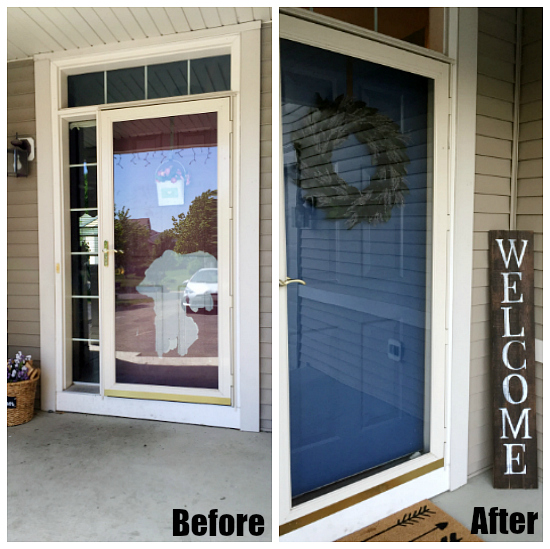
Our front door had paint peeling off in sheets throughout the winter. Because painting in subzero temperatures is strongly discouraged, I waited until it was warmer. I had always wanted a blue door, so a blue door is I got. You can read all about how this door went from red to blue here.
I also found a gorgeous wreath (on clearance) at Target, so I added it to the door.

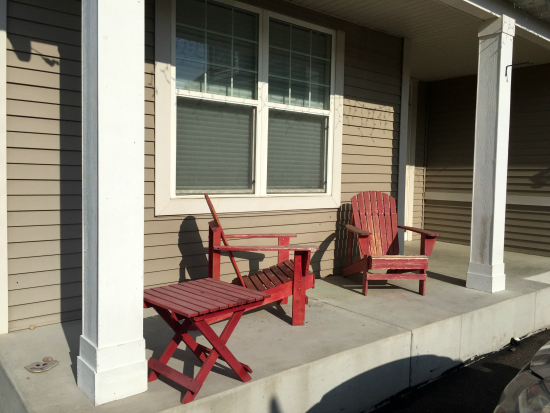
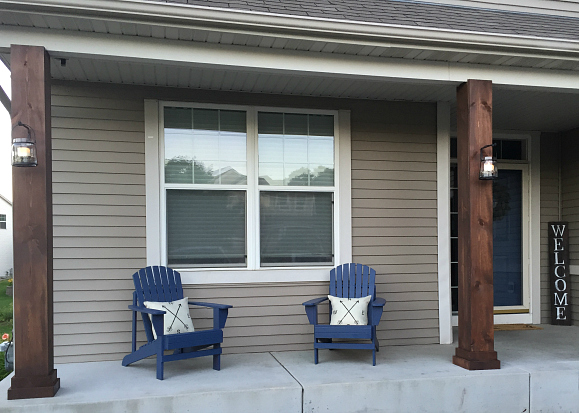
Goal 2: Update the Seating Area
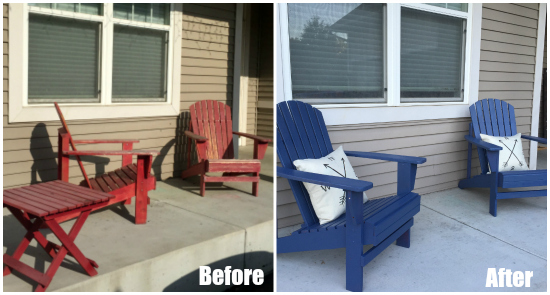
As I mentioned above, the paint on our Adirondack chairs was chipping off. If I recall correctly, they had been spray painted years ago, and I’m sure that was not the best choice. I went back and forth on what to do: Stain them? Paint them? In the end, I decided to paint them the same color as the front door.
I also added pillows to create a homey feel.
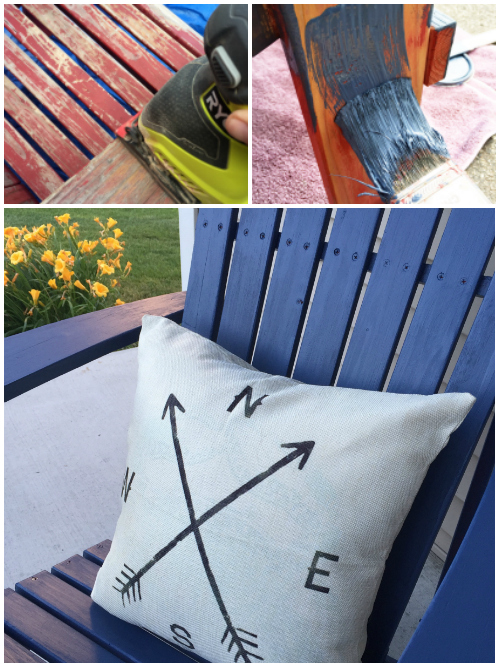
If you recall from last week, I actually bought outdoor pillows on clearance at Target (similar), and purchased pillow covers from Amazon.
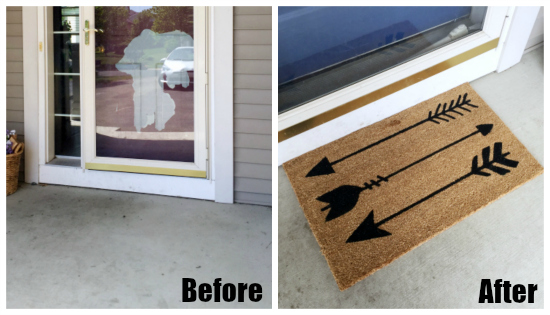
Goal 3: Add A Welcome Mat
The front door space was bland and boring, so I wanted to add a welcome mat. My original idea was to make one with a plain mat and spray paint, but I found one at Target (on sale) for less than my DIY version would have cost. (Here’s one that’s very similar on Amazon. Target doesn’t seem to carry them anymore). One reader also threw out the idea of spray painting a design on the cement. I thought the idea sounded fun, but knowing me, I’d somehow mess it up, or not like it, and wouldn’t know what to do at that point.
Goal 4: Clean Up
A simple spray of the porch with our air compressor did wonders. And, yes, the Christmas lights were taken down… 18 months later 🙂
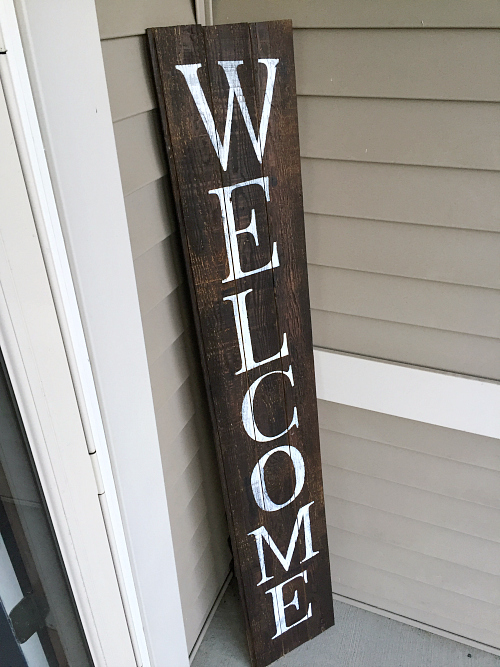
Goal 5: Add Some Character
One reader suggested doing a sign of some sort, and I fell in love with the idea. Last week I shared how I made this welcome sign… for free!
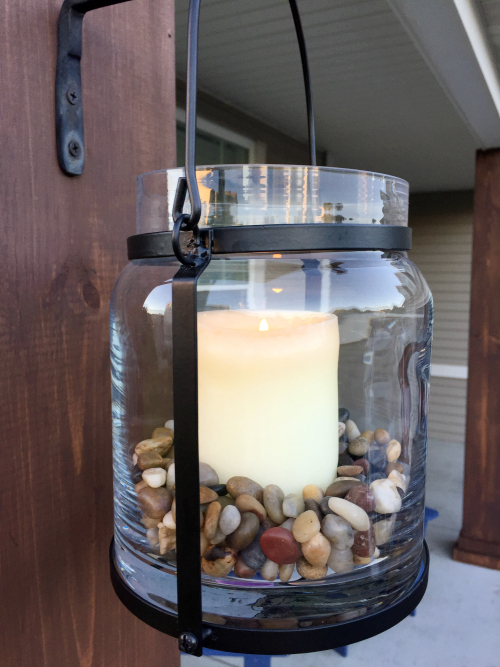
I also “stole” some lanterns off my fireplace mantle and put them out. I realize this won’t be an everyday thing, as the lanterns are glass, and I wouldn’t want them to break during a storm, but when guests are arriving, they sure do cozy up the place.
This was what I was able to accomplish for $100… and 19¢, but…
…there’s an additional “surprise” to this porch. As my husband was watching me work, he got inspired to redo the poles on our porch. You can see here that they were white… and dirty.
We peeled away the cement board hoping we could just stain the poles underneath, but the builder had used the worst wood possible. It had huge gouges in it, so my hubby rewrapped the poles in pine and stained them.
Here’s what they look like now.
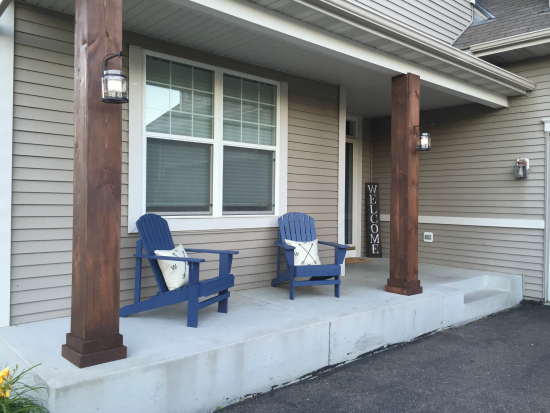
Such a HUGE improvement! I’m so proud of him!
And some Before and Afters:

The Budget:
I spent no money this week, and while I really tried to find cheaper pillow inserts (so I wasn’t 19¢ over), I couldn’t find any, so this whole porch (not including the posts that my husband did) cost… Drumroll please…
Total Cost of this Porch Makeover: $100.19!
Not bad.
Wanna Catch Up?
Week 1 // Week 2 // Week 3 // Week 4 // Week 5
Love it? Pin it!
Hi Erin, really nice work on the porch!
I wanted to ask about the poles that your husband redid. I like that look. Is there any step-by-step you’d be willing to share there? I think we have a very similar front porch situation here ! Thanks !
This looks great ! We have been working on our outdoor space and it is not an easy job! Trying to stay on a budget is the tough part. We only have so much money. Lucky for me my husband loves to putter around and build things. Made me the cutest little table to put between my chairs. Now if it would only warm up so we could have morning coffee out there. Darn Lake Superior!
I agree that budget can be a difficult part of any makeover… how wonderful that you have a handy husband though 🙂 And living on Lake Superior must be lovely… despite the chill.
It’s a beautiful transformation! I think the addition of two simple board and batten pine shutters coated with the same stain as the posts would finish it off nicely! Just add it to your husbands portion of the budget!?
A nice idea might be some window boxes- same stain as the porch columns.. and a nice pop of color in the plants.
Hi Erin,
impressed with your creativity and imagination. your porch truly gives the sense of cottage. Good job.
Do you think your cleaning tips for kitchen sink can be applied to shower tub? I have tried several things but still not pleased with results.
prem
If you have a porcelain tub, I’d say it should work. If you have a different material, you can certainly try it out. I always recommend trying the cleaning product on a small area first, to make sure there is no discoloration. The combination of hydrogen peroxide and baking soda is so great at cleaning… I have used it on my grout as well with excellent results. You could also try just baking soda and water as the baking soda tends to absorb the grime. Let me know how it goes.
Another project that turned out fantastic! I love the blue on the door and chairs. I also think it’s great that you stick to $100 because we all know how easy it is to fall down the rabbit hole when shopping for home decor items. The posts look amazing too!
I completely know what you mean about shopping. Home decor is one thing I LOVE shopping for (unlike groceries 🙂 ) I could spend so much money if I didn’t limit myself to the $100, but then I’m always impressed with how far $100 really can go.
Erin, I’ll miss your contributions to the $100 room challenges. I’m sure it won’t be long until one of you thinks up another idea. Maybe you will do one room in five different houses or nursing home rooms! I think I like your door in the porch redo the most. You took a creative and daring step that I want to immolation. Great job.
I swear I typed immolate.
Thanks Jewell! I certainly love doing these $100 Room Challenges, but with the kiddos home from school, I just need to take a little break. I’ll reevaluate for September when they go back to school. It’s always a great way to motivate myself to get things done 🙂 I always appreciate your feedback…
and I swear I type so many things that turn into typos 🙂
You did a great job on your porch. I love your blue color and your hubby did an awesome job on the posts. Just a suggestion, but I think an outdoor rug would really add some more warmth.
I completely agree. I think an outdoor rug would be a perfect addition to cozy up this space. When I do these challenges, I really try to show how much can be accomplished within that $100 budget. I think many feel like $100 can’t get very far, and I want people to know that they can do a lot on a limited budget (even if they don’t think they can). In many of the rooms I’ve done for these challenges, I add a little more to finish up the space, but I do so after the reveal. I actually think I’m going to go through all the spaces I’ve done for these challenges and show the additional things we’ve done in each space. It’s nothing huge, but most have a few finishing touches.
Try painting a rug with a stencil! Do you have directions on how your hubs wrapped the columns?
I thought about doing a stenciled rug directly on the cement, but I was so scared of what I’d do it I messed it up 🙂 And, I do not have instructions on the wrapped columns. He did that entirely on his own. I can find out what type of wood he used. I know he simply cut the wood to size and then screwed it into the post. We stained everything once it was up.
I think you should continue your project with another $100 and tile or install wood on the floor and steps, paint the block down to the ground and landscape with low shrubs. Would complete the picture.
Wouldn’t that be awesome!? I actually have some “stamped cement” images on Pinterest that make the cement look like wood. Not sure I could do everything with $100, but I like your ideas. We actually do have some orange flowers planted on the side of the porch, but you don’t see them in most of the pictures, and since the cement from the porch meets up with our driveway, we wouldn’t be able to plant right in front (I wish).
I love all of it!
Thanks so much Beka!
The blue looks so much nicer on the chairs and on the door. And those poles make all the difference. Pinning.
Thanks for pinning Mary! I love the blue too… and my husband’s vision for those poles was brilliant!
I love your porch makeover — that’s perfect that it only cost about $100! All the decor is super cute, and I love the pretty blue!
Thanks Lauren!
Hi Erin! Your porch reveal looks amazing! My favorite part…the new poles your husband refinished. Truly transform the space!! Well done!!!
Thanks Tammy! I completely agree with you. Those poles changed the whole feel of the space.
Love your cottage style home, its very cozy and adorable! I love the beams on the front porch! They came out amazing, what a transformation.
Maria
Thanks Maria! I agree that my husband’s handiwork completely created a warmer, cozier space.
Erin I just love your DYI ideas for $100.00!!! I’m in a nursing ( like assisted living) I would would love to lighten and brighten my room. I love blues and yellow together and hoping you might have a great idea, plus trying to keep it under $100.00.
Can you help me accomplish this?
The room now is off white walls, tile floor and all white linen, so boring along with depressing!
[email protected]
Thank You in Advance
Linda~
Your doing a great job :))
Thanks for you comment. I’m not certain as to what you are allowed to do in your room, but if you can paint the walls, I always think that makes the biggest change for a minimal amount of money. If you aren’t allowed to paint, then I would move onto linens and create some pops of color there. Throw pillows or lightweight blankets can add texture and pattern to a white space. These can often be found in the clearance section at certain times of the year (or online). Another idea is to add artwork with color and pattern. Again, I’m not sure of the rules surrounding holes in the walls, etc. Hope that helps.
What a difference #100.19 makes. I just absolutely love all your fresh ideas, especially the Welcome sign and colour scheme. Beautiful. Looking forward to your next post but enjoy the summer with your little ones.
Thank you so much Brenda. I was pretty happy with that Welcome sign as well. Nothing beats a free barnwood sign, right? I’m looking forward to spending a bit more time with the kids (and not hearing them whine about, yet another trip to Home Goods 🙂 ), but I’ll miss these challenges. I love sharing budget-friendly ways to transform your home.
Great job Erin, I love the color of door @ chairs (pretty)!! And really love what Ron did w/pillars & candles. Way to go, ❤️ Watching your room challenges!
Mary RB
Thanks Mary! Didn’t Ron do an awesome job? This porch is looking so much better!