Lemons, Lavender, & Laundry

  • Home
  • $100 Room Challenge
  • Contact Me
  • Essential Oils
    • Where to Buy Essential Oils | Find the Best Essential Oils for You
    • Essential Oil Recipes & Diffuser Blends
    • Essential Oil Must-Haves
    • Essential Oils: Safety
    • Understanding Common Essential Oil Terms
  • 8 Week Cleaning Challenge
  • Shop My Amazon
  • Fine Print
    • Advertising Disclosure
    • Cookie Policy & Privacy Policy
    • Copyright
    • Disclaimer

DIY Bench Cushion

This post may contain affiliate links for your convenience. For more information, please visit our advertising disclosure.

$100 Room Challenge· DIY Projects· Room Makeovers

23 Sep

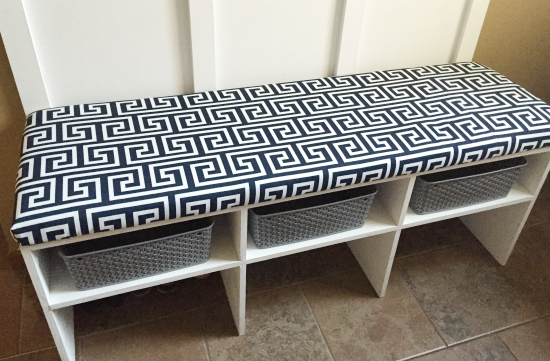
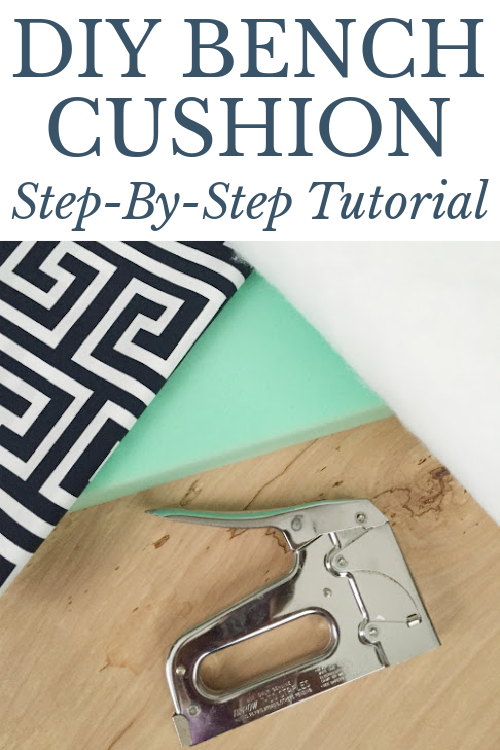
This post will walk you through how to make a DIY bench cushion with an easy, step-by-step tutorial. Best part is: this DIY bench cushion do not require any sewing.

DIY Bench Cushion tutorial
 

It is week 4 of the $100 Room Challenge and this week I worked on creating a DIY Bench Cushion. Please keep in mind that I am SO not a crafty sewer. Truth: I don’t know how to sew, nor do I own a sewing machine. My aunt was gracious enough to sew a seam to avoid a sideways pattern, but, if you are like me, and lack the ability to sew, you can certainly complete this project without a sewing machine; the only thing to keep in mind is making sure you have enough fabric to cover the cushion with the pattern going in the direction that looks best to you.

What You Need to Make A DIY Bench Cushion

Items needed to make a bench cushion: fabric, batting, foam, and staple gun
 

Affiliate links may be used. Please see our advertising disclosure for more information.
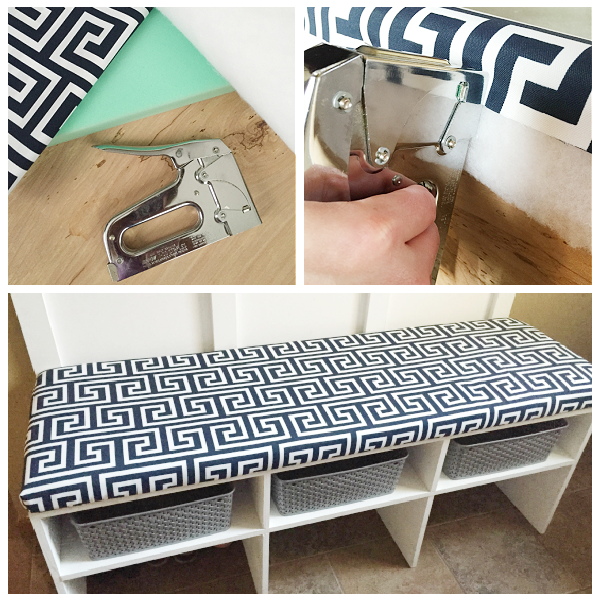
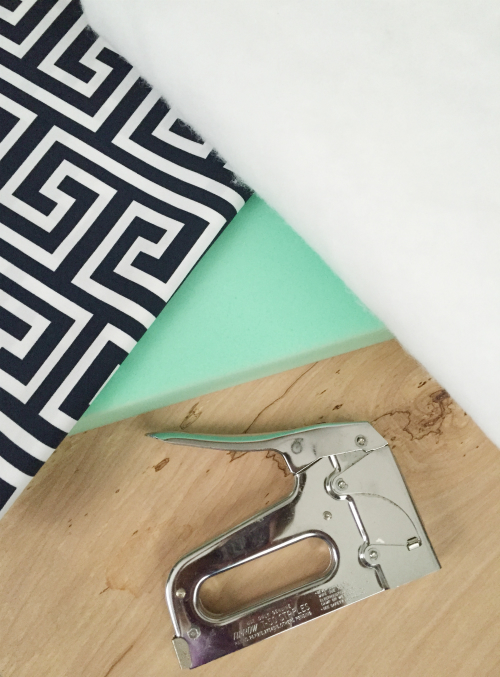
  • A thin piece of plywood, also known as underlayment (mine was 5 mm thick)- A note to possibly save you some money: I went to Home Depot and they have scrap wood you can purchase for a reduced price. I got mine for under $4.00 (a 70% savings). So, check the scrap wood area before buying a whole sheet. Home Depot will also cut the wood for you; just be sure you have your measurements.
  • Foam padding– This stuff is expensive! I could not believe the price. Check for coupons before purchasing. Joann’s happened to have 50% off foam, but even with that coupon, I paid about $27 for it!!! I chose to go with a 2″ foam, but 3″ is also available… it just costs more. Again, know the dimensions of your cushion so you don’t overpay for more than you need.
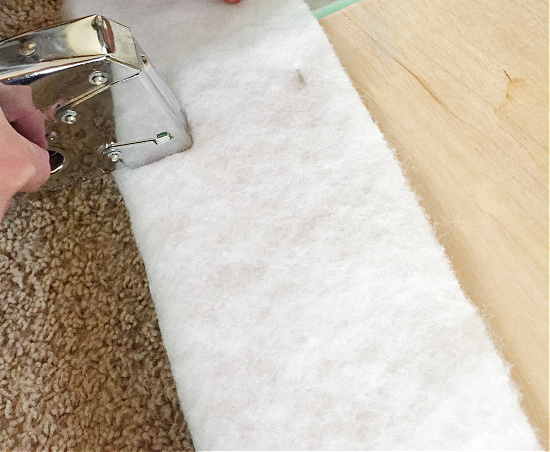
  • Batting– When figuring out how much batting you need, remember to figure out the length of your bench + the measurement of your foam x2 + your wood x2 + 1″ extra for stapling x2. My cushion was 55 3/8″ x 17 1/4″. The batting was already wide enough, but I needed 55 3/8 for the length + 4″ for the foam (2″ on each side) + 2″ for the wood (1″ on both sides- more than I really needed, but I’d rather go over a little) + 2″ for wrapping around and stapling (1″ for each side) = 63 3/8″ needed in total.
  • Fabric- I chose to go with an outdoor fabric. I feel like it’s a little more durable, and easier to spot clean since I can’t exactly throw my cushion in the laundry whenever it gets dirty. The dimensions are figured the same way as your batting. If your bench is not as long as mine, the fabric was already 55″ in one direction, so keep that in mind… ask the associate cutting the fabric what’s best. They are SO helpful!
  • Staple Gun with Staples about the size of your wood. You certainly don’t want the prongs to poke through the foam or fabric… I used 1/4 inch (6 mm) staples, the shortest I could find.

How to Make A No-Sew Bench Cushion

First thing’s first. If you know how to sew, start there. As I mentioned, my aunt helped me sew a seam so my pattern would go in the direction I thought looked better. If you do not sew, that’s okay, just make sure your fabric is the right size. Once you have all your supplies, the process is actually very quick and easy- I’d say we spent a total of 30 minutes making the whole thing.

Start by cutting your foam to size. While the length of my foam was cut in the store (55 3/8″) the width was wider than what I needed. While I have heard that an electric knife is great for cutting foam (that’s what they used in the store), I don’t have one, so I used a utility knife, and it did just fine. Make sure to measure and draw a line to guide your knife.

Cutting foam with razor to make a bench cushion
 

Put your foam on top of the thin plywood board and wrap the batting around it. Pull it securely and staple it to the bottom of your board using a staple gun.

Using staple gun to adhere batting to board
 

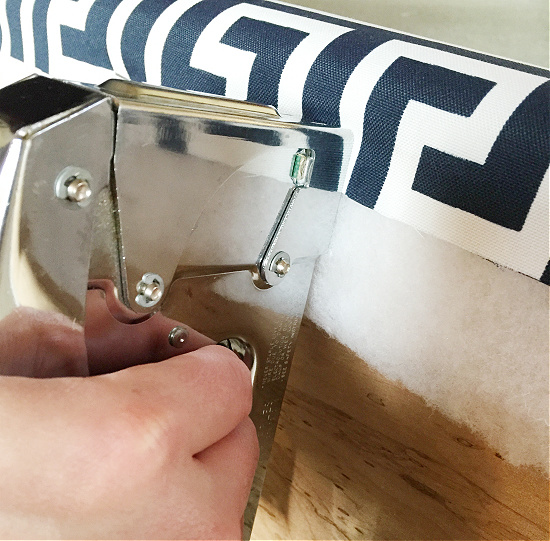
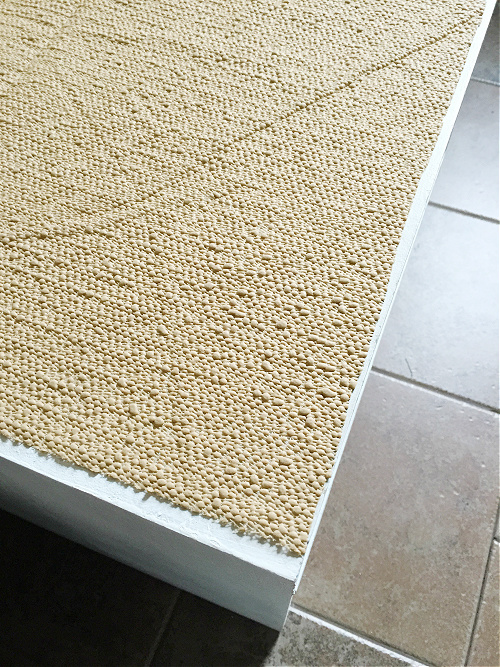
Now wrap your fabric around and pull tightly, making sure your pattern aligned. Then staple your fabric onto the bottom of the board.

Stapling fabric to board to make a DIY Bench Cushion
 

Ta Dah!!! DIY bench cushion! In order to prevent the cushion from moving all over the bench, I laid down some rug pad gripper I had downstairs.

Rug grip on bench to hold cushion in place
 

And there you have it! A DIY bench cushion.

DIY Bench Cushion on bench in mudroom
 

The Budget

Cushion

  • Fabric= $20.98 (Little story. I don’t know how to sew, so I thought I was going to have to go with a sideways pattern and, therefore, would need more fabric. A HUGE thank you to my aunt who helped sew a seam so I wasn’t looking at a wonky pattern!!! This also means I had a lot of fabric left over. If I knew how to sew, or knew my aunt could help me, I could have gotten by with spending only $11.99, but I’m being honest with the actual amount spent.)
  • 2″ foam= $27.22 (After 50% off coupon) I know! Who knew foam was so expensive? If I hadn’t had my coupon, it would have been $54.44… over half my budget!
  • Batting= $4.36 (After 50% off coupon)
  • 5mm Plywood= $3.89 (After 70% discount for using Home Depot’s scrap wood)


Love it? Pin it!

Easy to Make, No Sew Bench Cushion Tutorial

21 Comments

« Pantry Organization from the Dollar Store
Ideas for A $100 Laundry Closet Makeover »

Comments

  1. Peggy says

    May 12, 2020 at 10:23 AM

    A terrific tutorial, even if you do sew. Foam being so expensive, I reused a mattress topper that one of my college aged kids had left at home when they got a new bed – it wasn’t the right size for any of our beds, and no one wanted it, so I recycled. I cut it to size using the electric knife we have (not just for turkey!) and have plenty left for other cushions.

    Reply
  2. Sharon says

    October 4, 2019 at 3:22 AM

    I love this project I think I’m going to try it and it doesn’t require you to sew thanks.

    Reply
  3. Debbie Fortenberry says

    July 30, 2019 at 4:16 PM

    I got freebie low credenza that is just begging to be made into a bench, I am going to have to try this out!

    Reply
  4. Jeanne Morris says

    August 4, 2018 at 5:31 PM

    Just an FYI: if you have an Ollie’s store near you, they sell foam. I got a piece of 4 x 22 x 22 for $12.99.

    Reply
    • Erin says

      August 6, 2018 at 8:03 AM

      I have never heard of Ollie’s, so I am assuming we do not have one near us, but what a great deal!

      Reply
  5. Patty says

    April 14, 2018 at 8:06 PM

    We have an apt. entry that could use a smaller one by the closet …..going to add a punch of color there…

    Reply
  6. Patty says

    April 14, 2018 at 8:02 PM

    The grippy stuff is shelf liner….love the bench cushin….going to try a shorter version…ty

    Reply
  7. Rachel says

    August 18, 2016 at 11:46 PM

    I feel like an idiot having to ask, but I just can’t figure it out… where is this seam that your aunt made? Like, where on the bench? Longways down the middle? It looks so perfectly made, and all one piece. I can’t believe there is a seam in there!

    Reply
    • Erin says

      August 19, 2016 at 7:33 AM

      A big shout out to my aunt, because she really did an excellent job sewing that seam. The seam is actually towards the right side when you’re looking at the pictures. I can hardly see where it is either, although if you were to be standing in my mudroom, looking for the seam, you’d be able to see it.

      Reply
      • Rachel says

        August 19, 2016 at 7:41 AM

        I am just so impressed! High five your aunt for me! 🙂

        Reply
        • Erin says

          August 19, 2016 at 4:42 PM

          I will 🙂

          Reply
  8. hanna whang says

    June 1, 2016 at 9:08 PM

    why is batting needed?

    Reply
    • Erin says

      June 1, 2016 at 10:41 PM

      Great question. Batting provides a little extra padding for your fabric. If fabric were to go directly up against the wood corners, it has a higher chance of wearing or tearing. The batting also gives a smoother shape to the cushion overall.

      Reply
  9. Mary, Living a Sunshine Life says

    October 3, 2015 at 11:11 PM

    We are currently in the process of redoing (or at least planning the redo) of two different rooms. Well, when all is said and done it will be 2.5 rooms. I know I can make this to enhance one of our rooms, especially with all of the storage we need around here. Thanks for sharing.

    Reply
    • Erin says

      October 6, 2015 at 7:10 AM

      It was such a simple project that really added to the room. Sounds like you have a lot of your plate! Good luck as you redo the spaces in your home!

      Reply
  10. Denise/DIY Crush says

    October 2, 2015 at 12:08 PM

    Hey, stopping by from The Inspiration Gallery! LOVE this project and would like to invite you to link up at my new party! Every Thursday at 7pm EST. Hope to see you there!

    Reply
    • Erin says

      October 3, 2015 at 11:52 AM

      Thanks for the invite. I’ll check it out!

      Reply
  11. Mary-In the boondocks says

    October 2, 2015 at 10:09 AM

    Well of course I love it, it has Greek keys on the fabric! Great tutorial!

    Reply
    • Erin says

      October 3, 2015 at 11:52 AM

      Thanks Mary! I’m so glad I went with the Greek key too!

      Reply
  12. Sharon says

    October 1, 2015 at 12:14 AM

    Love how this bench turned out, and your choice of fabric is spot-on. Very smart of you to go with outdoor fabric!

    Reply
    • Erin says

      October 1, 2015 at 8:55 AM

      Thanks Sharon! Second time I’ve ever bought fabric. Blogging sure does get me out and trying new things.

      Reply

Leave a Reply Cancel reply

Your email address will not be published. Required fields are marked *

Recipe Rating


Hi there! I'm Erin. Welcome to Lemons, Lavender & Laundry, where we believe that creating a clean home should be done as simply and naturally as possible. [Read More...]

Come Say Hi!

  • Amazon
  • Facebook
  • Instagram
  • Pinterest

Let’s Keep In Touch

Subscribe!

Search This Site

Browse By Category

Affiliate Statement & Your Privacy

As an Amazon Associate, I earn from qualifying purchases. To learn more about earnings made from the affiliate links used on our site, please see our advertising disclosure.

Your privacy is important to us. Please review our updated privacy policy here.

We use cookies on our website to give you the most relevant experience by remembering your preferences and repeat visits. By clicking “Accept All”, you consent to the use of ALL the cookies. However, you may visit "Cookie Settings" to provide a controlled consent.
Cookie SettingsAccept
Manage consent

Privacy Overview

This website uses cookies to improve your experience while you navigate through the website. Out of these, the cookies that are categorized as necessary are stored on your browser as they are essential for the working of basic functionalities of the website. We also use third-party cookies that help us analyze and understand how you use this website. These cookies will be stored in your browser only with your consent. You also have the option to opt-out of these cookies. But opting out of some of these cookies may affect your browsing experience.
Necessary
Always Enabled
Necessary cookies are absolutely essential for the website to function properly. These cookies ensure basic functionalities and security features of the website, anonymously.
CookieDurationDescription
cookielawinfo-checkbox-analytics11 monthsThis cookie is set by GDPR Cookie Consent plugin. The cookie is used to store the user consent for the cookies in the category "Analytics".
cookielawinfo-checkbox-functional11 monthsThe cookie is set by GDPR cookie consent to record the user consent for the cookies in the category "Functional".
cookielawinfo-checkbox-necessary11 monthsThis cookie is set by GDPR Cookie Consent plugin. The cookies is used to store the user consent for the cookies in the category "Necessary".
cookielawinfo-checkbox-others11 monthsThis cookie is set by GDPR Cookie Consent plugin. The cookie is used to store the user consent for the cookies in the category "Other.
cookielawinfo-checkbox-performance11 monthsThis cookie is set by GDPR Cookie Consent plugin. The cookie is used to store the user consent for the cookies in the category "Performance".
viewed_cookie_policy11 monthsThe cookie is set by the GDPR Cookie Consent plugin and is used to store whether or not user has consented to the use of cookies. It does not store any personal data.
Functional
Functional cookies help to perform certain functionalities like sharing the content of the website on social media platforms, collect feedbacks, and other third-party features.
Performance
Performance cookies are used to understand and analyze the key performance indexes of the website which helps in delivering a better user experience for the visitors.
Analytics
Analytical cookies are used to understand how visitors interact with the website. These cookies help provide information on metrics the number of visitors, bounce rate, traffic source, etc.
Advertisement
Advertisement cookies are used to provide visitors with relevant ads and marketing campaigns. These cookies track visitors across websites and collect information to provide customized ads.
Others
Other uncategorized cookies are those that are being analyzed and have not been classified into a category as yet.
Save & Accept
Powered by CookieYes Logo