Welcome to the One Room Challenge, where 150+ bloggers (including myself) tackle one room in our home, transforming it in just 5 weeks’ time! Today I’m talking about some budget-friendly laundry closet ideas because I’m going to try and tackle this project with $100 or less.
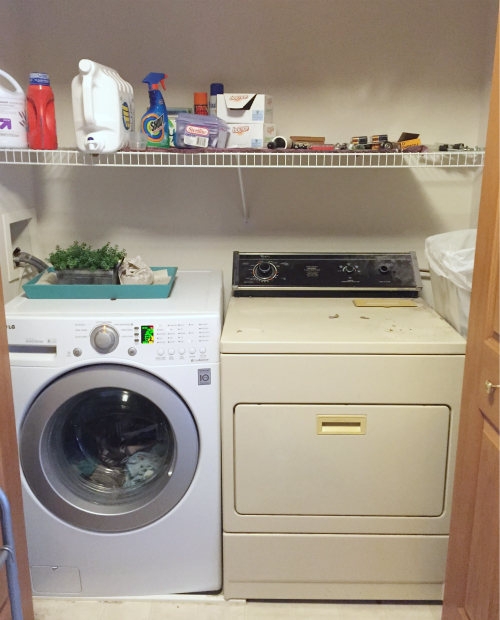
Let’s take a look at the space I will be working on… May I present our Laundry Closet.
I have given myself a budget of $100 for this makeover. Say what? I know. $100 is not much. I actually like having a (very) limited budget because I am forced to think outside the box and get creative!
This week I’m sharing my plans for this space. There are a total of zero things I like about this closet, which means I need to do some major overhauling.
*Please note that I did not “spruce up” the laundry room in any way prior to these pictures (which you will know is the absolute truth once you see them). I am all about giving an honest picture of what I’m about to deal with… So here we go… and… prepare yourself for a rather disturbing picture at the end… seriously folks, it’s about to get real…
Goals for Our $100 Laundry Closet Makeover
Goal 1: Paint
 As is true for most (maybe all) closets in a builder-grade house, they are painted semi-white, creamy, blah. I want my laundry room to be clean, fresh, and crisp, so I need a clean, fresh, crisp color. I know what you’re thinking. Paint costs money, and your budget will be gone after buying paint… Fear not. I have a plan that should allow me to paint this closet for free. I want a very light bluish color in here. I happen to have two bluish paint samples that I bought for the last One Room Challenge, as well as 1/2 gallon of white paint. (I knew there was a reason for keeping those little samples!). I think I can do a little combination experiment, and since this is such a small space, I should have enough paint to cover it. Anyone out there mix paint before? I am open to any, and all, advice because this is something I have never done before.
Goal 2: Cover the Wire Shelving
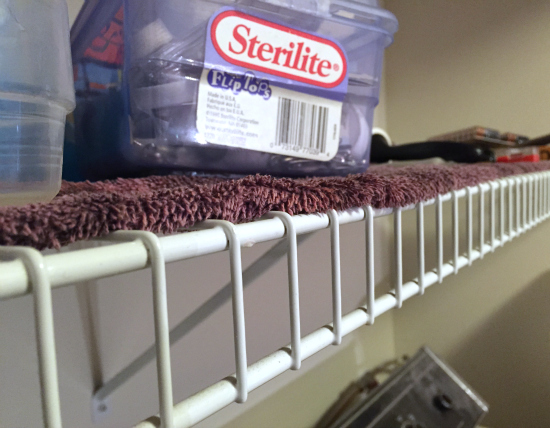
This shelf is pretty much non-functional. Notice how I have cleverly laid an old towel on it? This is to prevent items from slipping through the cracks of the wire shelving. Doesn’t it look adorable? Nope! It looks terrible! I wash the towel every 2-3 years (yep, I did say years) to keeps it looking fresh, but it’s time to say goodbye. Again, I’m working with $100, so I’m not adding new shelving, instead I’m going to try to problem solve with some sort of wood overlay… which I may, or may not, paint… and which may, or may not, get some sort of treatment with washi tape.
To see the results… check out this post.
Goal 3: Storage
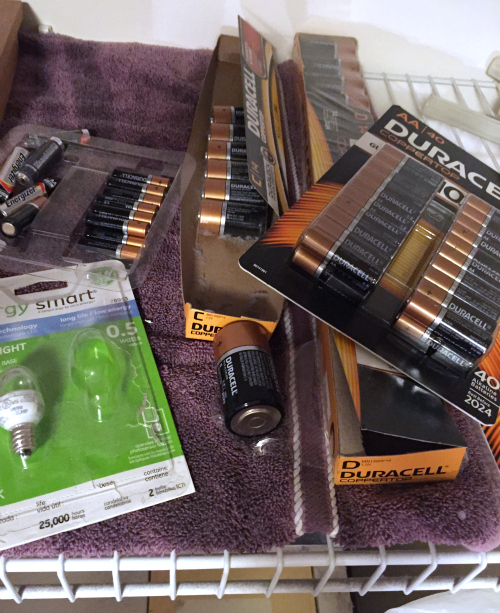
I know the packages of batteries spewing their contents is cute and all, but really, let’s get some baskets to contain the madness. Baskets are definitely on the list of needed items, so I’ll be scouring my local Goodwill for some ideas. I also bought a tray, like 6 months ago, that I was contemplating using in my kitchen. Time passed, I could no longer return it, so I brought it up to the laundry closet thinking I might find a use for it. It’s been sitting on my washing machine ever since. I’m thinking it’s time to put that to use as well.
Goal 4: Add Décor
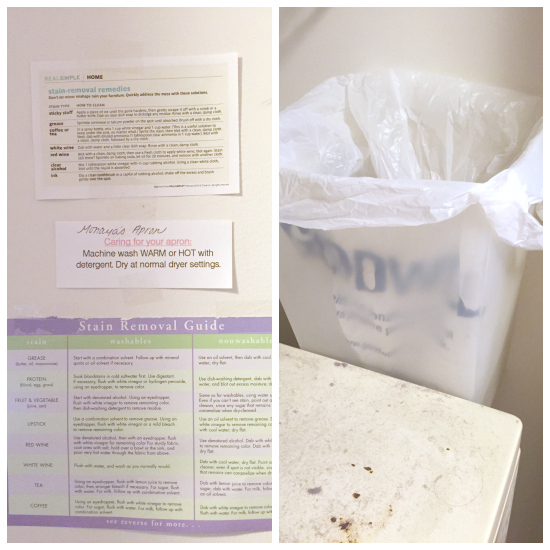
Again with the cuteness factor going on in here… This is my current “décor”. I know you’re jealous. These washing instructions are truly impressive taped to the wall, but it’s time to upgrade. I already bought my favorite gallery frames, and I’ve got some ideas for using free printables on Pinterest. I also need to do something about the over-sized trash can stuck in between the dryer and the wall. I’m thinking a small box of some sort hanging on the wall (for the purpose of lint) would be much more suitable.
See how I created a DIY Lint Box (from a cereal box) here.
Goal 5: Paint the Dryer

Soooo… maybe you noticed that my washer and dryer don’t match… Here’s the deal. When we moved into this house, there was a washer and dryer already here. After a couple months, I was confused as to why, after pulling clothes from the washer, there were areas of my clothing that were still dry. I decided to investigate and realized my washer was simply filling with water (wash cycle), draining the water, and filling back up with water (rinse cycle). Hmmm… we’re missing something… like the agitation that actually cleans the clothes. We needed a new washer STAT. The dryer was working well, and our budget at the time didn’t allow for us to buy both. I figured since this room was hidden behind closed doors, it wouldn’t really matter. Honestly, it really doesn’t bother me a whole lot, but since we’re overhauling the space, my husband suggested painting the dryer to match the washer. We’ll see how this idea turns out.
You can see how we painted the dryer here.
Goal 6: Clean It Up
Did I seriously just put up a picture of my lint carpet? That may be the most embarrassing picture I’ve ever put on this blog (although the before pictures of my mudroom were pretty bad as well). But seriously, who can get into such a tight space to vacuum that up? I realize cleaning really needs to be my first step (ya think?), but I’m dreading it, so I’m putting it at the bottom of the list. That way, I somehow feel like it’s less important and I don’t have to think about it.
Okay, with all those plans, I best get to work. There is a whole lot to do, and just about zero time to get it all done.
Wanna Jump Ahead?
Week 1 // Week 2 // Week 3 // Week 4 // Week 5 // Week 6 (REVEAL)
I have had a dish washer door painted at a auto body shop for really cheap, compared to replacing the dishwasher. They also do fridges ,washers and dryers really anything metal you need a good paint job And there are soooo many colours to choose from. Some day I will get my fridge painted Red LOL I know this option is not in your budget but it just might be the answer for some one.
I had no idea an auto body shop would paint your appliances. That really is a great idea! Love the idea of going with a fun color. Thanks for sharing!!!
It’s too bad you couldn’t paint your dryer in place, instead of having to haul it down the stairs. Drape everything in plastic and create a paint booth? I mixed up my own mint paint color for the Spring 2015 ORC and I just made sure to use a separate container(a Quart Canning Jar, wide mouth makes things much easier to stir) to mix the color in. I started by pouring in some color, in your case the blue, in my case green, and then added the white to the color, and mixed, until I got the shade I wanted. Does that make sense? Then stir really well, and it can be stored in the jar, and you’ll have a good view of what color it is all around, and will be able to see if it is well mixed or if there is some hanging out on the bottom that needs more mixing. I hope this helps. Great plan! Lots of potential!
Funny. My husband was almost asleep one night and I blurt out, “Do you think there’s any way we can paint the dryer upstairs?” He half-heartedly answers that we could try painting it in the loft… Haha! He must not have really been awake. Yes, let’s spray paint where there’s carpet, furniture, etc… I’m still think through whether we could somehow create that tent idea with tarps. Thanks for the advice on the paint mixing. Unfortunately, I knew I was going to need all that white paint in order to have enough to cover the space. Luckily pouring both samples into the white created a perfect color.
If you search the internet you can get a magnetic cover for your dryer so you won’t have uto paint it. I believe they are round 30.00 and they come in different patterns. As for a shelf, l have those shelves too,hate them. I used Luanne to cover them and painted it. My spac is quite small as well.
Interesting about the magnetic cover. I didn’t know that existed. Thanks for sharing your ideas!
I love the amazing budget you gave yourself. When I first started blogging I overhauled our laundry room – I think I spent $347. But that was for a lot larger space – so I know you can do an amazing job with $100. I’m curious to see how the dryer painting goes!! Fun!
I’m a bit curious about that dryer too… mainly curious about how we’ll get it down the stairs. I figure we probably can’t make it look worse, so anything should look better than its current state.
Super excited to see how this turns out! Small spaces are so challenging but also make you think out of the box. I am intrigued by the grass…hmmmm.
Now I’m really wishing that grassy patch was something more exciting… (see my reply comment for Sharon above). I’m gonna have to start thinking of something better and more creative than a tin with greenery in it…
Smaller budgets force you to get creative! Can’t wait to see how it turns out! Cheers and good luck!
Thanks JoAnn!
I can’t offer any tips on paint mixing other than make sure what you mix up will cover the entire space since you will have a hard time replicating it if you run out. I’m curious about the box of turf/greenery but won’t force you to tell me what it is. Clothespin garden?
I wish that grassy patch meant I was doing something super creative. Really, it’s the only image I could find to come close to this little tin with greenery that I have. If you look close at the before pictures, you can see it on the washer… Bummer.
Love the direction you are headed in! Great color palette!
I love that you gave yourself a budget and that you’re doing such amazing things with it! Love your idea for the shelving, as well. I can’t wait to see this room come to life!!!
Thanks! I’m very much looking forward to a better space than what you see above. 🙂
Love your design board, and can’t wait to see how the color for the paint turns out 🙂 Good luck!
Thanks! I’m thinking I’ll just start by adding a little paint at a time until I get the color I’m going for. Hoping this process works out okay!
My laundry room could totally use a makeover, too! Can’t wait to see how yours comes together! LOVE your plans!
Thanks Samantha!
My husband and I mixed two sample colors together to get a paint color for our dining room, but then we had to buy a gallon to get enough. Best of luck with the mixing, I bet it will come out great!
I’m hoping, that with such a small space, I’ll have enough paint that I won’t need to buy more. Fingers crossed!
Great plan! I think there’s a piece that attaches to your drill & uses the drill action to stir paint. Maybe you could rig something up? Also, for the shelving, I’ve used peel & stick faux marble floor tile before as a way to provide a solid surface on top of the shelf. Super cheap, & pretty cute too!
Fantastic ideas! Thanks for sharing Holly. I’ll have to look into that idea!
What I did to make my vinyl shelving in pantry & also vinyl drawers in my walkin closet was take cardboard the size I needed and covered it with fancy paper sheets! Now things don’t topple over in pantry…… As for the drawers in my closet, I did it to make it look nice, and also don’t get the impression from drawers on my clothes that are stored in it! I have also covered the bottoms of my large vanity drawers in bathroom, that is loaded with makeup or skincare products…. Another thing I do to save is keep some of the containers that fruits/veggies and even sometimes meat, after going thru dishwasher. I use them under the sink, in drawers where I can use separators, anywhere that will make items more tidy! Hope this helps some of you!
Great ideas Jo!
This is going to look so good when finished. I have never painted an appliance before so I am excited to see how that goes. BTW…You have been on fire lately! Congrats on your success.
Thanks for you kind words Jessica! I also have never painted an appliance, so we’ll see how this goes. Let’s be honest… the dryer can’t look much worse, so it’s a perfect piece to try out the process. Enjoy your day!
Can’t wait to see the transformation!
Thanks Kyla!
I love your humor and I love the plan! Can’t wait to see it all come together- I know it will be fabulous. Heres to a great productive week ahead! ~Joy
Thanks Joy!
I love the paint color! It looks so refreshing. Have fun painting that dryer!! I never would have thought of that. Can’t wait to see how it turns out.
I’m not as much worried about painting the dryer as I am about getting the dryer down the stairs and outside to actually do the painting. Fingers crossed we can find some good help 🙂
I love your design plans and $100 budget? I’ve been able to bring extra paint colour to Benjamin Moore and have them adjust the colour. They keep playing and adding colours until I get a colour i like. Good luck.
Thanks for that tip Bette!
That paint color is perfect!
Thanks! Now if I can just get my paint mixture to match 🙂
Love the $100 budget idea. I think you are on to a great challenge idea!!
Marcie
Thanks Marcie! Hoping all my budget-friendly ideas work the way I’m hoping!
The Washington Co recycling center may help you with the paint if your mixing experiment doesn’t work out. Free cans that people have dropped off there instead of storing in their basement. I just dropped off about 20 cans in July.
We have that in Carver County too, and that was my original thought for free paint. Then I realized I already had paint, but I’ll definitely look into it if my mixing method doesn’t work out. Thanks!
I love your plans!! I really to do this $100 challenge with you! After he ORC I’m in! Can’t wait to see what you come up with!
Awesome! We’ll have to see how we can collaborate in some way.