This DIY Stenciled Floor post is sponsored by Cutting Edge Stencils. All opinions are 100% my own.
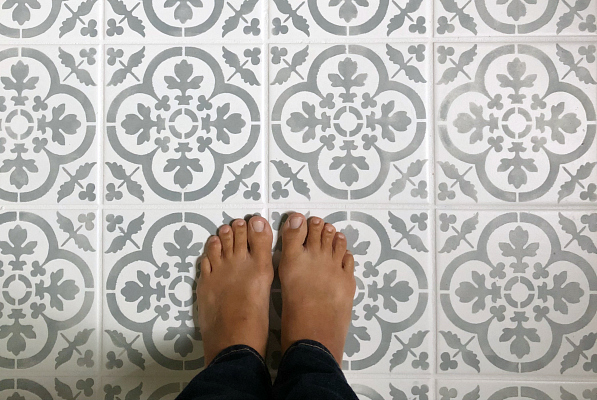
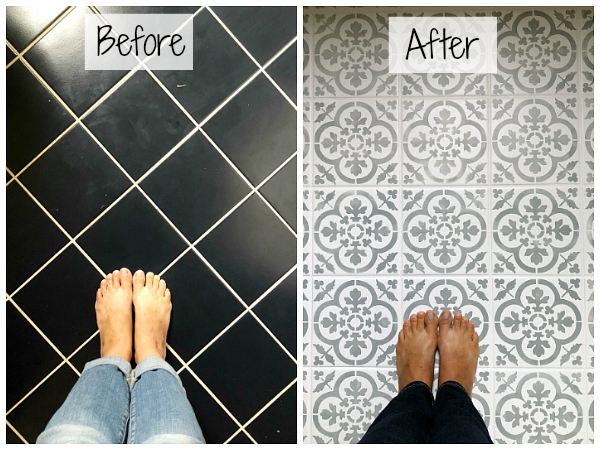
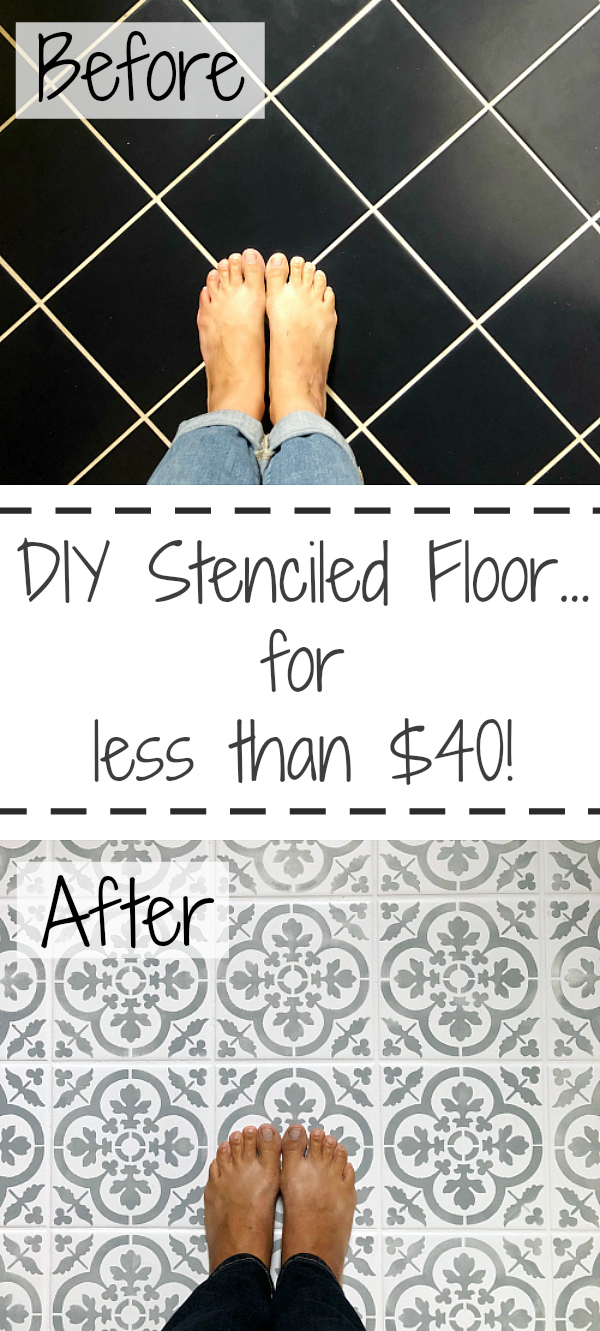
Anyone else living with an outdated floor? Our basement bathroom had navy tile, and it was in desperate need of an update… only thing is, I am attempting to redo our bathroom for less than $100, so I cannot afford new flooring. Instead, I stenciled the floor to mimic expensive cement tile, and the cost was less than $40. Here is the full tutorial on how to create a DIY stenciled floor, along with all the lessons learned along the way. Make sure to check out how this stenciled floor held up after one year.
It’s week 3 of the $100 Room Challenge, and I am tackling the biggest project of all: our bathroom floor. Remember this?
While the floor tile may look like it’s black, it’s actually a very dark navy. It felt outdated, and certainly didn’t go with the updated vanity I completed last week. My vision was to use a stencil to create the look of cement tile, without the hefty price tag.
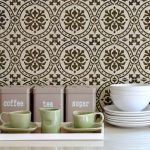
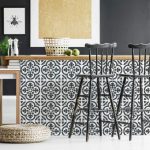
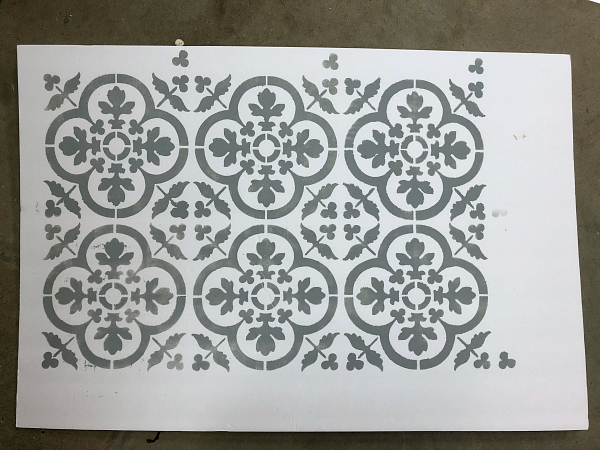
Before we go any further, I want to thank Cutting Edge Stencils for supplying stencils to our $100 Room Challenge participants this round. While we received our stencils for free, we will still include the price in our $100 budget. I am not gonna lie, I spent a long time deciding on a stencil. I truly loved so many of them. Best part: The stencils start at only $9.95! Here are a few of my favorites:
Affiliate links may be used. Please see our advertising disclosure for more information.
Click for more information.
-
- Abbey Tile Stencil
-
- Augusta Tile Stencil
-
- Calista Tile Stencial
-
- Felicity Tile Stencil
-

- Santa Ana Tile Stencil
-
- Verona Tile Stencil
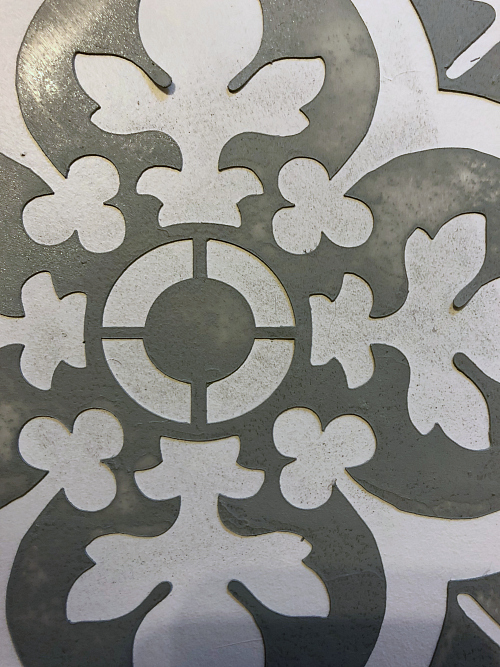
In the end, I chose the Felicity Tile Stencil.
I was so nervous to stencil our floor, but sometimes you just have to go for it. I am going to walk you through each step in the process and share every product used. You can also find a video-style tutorial in my Instagram highlights. It has a lot of information with real-time processes and tips 🙂
Step 1: Sand the Floor
This may not be necessary if your floor already has a little texture, but our tile was glossy, so I grabbed my sander and some 150 grit sandpaper, and just went over the floor to reduce the sheen a bit.
Step 2: Clean and Tape
I typically use TSP prior to priming/painting, but I am noticing some primers recommend that you not use it, so I just used my DIY All-Purpose Spray and a wet sponge. The whole point of cleaning the surface is to remove any debris to help the primer adhere properly to the flooring. I went over the whole floor a second time with a clean wet sponge to make sure I got all the dust from sanding the floor.
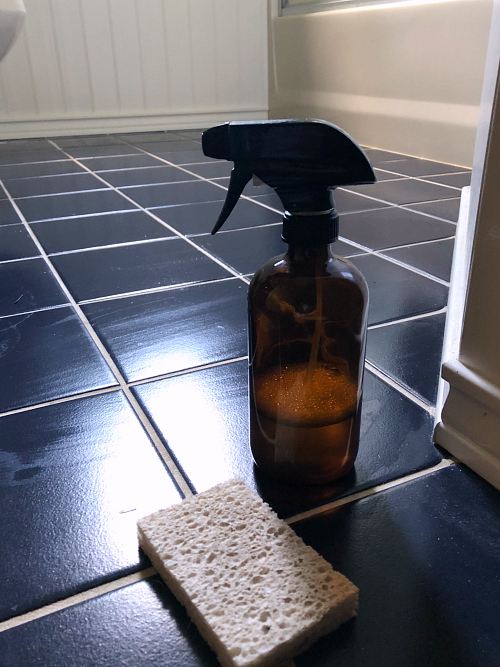
After cleaning, I taped around the walls, tub, toilet, etc with painter’s tape. Because I had just completed the vanity a few days before, I taped and un-taped after each application to avoid the paint sticking to the tape, being that I’m sure not everything had cured yet.
Step 3: Primer… x2
I was so concerned about which primer to use on the floors. I had done a trial run with a water-based primer I already had on hand, but after it dried, I could literally peel it off the floor. I ended up buying an oil-based primer as back-up, hoping it might adhere better… but the can of water-based primer said it takes 7 days to fully cure. There was a small area that still had the primer on it, and after 6 days, I could not pick it off, so I decided to save a little money and return the oil-based primer (which smells terrible, by the way) and go with Zinsser Bulls Eye 1-2-3 Primer. I applied two coats since the floor is so dark. For the application, I used a 4″ foam roller and (my favorite) Purdy paintbrush for the grout lines.
***UPDATE: I wrote a whole post on how this floor held up one year later and explained how I had to fix a few of the tiles as the paint had peeled on some of them. When fixing the tiles, I used an oil-based primer and now, a year after fixing those tiles, I can say those with oil-based primer are still in perfect condition. Use an oil-based primer for this project!
IMPORTANT: If you decided to stencil in your laundry room, and use an oil-based primer/paint, do not run your dryer while using it and for (at least) 24 after it has dried! The vapors are likely flammable, which is why you certainly don’t want to run it while priming/painting, and running your dryer too soon afterwards will cause your clothes to smell like kerosene. Yuck!
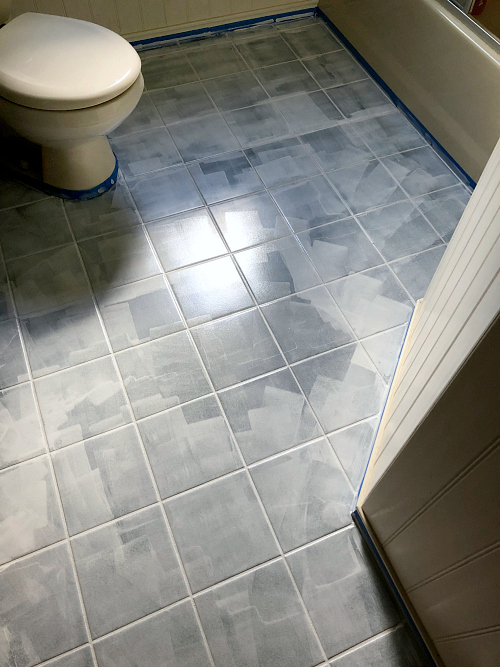
After First Coat of Primer
Primer is not going to look amazing… even after the second coat. No worries. It’s totally fine. Primer is there to help the paint adhere, not to look pretty 🙂
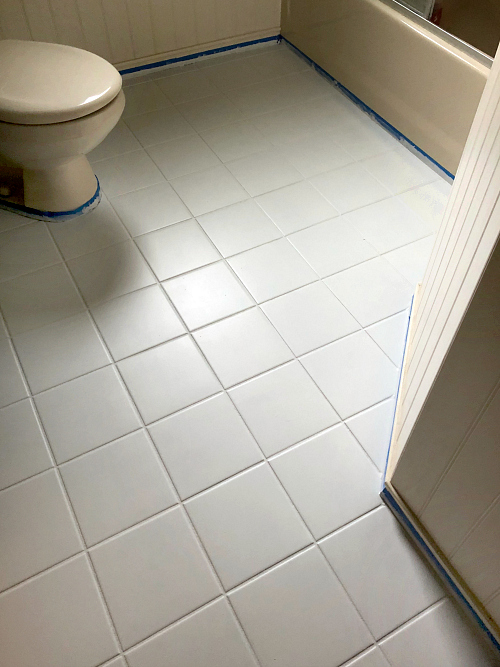
Step 4: Paint the Floor… x2
I did a lot of research on which type of paint to use for this floor. You can find a ton of tutorials out there, most claiming a high-level of success. After (literally) hours of research, I decided to go with Valspar Porch, Floor, & Patio paint. The nice thing about Valspar is that it comes in a quart size, which saves a little money. Each quart cost me $12.28, and I didn’t even need the full quart. This requires a bit of patience, as you need to allow the floor to dry between coats. I used the foam roller and paint brush once again, painting over everything. I then allowed the floor to dry for a full 24 hours. I applied the second coat, and let that dry for another 24 hours. Base color: White. (Yep. Just “White”)
Step 5: Stencil
I cannot tell you how important it is to practice, practice, practice before taking that stencil to your floor. I grabbed a piece of foam board and tried it out several times using different techniques. I had been advised to use a stencil brush, so that’s what I started with… and I hated it. First, it was time-consuming, and second, the bristles kept falling out, so no stencil brush for me. Instead, I grabbed that trusty foam roller and practiced some more.
My practice board
My Advice When Stenciling: Lessons Learned
- Practice… A lot
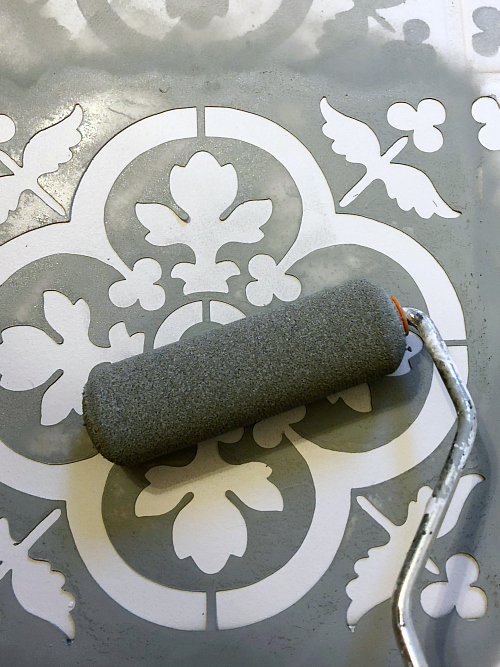
- You need (almost) no paint on your roller. Run the roller over your paint tray, then roll it on a paper towel until hardly anything is coming off, and then go over your stencil. If you have too much paint, it bleeds. Honestly, you’re going to get a bleed-free floor. I think it just happens when you are using a stencil, so you can call it “homemade-rustic” and embrace the bleed, or go back and touch it up. Up to you. The image below shows just how little paint you need. It should go on “dusty” (like a dry brush) and you just lightly roll until you get the look you desire. While it takes a bit longer to roll, it truly helps prevent bleeding.
- When working around the edges (where you can’t use the full stencil), I used a small round foam brush, which was helpful. I also had a small paintbrush to fill in any parts of the stencil that didn’t get as dark as I wanted, or around the edges where the foam roller couldn’t reach.
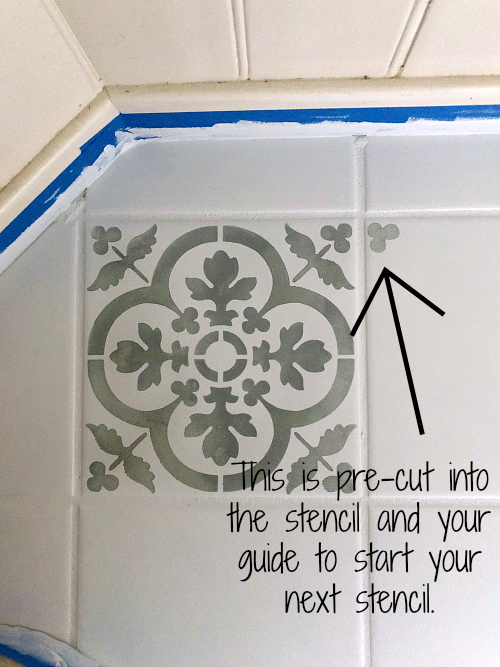
- After using my stencil 5-6 times, I washed the paint off. While the paint never seemed to get on the bottom of the stencil, it made it easier to see the grout lines. Cutting Edge Stencils also has an awesome guide for you to use if you don’t already have grout lines to work with.
- If you happen to get paint where you don’t want it, use a wet cotton swab and simply wipe it away. It comes off easily if you catch it right away.
For the stencil color, I, again, used the Valspar Porch, Floor, & Patio paint, but this time in the color Gray Flannel.
Step 6: Seal with Polycrylic… x3
I, again, let the stenciled floor dry for 24 hours, and then sealed it with Polycrylic. If I were doing this in my laundry room, I probably wouldn’t seal the paint, as technically, this type of paint doesn’t require it. However, this is a bathroom, and it has more water/moisture, so I am taking the extra step to seal the floor. I still have this step left to do (and it’s on my list before next week’s reveal). I plan to go with 3 coats of the Polycrylic, allowing each coat to dry before applying the next. I’m hoping the 4″ foam roller will do the trick once again, as I love how quick and easy it works on the floor.
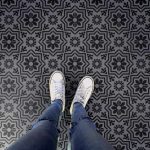
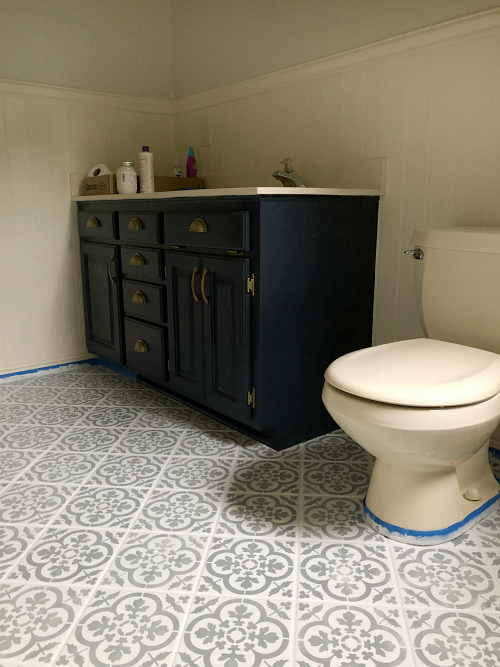
Wanna see the DIY stenciled floor?
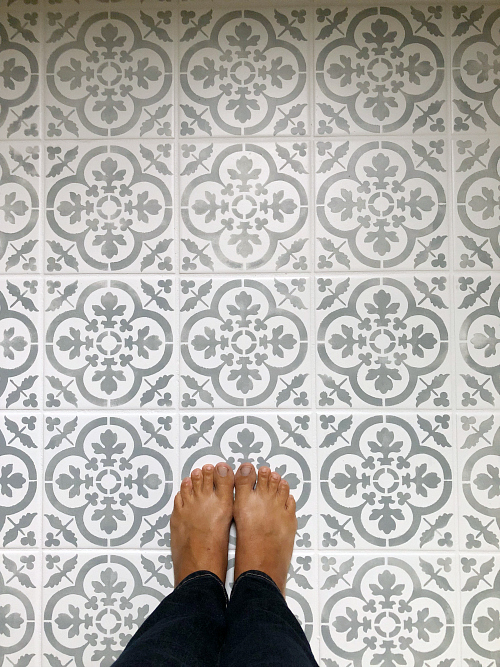
It look so much better than the outdated navy tile!
Ignore all the junk on the sink (#reallifediy). But look how amazing this is all going to look with that vanity!
… and because side-by-side “before and afters” and always fun…
Click Here to See How The Floor Held Up 1 Year Later
Couple other little updates for the week:
- I painted the walls using leftover Agreeable Gray paint.
- My husband (my hero) found a piece of matching chair rail, which was needed to replace the area where the cabinet had been. I had looked at 3 stores trying to match that chair rail, and I couldn’t find it anywhere. Husband looks in a stash of stuff left by the previous owners of our house, and finds just what we needed. Not only that, the previous owners had left the bathroom paint color as well. Yay!
Budget… So Far:
Last week I had spent $5.89 on the vanity. And here’s what I spent this week:
- Primer- FREE (Already had on hand)
- Paint Supplies- FREE (Already had on hand)
- Valspar Porch, Floor, & Patio Paint (Quart Size) x2- $24.56 ($12.28 each)
- Felicity Tile Stencil– $12.95
- Polycrylic– FREE (I already had some, but I also found more at the Recycle Center, which was also free 🙂 )
- Wall Paint- FREE (Leftover)
- Chair Rail- FREE (Yay! Found an extra piece left by the previous owners)
- Chair Rail Paint- FREE (Left by previous owners)
Total for the Floor: $37.51
Total Spent on the Bathroom (so far): $43.40
Catch Up or Jump Ahead:
Week 1 // Week 2 // Week 3 // Week 4
Love it? Pin it!
Hello! This is super cute and I really like the colors. Could you tell me the names of the colors you used?
Just bought a house and looking for this to be my first project for our laundry room! How long does the 2 coats of oil based primer need to set to cure before applying the paint? Curious how long I’ll have to wait to move our washer and dryer in! Thanks so much!
Your post inspired me to update my entryway tile for a lot less than what it would’ve cost if I had chosen to remove the existing tile and replace it with something similar. I was so hesitant to take on such a project, but I’m so glad I did because I absolutely LOVE the end results! Thank you for the inspiration!
Is there a way to post before & after pics?
Hope to hear how well it has held up so far!
You can find my one year review here: https://bit.ly/2Bs0bkq
Looks awesome! I’m curious to know how it’s held up… thinking of doing this in one of my bathrooms.
You can find my one year review here: https://bit.ly/2Bs0bkq
Beautiful, do you think this would work on vinyl tile flooring?
While I have not done this on vinyl floors, I know others that have done so with success 🙂
Wow! Beautiful job, Erin! It really is hard to believe that the floor is stenciled!! Heading over to your reveal now!
Erin, your floor is stunning and it looks great with the vanity color!
Erin, This is one of the coolest DIY features I have ever seen. WOW!!!
Oh wow Erin it looks amazing! I know that was a lot of work, but what a transformation! Your tutorial is great, I know it will help someone who’s thinking of doing this, but wondering how. Fantastic job, can’t wait to see the rest of the room!
Erin, this turned out fantastic! That is an amazing difference!
Looks great! I love the stencil you chose. And how lucky that you were able to find extra molding! I’ve tried to match something like that before and had absolutely no success.
Can’t wait to see it all put together!
Wow Erin, This looks so good!! I love the colour. So much warmer than the dark blue.
Erin! it’s amazing! I’m so glad you tested the stencil brush. I thought it would be time consumming and you’re confirming it! I also thought you were going to keep the black tiles and just stencil over it with a light color! I think you’ve made a good choice! It’s so much better than I imagined!
That floor looks amazing! WOW!!!!! Great job!
Erin – this looks incredible! Congratulations on a job well done.
I can’t wait to see it when you’ve finished. It is going to be phenomenal,
Thank you Janis! I am pretty excited for this makeover.
This looks amazing Erin!!! You should be very proud!
Thanks Laura! I actually didn’t mind doing this project at all. Didn’t love working around the walls, toilet, etc. but it went way faster than I thought it would.
Wow that floor is impressive! I knew it was going to be, but those tiles are perfect in size so it really creates great effect. I am so excited to see your bathroom next week.
Thank you! I am so excited to see everyone’s reveals… and I cannot wait to have a little time to go read up on everyone’s projects. I feel like I’ve been living in this bathroom for weeks 🙂
Oh my goodness, Erin, this looks AMAZING!!! You did such a great job on the floors. I really want to do the DIY tile stencil floor soon! I can’t wait to see your big reveal! 🙂
Thank you Ashlee! I was SO incredibly nervous that I was going to mess things up, but truly, it went much better than I thought.