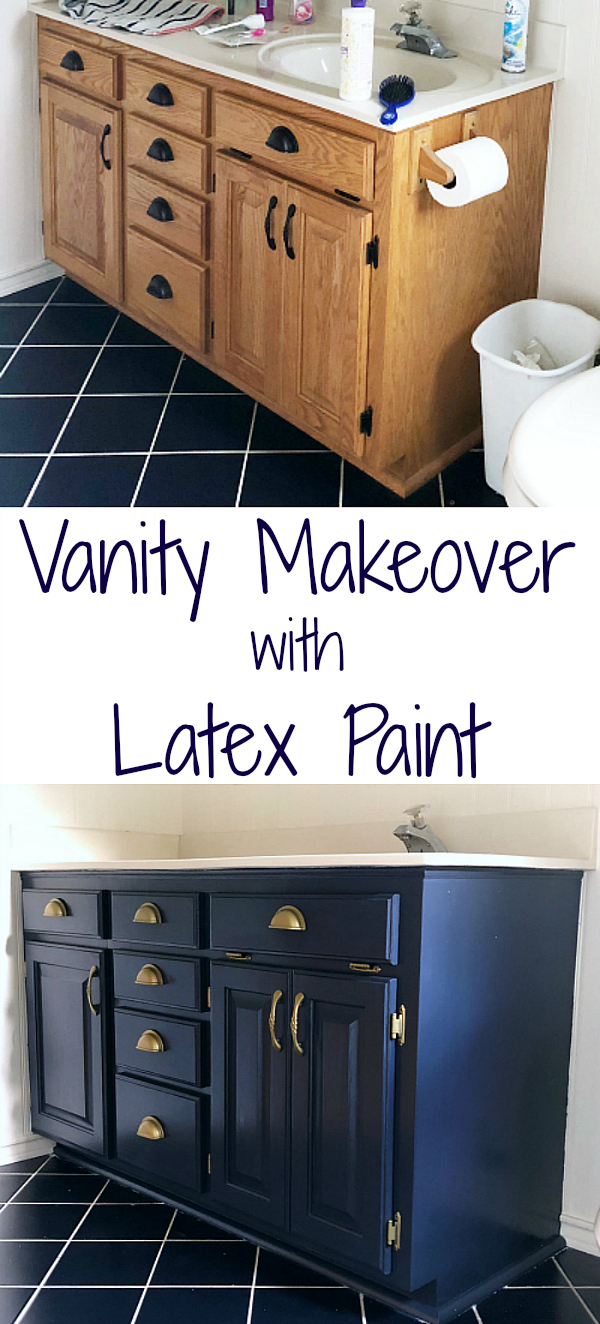
Anyone else living with an outdated vanity? While I have made over vanities in the past, this is my first time painting a vanity with latex paint. Not only was this project fairly easy to do, I was able to use up some leftover latex paint we already had on hand.
This isn’t the first time I’ve painted a vanity. You can check out our (less than $25) vanity makeover here, however, this time I used a different technique; mainly because I had almost everything I needed, which means less money spent out of my budget. #winning
My plan was to use the leftover Hale Navy paint from our entry makeover we did last September. I had hardly touched the gallon of paint, so I there was more than enough for this vanity makeover. I’m not going to go into crazy detail, because most of this is self-explanatory, but I am going to tell you want I have learned along the way. Ready?
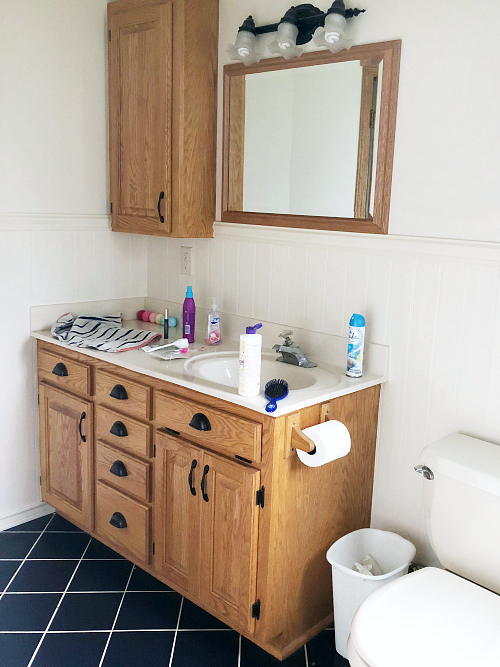
Here’s the “Before Shot”
How to Paint A Vanity with Latex Paint
Affiliate links may be used. Please see our advertising disclosure for more information.
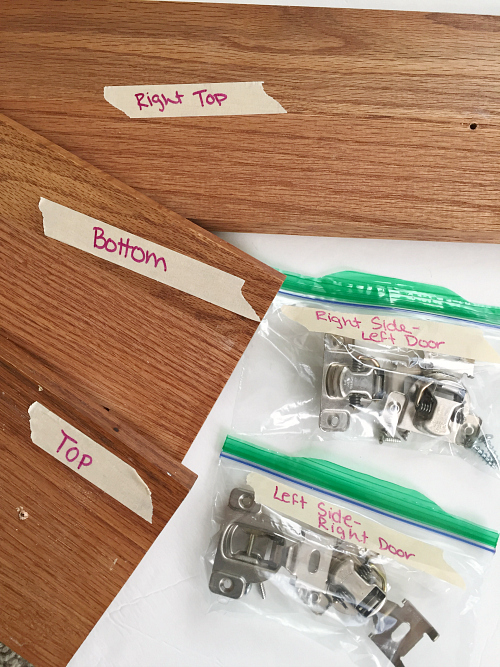
Step 1: Remove Hardware and Label
If you have not yet learned the joy of a drill, it’s time. I used to grab a screwdriver and undo each and every screw by hand as a drill was a bit scary for this clumsy girl. But really… what a time-saver. Remove all the hardware from the vanity (knobs, pulls, and hinges). Then label them. I put mine into individual sandwich bags and add a Post-It note telling me which door or drawer the hardware belongs to. This makes it much easier when you’re putting things back together.
Totally forgot to take a picture this time, but the image above is from my last vanity makeover 🙂
Lesson Learned: Label the Top & Bottom of your Drawer Faces as Well… I didn’t do this, and when it came time to put the drawer faces back on, I had to play around with lining the screws and holes up to see which side was up and down… oops.
Step 2: Clean the Vanity
This step is pretty important. You need to clean the grime (and toothpaste splatter) off the vanity. I used TSP cleaner, which you dilute prior to cleaning. Once mixed according to the instructions, you simply clean the surface with a sponge, the wipe it off with clean water.
*Please note: Some primer tells you to not use TSP, so read your labels.
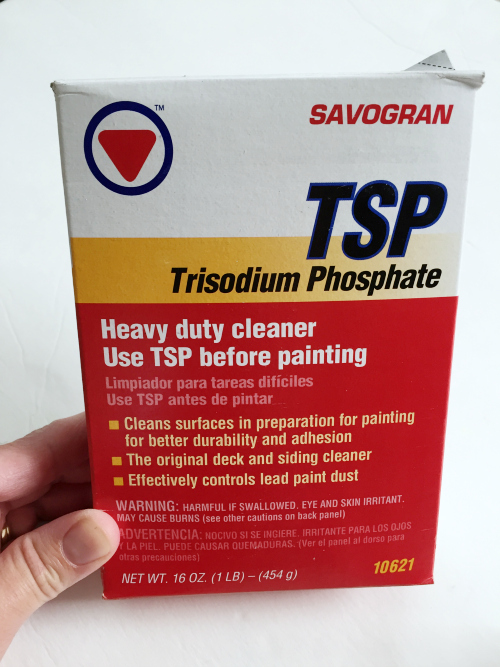
Lesson Learned: Wear Protective Eye Wear Lest It Fling in Your Eye (Ask me how I know)… I am a total rule follower, and I know that when using TSP you are supposed to wear gloves and protective eye wear, however, next time around, that eye wear is going on before I even open the box. See, I already had TSP cleaner from other projects, and I had put a piece of tape over the opening while storing. When I lifted the tape, a little piece of the TSP (which has the consistency of Epsom salt) flung up in my eye. According to the instructions (rule-follower) I was supposed to flush my eye for 15 minutes. I don’t know about you, but I don’t have an eye wash station in my house, so I just sorta rinsed it out a few times with my hand. Then I was supposed to “seek prompt medical attention”. Say what? I have a vanity to paint here. Luckily, it was only slightly irritated and red, so I let it go. After an hour or so, I was back to normal. Never again will I handle TSP without protective eye wear.
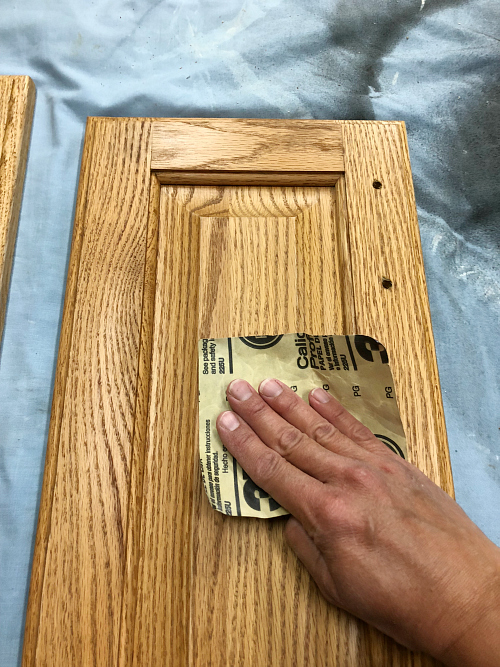
Step 3: Lightly Sand the Wood
Many products out there will tell you that you don’t need to sand, and they’re probably right. Many paints and primers will adhere to all types of surfaces, but I think sanding is always a good idea anyway. I’m not talking about grabbing a sander and going to town, just a light sanding over the surfaces you’ll be painting.
Step 4: Prime
Some products out there will tell you that you do not need to prime your surfaces with primer, and again, they may be right. The vanity I painted in our master bathroom held up well without primer, but…
Lesson Learned: Use Primer When Painting Oak… Our vanity is oak, and oak has a deep wood grain. Primer helps to cover the grain better (note I didn’t say completely, I said better). I actually asked a painter about primer, and he said when working with oak, you should really use an oil-based primer (oops… I had already used water-based… next time). I actually used two coats of primer in order to do the best I could to hide that wood grain. You can see the difference between one and two coats below.
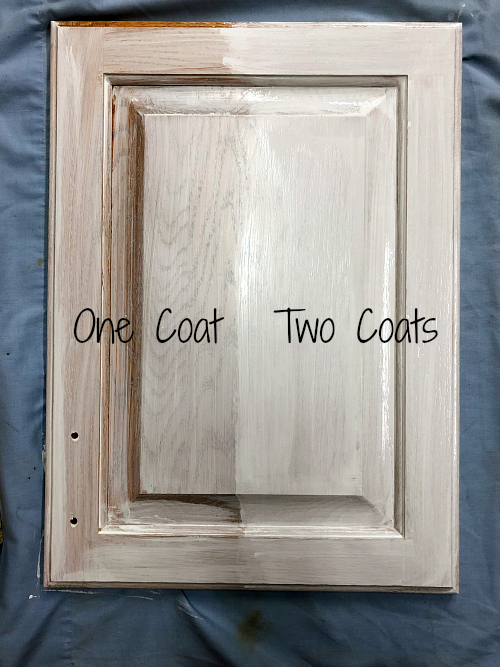
Primer Used: Zinsser Bulls Eye 1-2-3
*UPDATE- If you really want to hide wood grain in your oak cabinets, follow this tutorial.
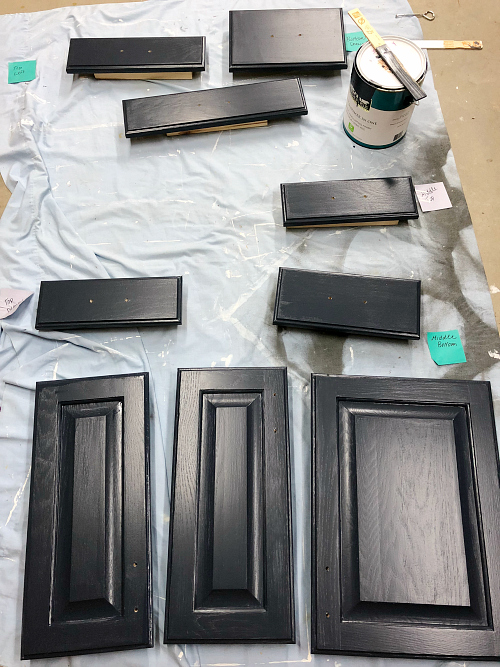
Step 5: Paint
I find a 4″ foam roller and 1 1/2-2″ paint brush to be perfect for this job. (I love Purdy brand brushes. Totally worth the money.) Simply roll the paint onto all the flat surfaces, and use the brush around the edges and in the grooves. I did two coats of paint.
Lesson Learned: Watch for Drips and Pooling Paint… I truly try to catch drips and little paint puddles before they dry, but man, I miss at least one every time. Make sure you are really watching those edges and corners, where paint tends to accumulate. While you can try sanding down drips and dribbles, it never looks quite as good, so catch them before they become an issue.
Speaking of drips and dribbles, I chose not to paint the back of my drawer fronts, simply because people don’t see them much, and most of it is covered by the “drawer box”, so I didn’t really worry about the back. I just grabbed a sander once everything was dry, and sanded off any paint/primer/sealer that had gotten on the back.

Step 6: Seal the Paint with Polycrylic
While not all things technically need a sealer, a vanity in a bathroom, heavily used by children, is a time in which you do, indeed, need it. Polycrylic will not only seal for your paint, it will also make it easier to clean.
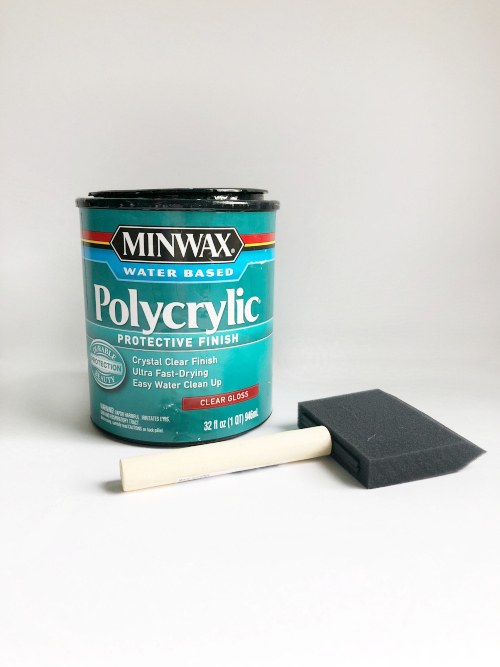
Lesson Learned: Use a Foam Brush to Apply Polycrylic… I used a paint brush over the entire vanity, including the drawers and doors, but it dried kinda blotchy (Ugh.) One door face was so bad that I sanded it down and started over. Then I remembered when we used Polycrylic on our dining room table, my husband used a foam brush to apply, and it was so smooth. So, on the door I had sanded down, I used a foam brush. Game changer. Smooth and silky. (Wish I’d remember that from the beginning!)
Lesson Learned (Part 2): Choose Polycrylic over Polyurethane… While this was a lesson I learned quite awhile ago, I want to share it with you. Many people are familiar with Polyurethane, but it can yellow once dried. Maybe not a huge deal if your painting with darker colors, but I tend to grab Polycrylic for the fact that it dries clear. Perfect when painting over whites or creams.
Step 7 : Put Everything Back Together
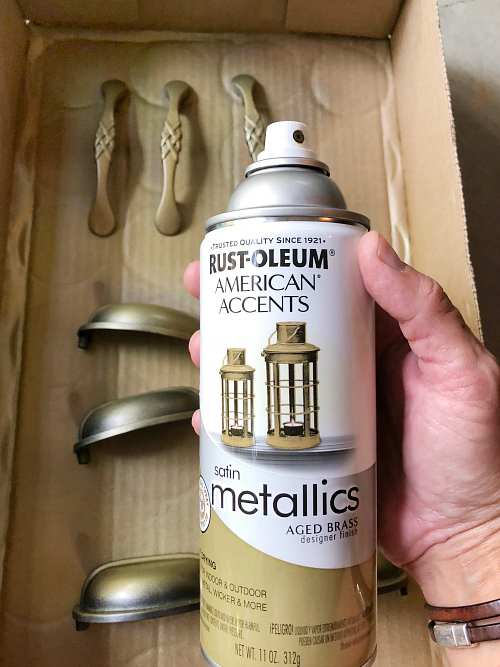
Once everything is thoroughly dry, you can put things back together. In my case, I decided to spray paint the hardware to go better with the new, darker color. I bought a can of Rustoleum Aged Brass (unfortunately this color has been discontinued, so you could try Antique Brass instead), and sprayed all the pulls, hinges, and screws prior to replacing them. This is a cheaper option that buying new, especially if the hardware isn’t too outdated.
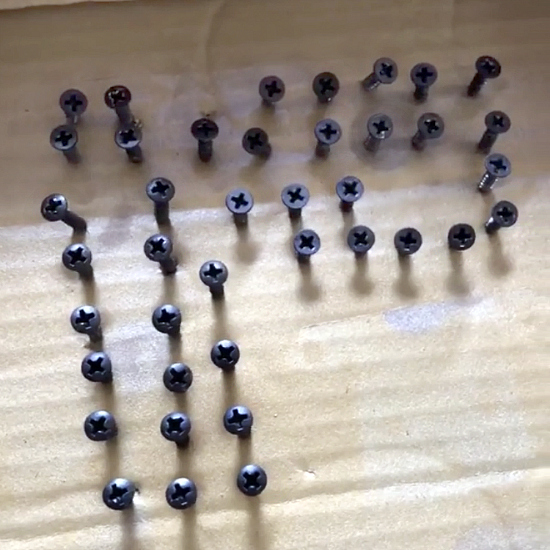
Lesson Learned: Spray Painting Screws… I have done this little trick for awhile, but wanted to share it with you. When spray painting hardware, you’ll often need to spray the screws as well. Simply stick the screws into a piece of cardboard so you can really get at the heads of the screws, spray, and let dry. Easy.
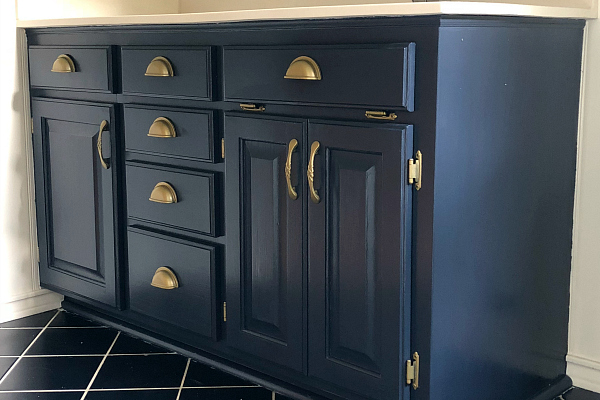
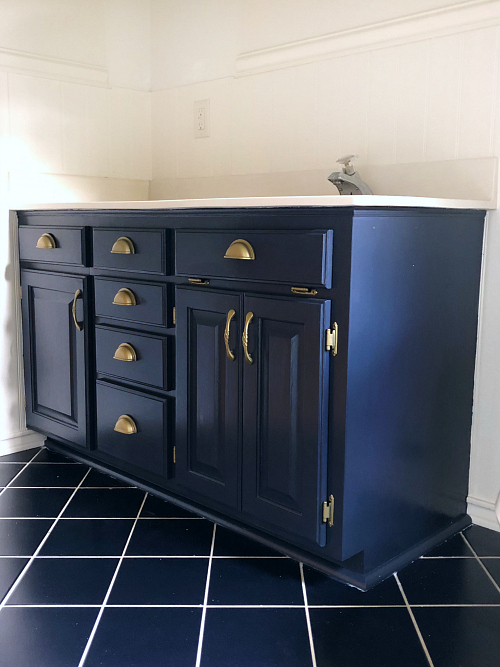
… and here’s the finish product:


The Budget So Far
- Supplies: Paint Brush, Foam Roller, Painter’s Tape, Etc. FREE (Already Had on Hand)
- Primer: FREE (Already Had on Hand)
- Paint: FREE (Using leftover paint from our entry makeover last year)
- Polycrylic: FREE (Have some leftover and found even more at the recycle center)
- Spray Paint: $5.89 (I actually had a rebate check from Menards for $5.14 (from 2016 that they still accepted, so I actually only spent $0.75 🙂 )
Total Spent So Far: $5.89
In Other News…
- I fixed the shower door (Yay!)
- I took down the outdated valence.
- We removed the medicine cabinet (which opened up the bathroom so much)… now to find some chair-rail where the medicine cabinet dug into it.
Wanna Catch Up or Jump Ahead?
Week 1 // Week 2 // Week 3 // Week 4
Love it? Pin it!
I love this color! I saw that you said it was “Hale Navy,” what brand is it?
It’s by Benjamin Moore, however, I always color match in Behr as it’s half the price 🙂
Thank you for a great post! We wI’ll be doing 2 bathrooms in the near future.
We plan on raising the cabinet to a floating cabinet, because it’s way to low.
We plan on using your technique when painting.
It looks fab!!
What a beautiful transformation!
Oh my! I’m not even a fan of navy blue in my decor but your vanity is beautiful!!! I love that you did the antique brass on the hardware, also. It looks gorgeous! Thanks for the helpful tips as well. I know to put poly over stained wood, but until recently I hadn’t really thought it was something you could use over paint for more protection. Good to know! I am really looking forward to see how you stencil the floor.
I don’t typically go this bold, but I have seen other projects done in Hale Navy and love them every time.I think it’ll look perfect with the white and gray stenciled floor 🙂
Great tutorial. I need to paint two vanities, so this was a great post for me to read. Thanks, yours looks amazing.
Thank you! This one was definitely more steps than the previous one I did (with just satin enamel paint), but there are limited colors with those, and since I have to work with such a tight budget, I figured I would use what I’ve got.