Updating a bathroom often requires a lot of time and money, but when it comes to the $100 Room Challenge, both time and budget are limited. With that being said, taking on our outdated basement bathroom was definitely an challenge… but the results of this $100 classic farmhouse bathroom makeover are stunning. I can hardly believe how much we accomplished in just 3 weeks! See how the transformation unfolded below.
It’s reveal day!!! Honestly, this round of the $100 Room Challenge was the most challenging one yet. I typically walk in knowing my ideas will come in under the $100 mark… This time? I had so much I wanted to do that I truly didn’t know if I was going to be able to make it. As always, let’s take a look at where this basement bathroom started. Ready?
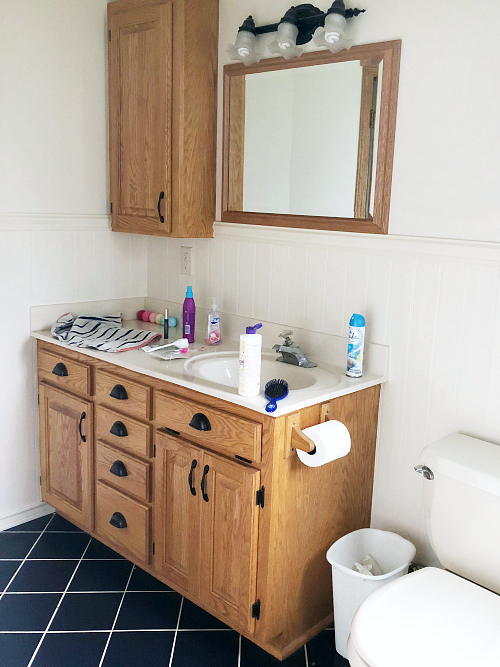
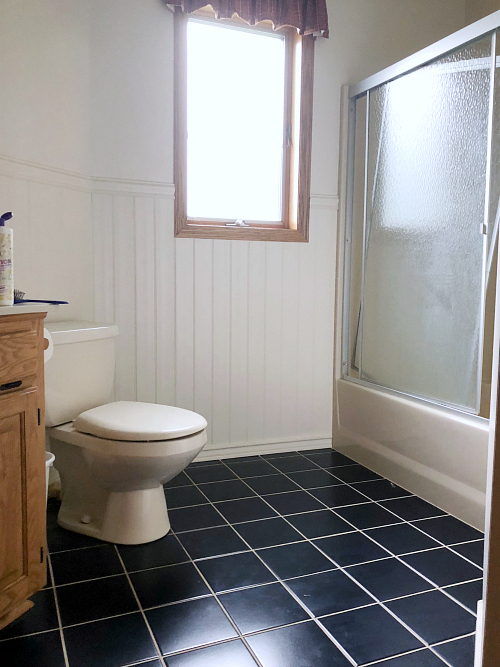
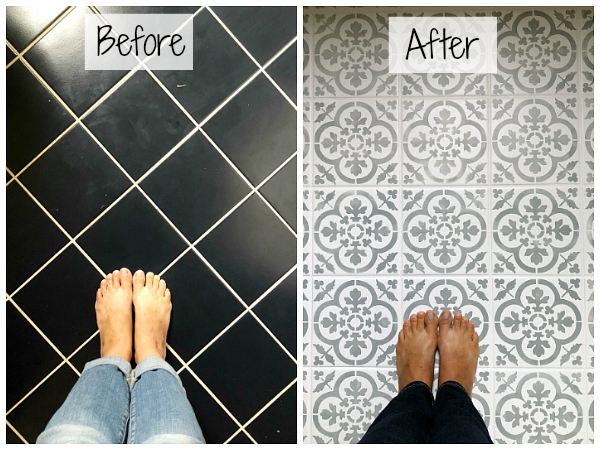
Here is what the bathroom looked like at the beginning of this challenge:
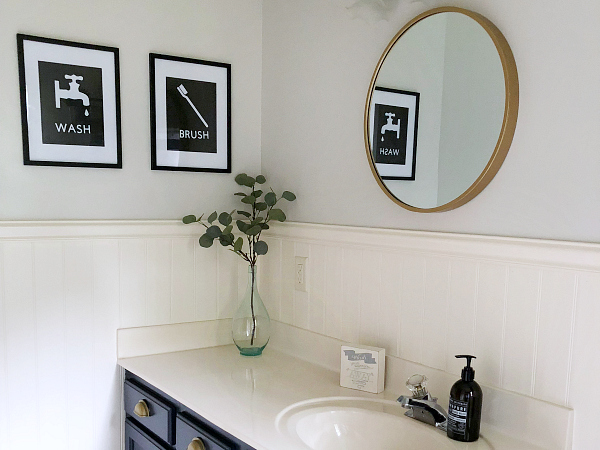
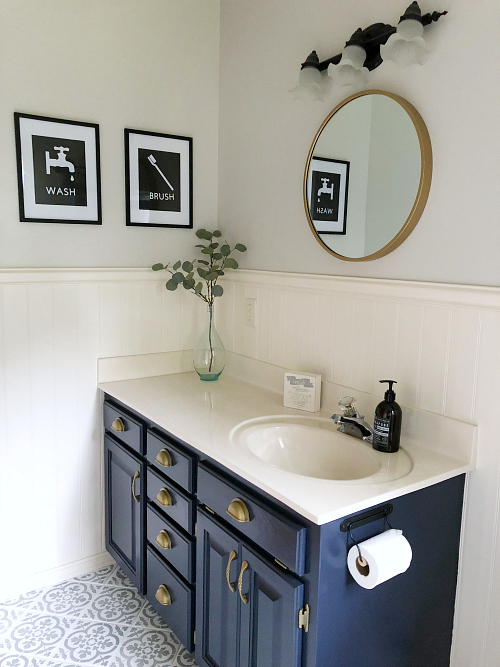
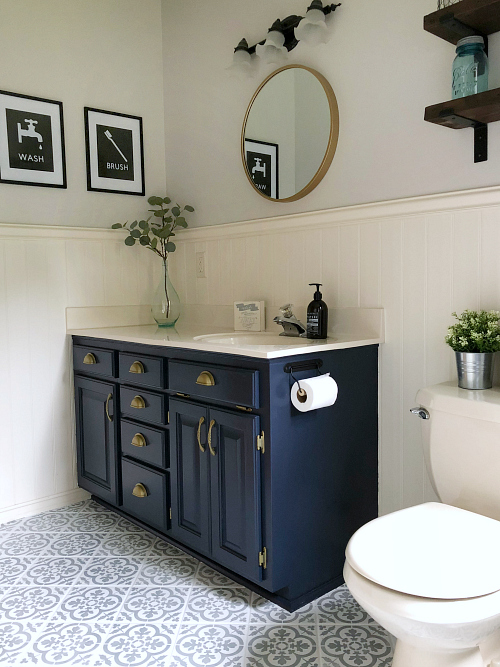
… and here’s where we ended up! (Drum Roll Please 🙂 )
Creating a Classic Farmhouse Bathroom for $100
Let’s take a look at how we got here. Below are the goals from Week 1.
Goal 1: Paint the Walls
This was an easy project. We had leftover Agreeable Gray paint that I used to paint the walls. If the budget had allowed, I would have also painted the chair rail and beadboard a brighter white, but nope. No money to spare, and I didn’t have any white paint I could use, so it remains a bit creamy. Oh well.
Goal 2: Vanity and Medicine Cabinet Makeover
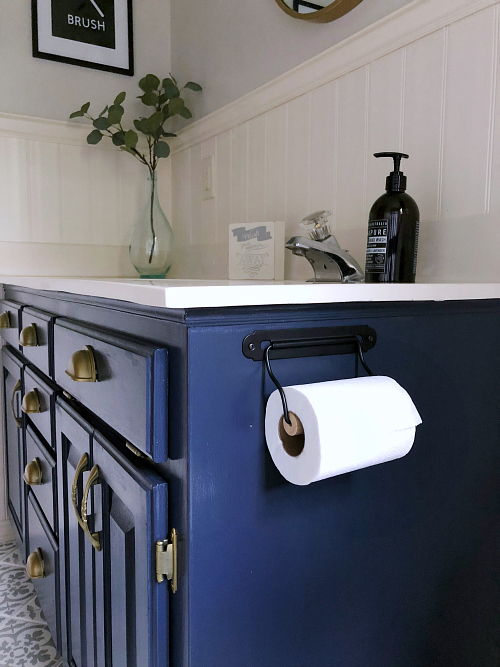
I wasn’t sure about the medicine cabinet. It looked awkward in the corner, but I feared removing it because it dipped into the chair rail, however, so many of you recommended removing it… so that’s what we did. And it was a perfect solution. I did drive around to 3 or 4 stores trying to find matching chair rail only to have my husband find some in a stash the previous owners had left behind 🙂 We removed the cabinet, installed the chair rail, and got it painted, all for free (as the previous owners also left behind extra paint from the bathroom). The vanity got a major makeover with leftover Hale Navy paint and Aged Brass spray paint. The navy was leftover from our entry, but I did have to buy the spray paint ($5.89). You can find the full tutorial for this vanity makeover HERE.

Goal 3: Stencil the Floor
This was the scariest project I did. I am nowhere near a professional painter, and I thought for sure I would mess up this floor. As you can see, it started out navy… but thanks to Cutting Edge Stencils, I got this floor looking like cement tile, and it cost less than $40. I plan to share an update on how this floor holds up (you can now find that update HERE). I figure if it chips or doesn’t hold up, it was a very small investment, and provides a short-term solution until we decide to install something different. You can find my tutorial on stenciling a floor HERE (or check out a real-time video of the progress in my Instagram Story Highlights.)
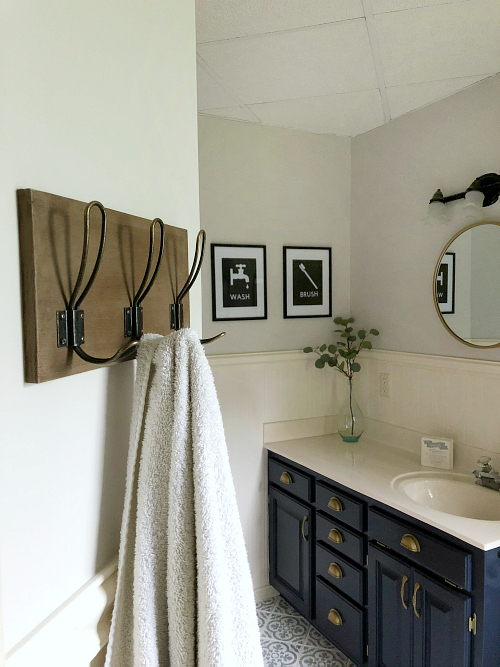
Goals 4 & 7: Fix the Shower Issue & Towel Hooks
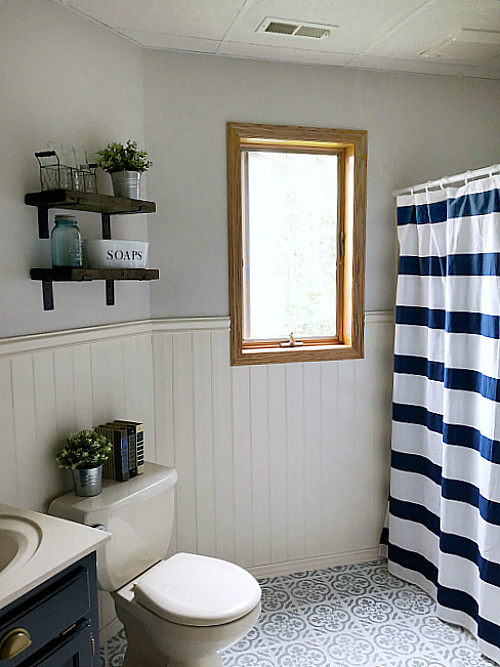
The door on the shower was broken, and at first, I thought I’d need to take the door off, but I was able to fix it, and then I covered the whole thing with a shower curtain because the yellow-y tub looked terrible. I bought the tension rod (on sale) at Target and used a shower curtain (also from Target) we already had. This bathroom also had nowhere to hang bath towels. Honestly, the walls are weird in here and don’t allow for many spaces to actually hang hooks. I ended up grabbing this little hook/wood combo I had made for our entry last year. Screwed it into a stud outside the shower, and done. Free.
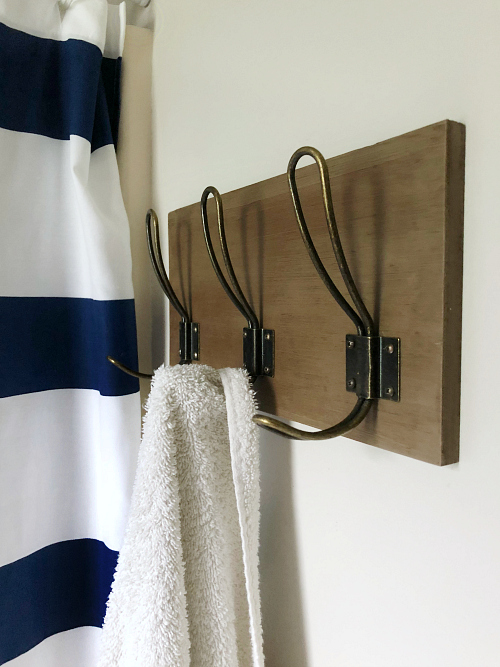
You can find similar hooks here.
Goal 5: Take Down the Valence
Done. I mean, does this need an explanation beyond that? 🙂
Goal 6: Update the Light Fixture
This did not get done. Trust me, I checked every Goodwill within a 30 mile radius for replacement globes, and I couldn’t find any that would work. I plan to buy new glass globes, but I didn’t have the budget to buy new for this challenge.
New Goals Along the Way…
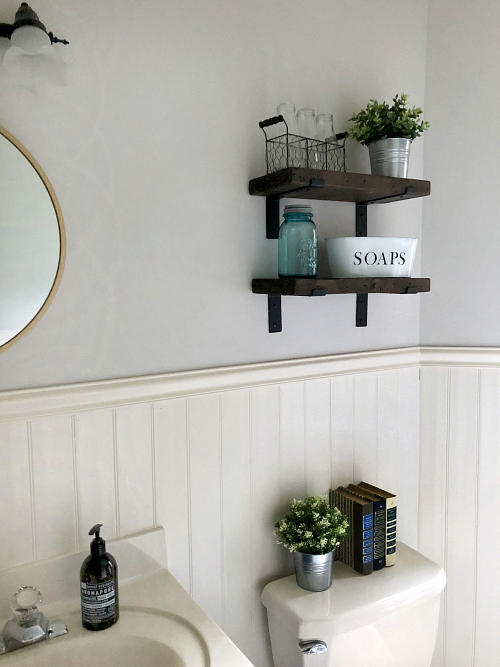
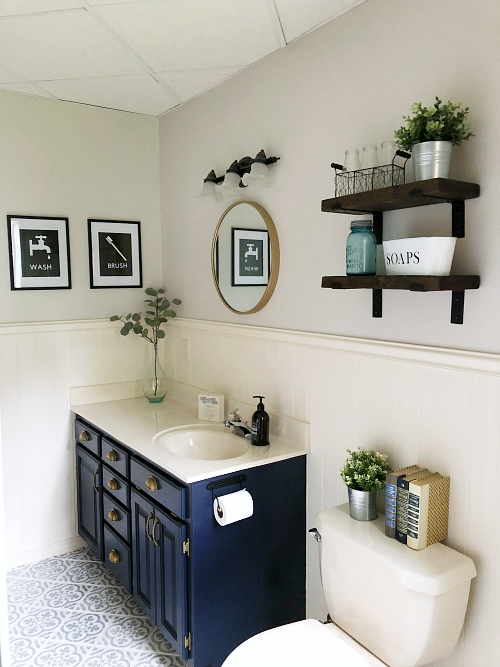
1.) Add shelving above the toilet.
We used wood we already had, and I bought the brackets from Hobby Lobby (on sale) for $3.99 each.
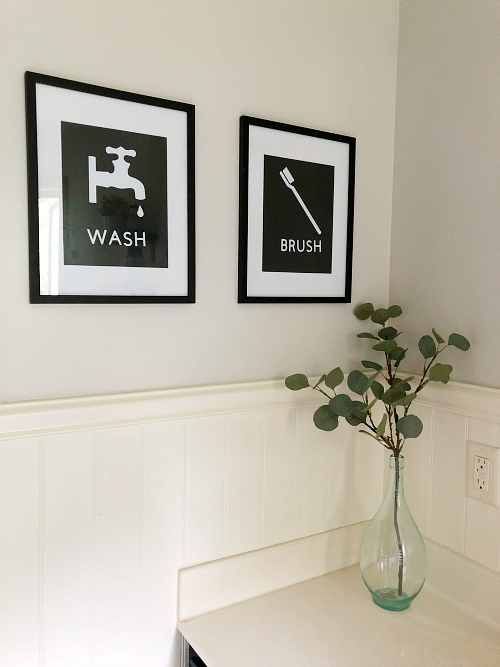
2.) Add Some Wall Art
I wanted to add something to the wall, so I grabbed a couple frames we already had (similar frames can be found here), painted the backing with chalkboard paint, and cut out the “Wash” and “Brush” symbols and words with my Cricut. Wall art done. For free.
3.) New Toilet Paper Holder
I didn’t realize how bad the previous toilet paper holder was until I took it down. It needed to be replaced. IKEA to the rescue with one for $3.99
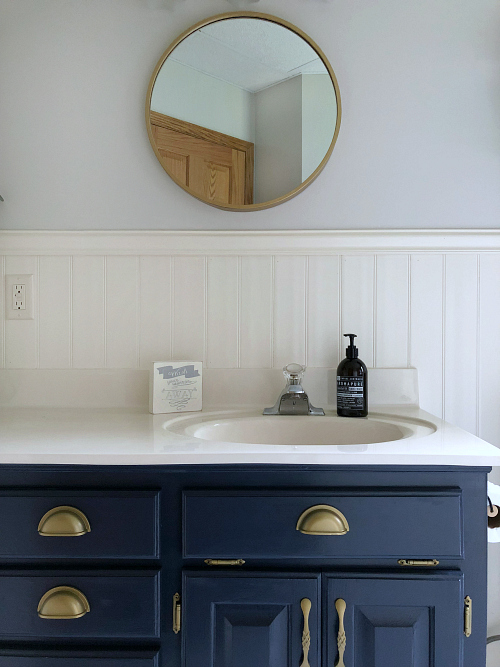
4.) Mirror
The previous mirror was not good. It just seemed wrong for the space. I literally looked everywhere for a round mirror that would fit the smaller gap between the light fixture and chair rail: Home Goods, Facebook Marketplace, Michaels, Target, Goodwill… Finally, I took a trip to At Home (my first time), and found the perfect one… and it fit the budget.
So… here’s the room all put together. I am seriously in love with this space. What started out as the worst room in our house, has become my favorite.
And some “Before and Afters”…
Total Budget
Last week, I had spent a total of $43.40. Here’s the breakdown for this week.
Shower Fix: $6.82
- Tension Rod for Shower Curtain: $6.82 (That was 20% off with Cartwheel, and another 5% off for using my Target RedCard).
- Shower Curtain: FREE. Already had.
Towel Rack: FREE. Already had.
Shelving: $15.96
- Wood: FREE. Already had.
- Stain & Supplies: FREE. Already had.
- Brackets: $15.96
Wall Art: FREE. Just used things I already had.
Soap Dish: Spray Paint $2.95
Mirror: $24.99
Toilet Paper Holder: $3.99
I also bought a foam brush to apply the Polycrylic to the floor: $0.94
Total for this Classic Farmhouse Bathroom Makeover: $99.05!
Wanna Catch Up?
Week 1 // Week 2 // Week 3 // Week 4
Love it? Pin it!

How did the stenciled floors hold up?
You can find my one year review here 🙂 : https://www.lemonslavenderandlaundry.com/how-well-does-painted-tile-floor-hold-up/
I’m curious how the stencil flooring held up as I’m thinking about doing this in my bathroom.
You can find my review (after having them for a year) here: https://www.lemonslavenderandlaundry.com/how-well-does-painted-tile-floor-hold-up/ Hope that helps!
This 100 dollar make over is extremely miss leading. It only cost you a 100 because you had all the left over material laying around. If you had not had all the material there is no way you could achevie this for a 100 dollars.
One of the questions I am often asked when people join this challenge is whether they are allowed to use materials they already have… and my answer is always “YES! Of course!” That is part of doing things on a budget. One of the tips I always share is to shop your house to see what you already have that could work in the space you’re redoing. While I had things sitting around my house (unused) that ended up working in this bathroom, allowing me to keep my cost under $100; others also have things lying around that they could reuse. Maybe I have leftover paint that allows me to redo a vanity for $6, but someone else has leftover tile they could use that’s leftover from a kitchen reno they did a few years ago. And yet others have a cute rug they were using in their bathroom that would work better in their laundry room. So while, yes, if you did exactly as I did, you may end up spending a bit more, you probably also have a few items around your house that I didn’t have and that would affect your cost as well. Using leftovers (like paint) not only keeps it out of landfills, but also allows you to save a lot of money when making over spaces in your home 🙂
You were so graceful with a snarkey comment.
Now, I’m doubly impressed!
Nice job!
Thank you for taking the time to post the pics, price breakdown, etc 🙂
The only thing left besides those bulbs is a new faucet but you pretty much got everything else covered! But $100 is $100 lol and you killed it!
I agree, I’d have been much more impressed with $100 bathroom makeover if the majority of the materials weren’t stuff already on hand.
I can completely understand what you’re saying, and as I stated above, shopping supplies you already have on hand is part of what allows people to do things on a budget. Many believe they need to buy everything new instead of checking their home/garage for things that might work in a space. Even if I had to buy everything for this bathroom, and use nothing I had on hand, it would probably only add $25-50 ($25 if you shopped garage sales/Goodwill for frames and checked the discounted wood section at your hardware store, selected paint from the “oops section” or got it free at your local recycle center, etc… $50 if you literally bought every single item new).
Awesome basement bathroom makeover. I’m still too scared to stencil a floor. I thought of an idea about the globes, what about replacing them with some cool bare bulbs? I’m into the industrial look right now and starting my makeovers today. You are brave and talented.
Wow. This is nice. Very creative.
This is INCREDIBLE! Your bathroom turned out beautifully! My favorite is the vanity with the painted hardware – it looks so so good! And that black and white word art really makes a bold statement – love it! Thank you for hosting another wonderful challenge and allowing me to participate. I always have the best time and love seeing everyone’s hard work and creativity pay off!
I just love how your bathroom turned out Erin! So glad you decided to remove that cabinet! 🙂 I really want to tackle some painted floors so it was fun to follow along as you did yours in stories and on your blog. Thank you so much for creating this challenge – it really is so fun and so rewarding to end up with a beautiful finished space for $100 or less. Can’t wait till the next challenge!
Your bath turned out so good Erin! I really like all of the wood accents with the shelves and hooks. Thanks for hosting this fun challenge!
It looks SO good!!!! All the heart eyes. Love the diy art!
Erin, this is amazing! Such a difference! I’ll follow up with you if your stencil holds cause I’d really like to do the same to the bathroom I did for my first 100$ Room Challenge!
Erin, this turned out so great! I love the pop of color with the vanity and the beautiful stenciled floors! Another terrific makeover 🙂
This looks so much better Erin. I really love the blue on the vanity and of course the stencil is amazing!!! Thanks for hosting!!
This is fabulous! I’m always amazed at what can be done with $100. I wasn’t able to participate this round, but I will certainly participate in January.
Oh my goodness, I just can’t get over the difference in this room! I love the colors, love the cabinet hardware in brass, love the mirror. But that stencil! Talk about a game changer! It’s all just absolutely gorgeous!
What a great change! Definitely taking the cabinet out was a good call. Love the end result.
I love this Erin! I love the navy with the pop of gold…then those floors are stunning (all the heart eye emojis for them!) 🙂
Fantastic job Erin! Wowsa!!!
Erin you did an amazing job! I love how the floor came out, and the vanity!! The paint colors and details like the hardware make such a difference!
It turned out amazing! You seriously did an amazing job on the floor!
An amazing, amazing job, Erin! Love the navy and that stenciled floor!!! Gaaaah! Congrats on a great makeover. ~~~ Susie from The Chelsea Project
The bathroom is beautiful! Honestly, I think the beadboard and chair rail look fine more of a creamy white because it appears to be about the same co,or as the countertop on the vanity. $100 well spent. and the floor is awesome!
Your bathroom turned out great!!! I love what you did!
Love your floors! How have they held up? Can you post updated pictures?
Fantastic! SUCH a huge difference Erin, great job!
Wow this basement bathroom turned our AMAZING that farmhouse tile stencil really made a big different in your flooring which transformed the entire room. Love the navy cabinet, those cute printable’s and the new gold mirror too. Great job my friend, so glad to be a part of this amazing group!
That turned out beautifully! So glad you decided to take down the medicine cabinet – that makes such a huge difference.
Loved participating in the $100 Room Challenge along with you this month!
Erin, this bathroom transformation is amazing. I love navy and gold together and it looks so bright and beautiful! Your work on the floors paid off and they look perfect. You have done a great job as always. Thanks for organizing this challenge.
Wow it turned out amazing Erin! I love how the floors pop against the navy cabinet!
It looks so so good Erin! I love it!
It looks so good! The floor is my favorite but the whole room came together so well.