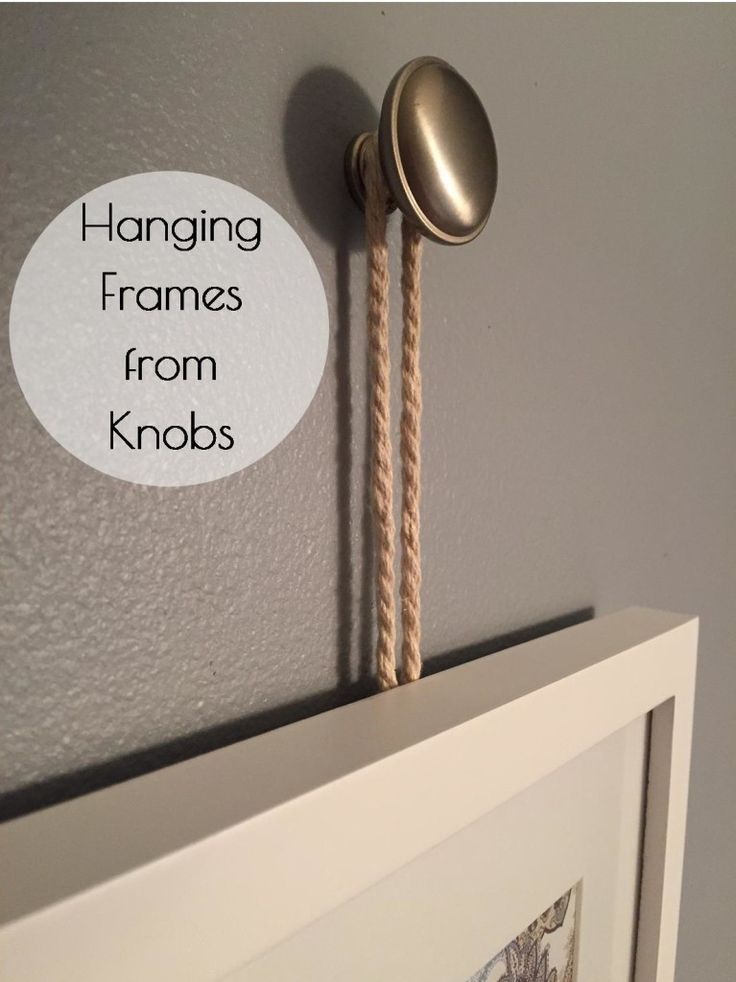
Looking for a fun way to hang pictures and artwork in your home? This creative idea adds a little twist to the usual. Instead of using nails, try hanging frames from knobs using rope. It’s a unique way to display your wall decor.
I wanted to hang some “art” in our powder room (and by “art”, I mean framed scrapbook paper), but I didn’t want the typical “pound a nail in the wall, hang the picture” look, I wanted something different. I started to brainstorm and came up with the idea of hanging the frames by a rope from drawer knobs. There was a lot of trial-and-error, so I thought I’d share my experience… that way you can skip the “error” part and just have the lovely end result.
What You Need to Hang Art from Knobs
Affiliate links may be used. Please see our advertising disclosure for more information.
- Picture Frames (I wanted white gallery frames, and after looking everywhere for them, I finally found these at Walmart.)
- Cord Rope
- School Glue
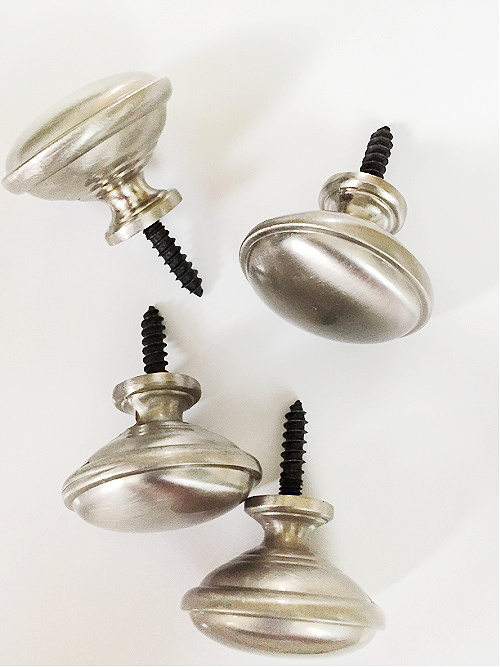
- Knobs
- Hanger Bolts (These are basically screws that have the thread you need for your knobs on 1/2 of the screw, and drywall thread on the other half)
How to Hang Frames from Knobs
First, I had to figure out a way to attach the rope to the frame so I could hang it. I started by screwing “screw eyes” into the top of the frames, but some of the frames started to crack (not good).When I tried going with a smaller “screw eye”, they would break off as I was turning them.

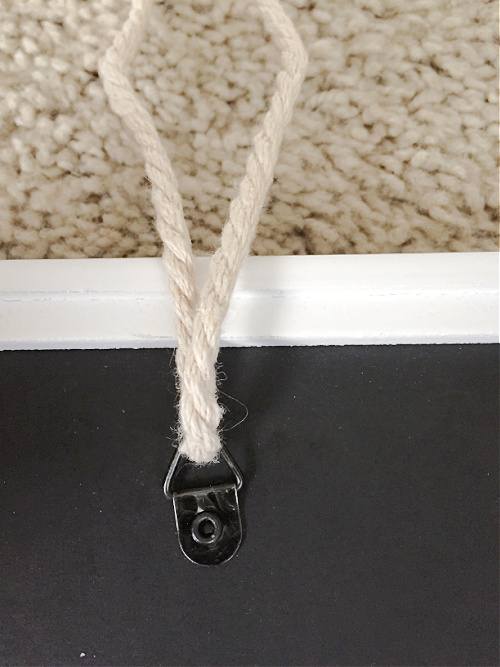
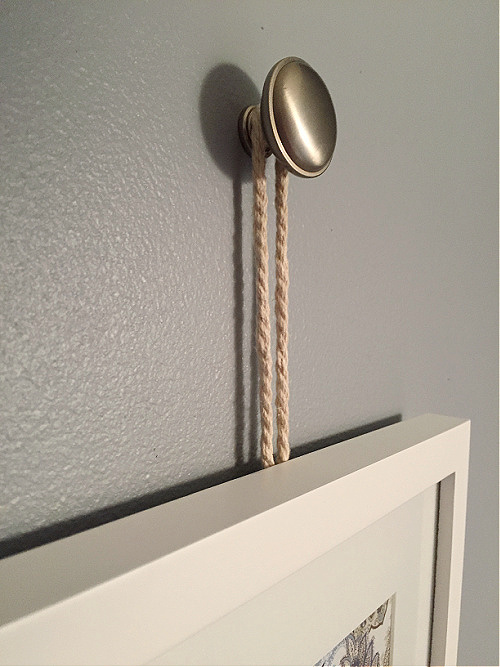
I scrapped that idea and decided to loop the rope through the hanger on the back of the frame.
Simply thread each piece of rope through the hanger, then tie a knot to form a large loop.
I was hanging multiple frames, so I made sure to cut each piece of rope the same length. (For reference: I used 14 inches, but you can make it longer or shorter depending on the look you want).
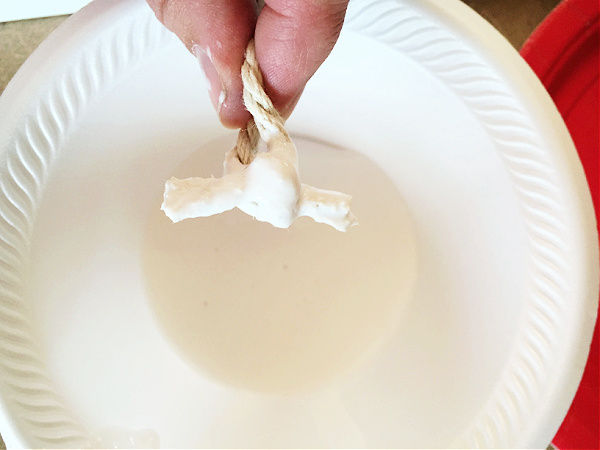
Once all the loops are even, trim the ends and dip the knots in glue. Then allow the glue to dry. This is done so the rope doesn’t unravel and the knot stays tight.
Once the glue is dry, slip the knot to the bottom of the loop so it’s covered by the frame when hung.
Next, screw each knob into a hanger bolt.
Measure out where you want to hang your frames so you know exactly where to place the knobs. Once you have that mapped out, screw the hanger bolts into the wall. I found it helpful to pound a nail just a little bit into the wall as a starting point for the screw to turn into.
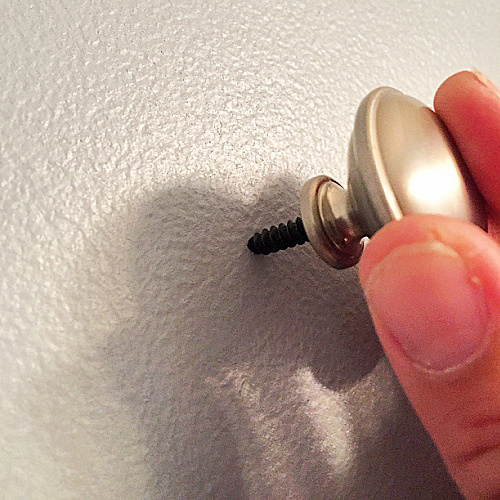
Remember that you can always adjust the rope to shorten or lengthen the frames, but you don’t want to move the knobs once in they are in place… unless you want to fill and paint the holes 🙂
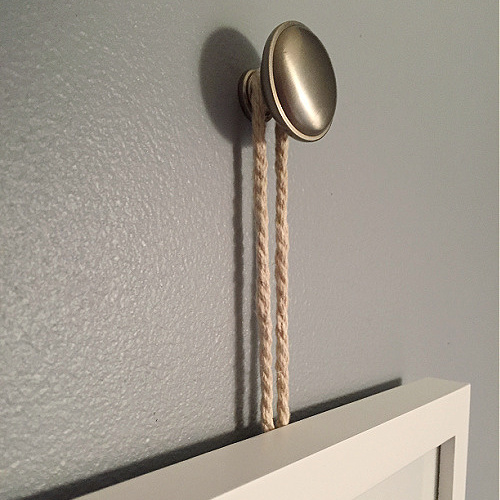
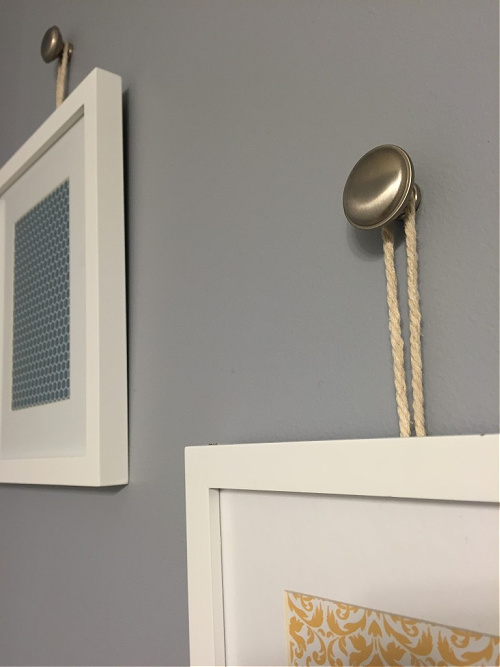
With the knobs in place, simply loop the rope around the knob to hang the frames.
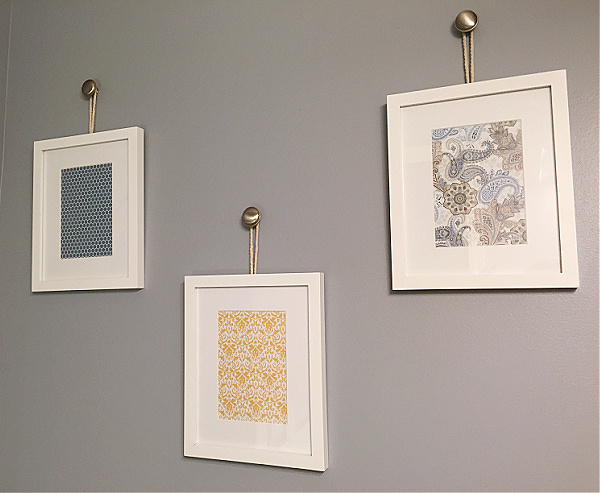
And here’s the finished project!
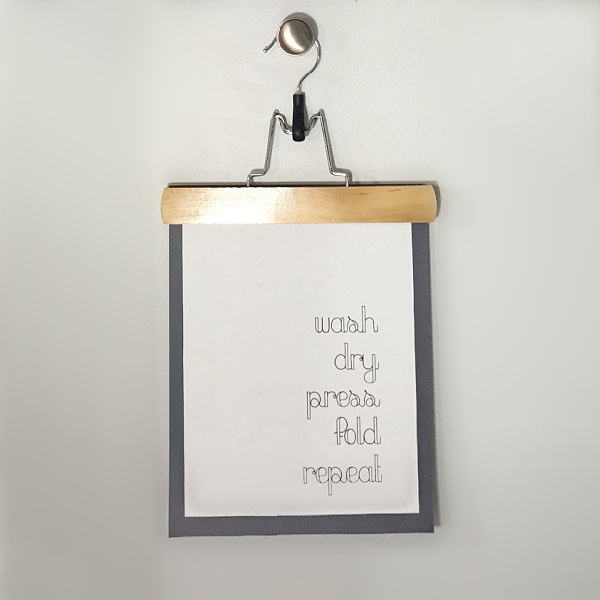
I ended up loving this unique way to hang artwork so much the I replicated it in my laundry room, but instead of using rope, I used wooden pants hangers 🙂
We think you might also love these ideas!
Budget-Friendly Accent Walls | Chalkboard Sign… From Cardboard | Dollar Store DIY: Vintage Clipboard Gallery Wall

Love it? Pin it!
Hi! Did you just force the knobs into the wall, or did you use an anchor of some sort? I do all the purchasing/planning and my husband does all the hanging (he’s a perfectionist and I’m much more of an eye-baller). Anyway, I can just picture him hesitating to hang a frame on a knob on the wall without it anchored into the drywall – in fear that the frame is too heavy, leading to it pulling the knob out and damaging the wall.
As mentioned in the post, I used hanger bolts for inserting the knob into the drywall. Half the “screw” is threaded for the knob and the other half is a drywall screw, meant to secure into the drywall. I just used a hammer to get the screw started, and then twisted it into the wall by hand. I have had these frames hanging for almost 2 years and have had no problems at all. I would certainly not recommend hanging anything extremely heavy from the knobs secured with the hanger bolts, as this may be too much for it to hold, however, regular frames should be light enough, and wouldn’t cause the knob to pull out.
What a wonderful idea. I have knobs, just need the hanger bolts. This idea of yours is so helpful in that you especially explained where you got your materials. Thanks.
You are so welcome. This little project was so easy to do and I love the way it turned out. Good luck!
What an easy and creative thing to do! I have always loved hanging things from knobs on wooden boards and things like that- but had honestly never thought of doing a frame directly from the wall! There are so many fun knobs out there- the possibilities are endless! Thanks for sharing!
What a simple and neat idea! I love it! There are so many fun knobs out there! This would be a great project. I am specifically thinking about my little 3 yr old girl’s room 🙂 Thanks so sharing! Got my imagination going now!
I want to do this in my daughter’s room too! There are SO many knobs to choose from and it’s so easy to do! Happy to provide a little inspiration! Enjoy your Sunday!
That’s such a nice, clean look. Easy, too. Thanks for sharing your process and end results!
Absolutely- Thanks for stopping over and leaving a comment, they sure make my day! Have a wonderful day Kim!
I didn’t know about those special screws. This is a fabulous way to hang stuff.
I didn’t know about the screws either. I just told the man at Home Depot what I was trying to do, and he pointed me towards these screws. It was extremely easy to do. Enjoy your day!
Hello Gorgeous! This looks incredible! Thank you so much for sharing it with us. Pinned and tweeted. I hope to see you tonight at 7 pm, so we can party with you! Lou Lou Girls
Thanks for stopping over! And thank you for hosting! Have an amazing day ladies!
This is such a great idea! I don’t think I would have ever thought of this!
Visiting from the DIY Sunday Showcase link party! Have a great week!
Kate | TheOrganizedDream.com
Thanks for stopping over Kate! I’m not even sure how I thought up the idea to hang frames from knobs, but I wanted something a little more classy for this space and I’m so glad I figured out how to add a little something different with the knobs. Hope you enjoyed your weekend!
So simple and elegant!
Thanks Brandi! Enjoy your weekend!
This looks great! What a nice idea!
Thanks- such a simple addition to create a little something extra in a room. Have a wonderful day Katrin!
What a great idea…super cute! Thanks for sharing at the #HomeMattersParty – we’re looking forward to what you have to share next week. 🙂
~Lorelai
Life With Lorelai
Thanks Lorelai! And thank you for hosting and letting me know about your party! Enjoy your day!
Hi there. Stopped by to let you know that I picked this as my favorite link up from last week’s Teach Me Tuesday linky party. It will be featured at this week’s party.
Thanks so much for linking up with us!
Have an awesome week 😉
Thank you so much Bobbi! It is a honor to be featured! Glad you enjoyed the post. Hope you enjoy this Memorial Day!
This makes it easier to “level out” the frames. All one has to do is adjust the length of cord, which sounds easy to me. 🙂 Great tutorial.
Thanks Audra! There are so many endless possibilities for what you could do with this project. Have a lovely weekend!
What a great idea and such a modern look for your home. It makes evening up the pictures so much easier too. Thank you for visiting and sharing with #AnythingGoes.
Thank you Sandy!
What a fabulous idea! I’m definitely going to use this. Thank you for sharing with us at #AnythingGoes.
Such a fun twist instead of using a nail. And there are so many knobs from, classy to colorful to rustic… you could do so much!
I really like the way these look! It’s nice to change something we all tend to do the same way. Thanks for sharing at The Creative Circle.
Thanks for stopping over Kathy! And thank you for hosting!
What a pretty treatment – great tutorial! I’d love it if you’d share this at this week’s Awesome Life Friday Link Up!
Thanks for the invite over to your linking party. I just added the link. I’m very new to the blogging world, so I’m just learning about all the linking parties out there. Thanks for stopping over Lynda! Have a good weekend!
What a great idea- so cute!
Thanks Christina! I was such an easy way to add a little flair to the room. There are so many cute knobs you could use… thinking of doing something like this in other places around the house now… like my kids’ rooms! Hope you have a wonderful weekend!
What a great idea! Love this:)
Thanks Jackie! It’s so simple, but can add quite a statement.
What an awesome and easy idea to really give a room character. Can’t wait to try this!
Thanks so much for linkingup at MeetUp Monday! Hope to see you tomorrow too!
Krista
(www.thequinntessentialmommy.com)
This really was a super easy way to add to a room! I’m hoping to do this in other rooms too as there are so many fun/cute knobs out there. Glad I found your linking party, and I’ll link up again tomorrow. Have a wonderful evening. Hope you enjoyed your Mother’s Day!