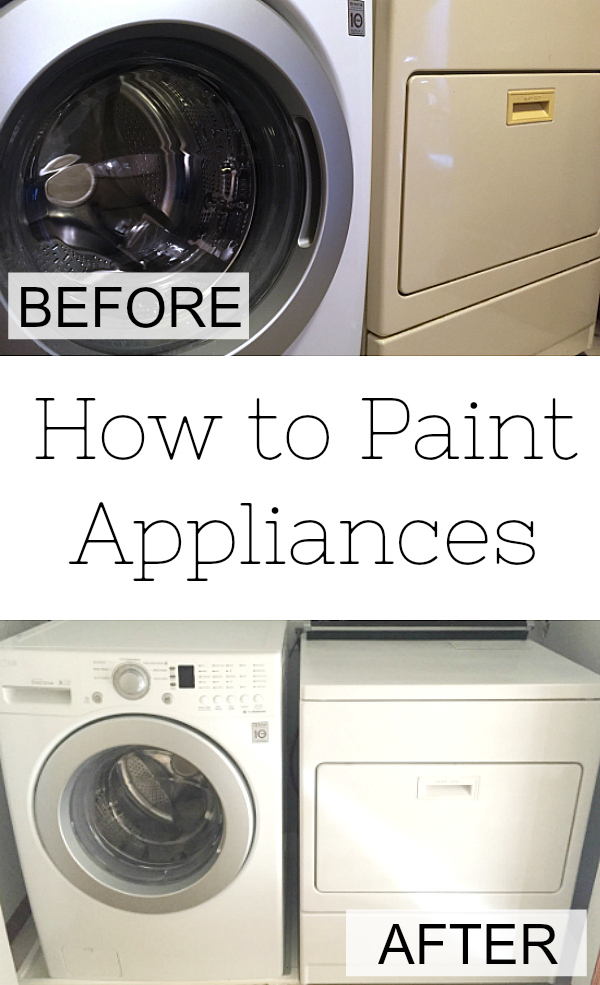
When our washing machine died, we had to make a choice: either buy a washer and dryer (despite the fact that our dryer worked just fine) or live with a mismatched pair. Little did we know at the time, there was a third option available to us. Paint the dryer to match the washer! It was such an easy process (aside from hauling the dryer up and down the stairs). Here’s a full tutorial on how to paint appliances.

As you may (or may not) know, I am working on making over our laundry room for the One Room Challenge… with a $100 budget… and it just wouldn’t be a challenge without hauling the dryer up and down the stairs to paint it, right?
I’m going to walk you through the process of painting our dryer step-by-step… and tell you all the lessons I learned along the way. I’ll end with my honest review of the product I used to paint the dryer. (*This is NOT sponsored.)
Here’s Where We Started…

Ummm… what can I say? The washer and dryer don’t match. If you want the story behind the mismatched pair, you can read about it here.
While the dryer was still upstairs, I thoroughly cleaned it, both inside and out. We then got some help moving it down to the garage. (Remember to put the appliance on tarps so you don’t paint your garage floor.)
How to Paint Appliances
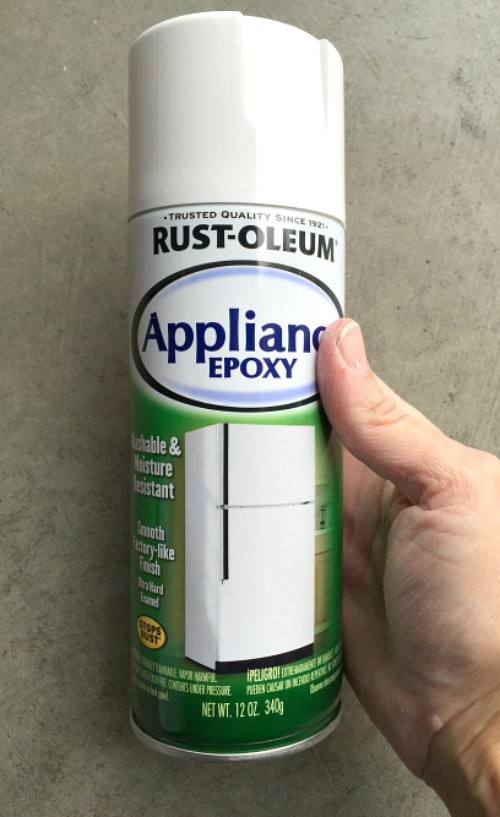
I bought a can of Rust-oleum Appliance Epoxy.
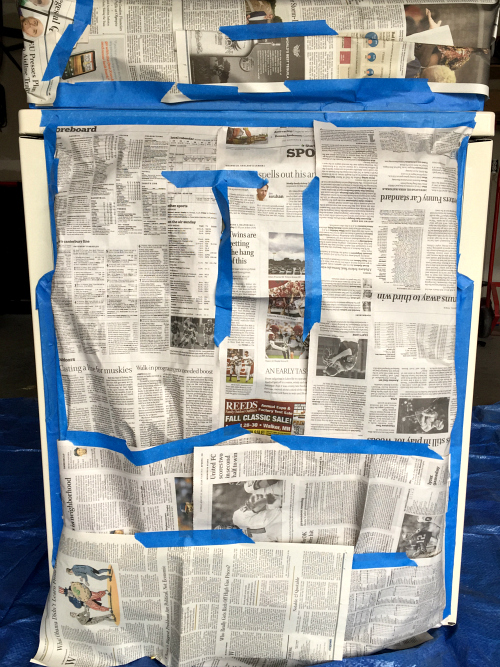
I then covered the back and top of the dryer with a combination of newspaper and painter’s tape. While I would love nothing more than to get rid of the dark brown control panel, it has all the settings marked, so I can’t.
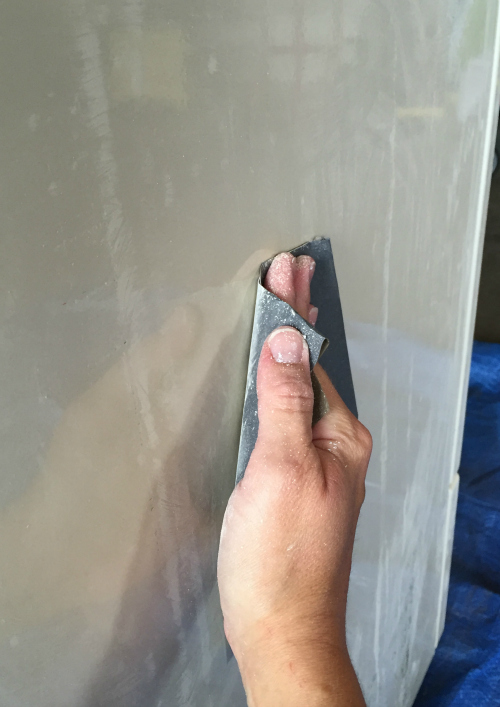
The next step was lightly sanding the dryer with fine grit sandpaper…
Lesson 1: I would NOT recommend doing this! I did it because the directions say to do it, and I’m a rule-follower. However, there was a small strip I forgot to sand down on the back and the paint looks bright white and glossy. Over the parts I sanded, it’s more of a matte finish and not nearly as bright.
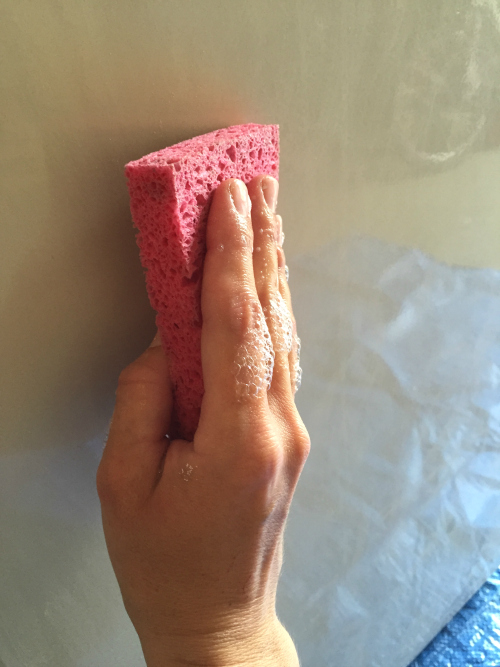
Whether you decide to sand or not, thoroughly wipe down the appliance with soapy water to remove any dust and dirt. Then allow it to dry.
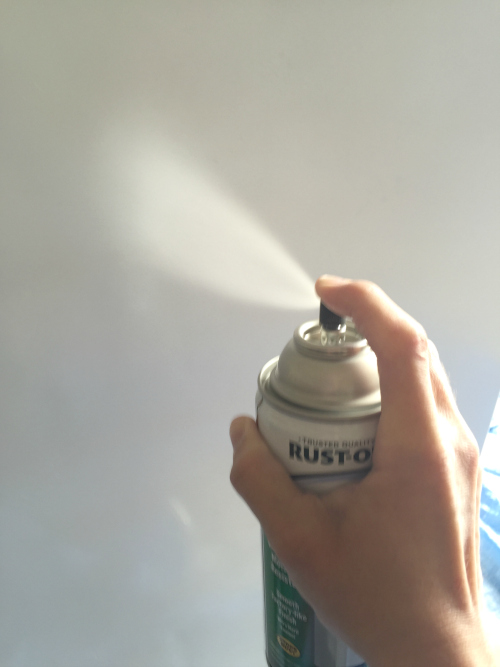
Let the painting begin! First and foremost, make sure you are painting somewhere with good ventilation. Shake the epoxy paint can for 1-2 minutes, making sure the balls are rattling to mix the paint. Start spraying in sweeping motions back and forth across the surface.
Lesson 2: The can of paint states that you are supposed to spray continuously as you sweep back and forth, but when I did this I would get little drops of paint splattering out versus a mist (see image below). I found it worked better to do one sweep across, stop spraying, and do another sweep across right under the previous sweep.
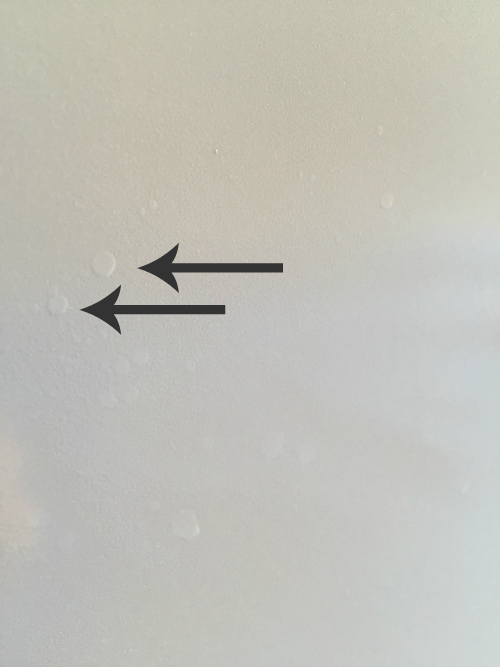
After painting the entire dryer, I let it dry for 24 hours. I noticed there were a couple spots that needed touching up, and I thought the whole thing could use one more coat, as there were areas that didn’t look quite as white. While applying the second coat, I noticed this happening in a couple spots ↓ ↓ ↓

Well, that stinks! I tried wiping off the paint, and not only did the wet layer of paint come off, but the first layer came off too. When I tried going over it with the paint again, it would just continue to bubble. I realized I needed to stop trying to fix it and allow it to completely dry for another 24 hours, sand it down, and start over. I did a little research, and found I was not the only person that had this happen when applying a second coat of paint. One person on Amazon recommended applying Weldbond, which would adhere to the dryer and you would essentially paint over the layer of Weldbond instead of the dryer. It seems trying to paint over the same area on the dryer results in continued bubbling.
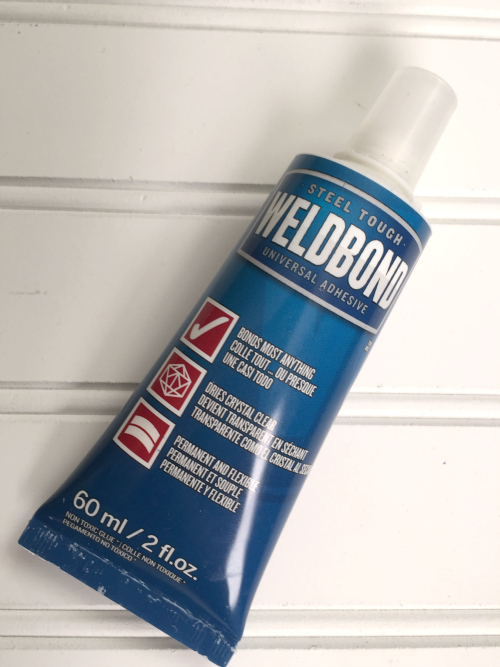
After the paint had completely dried, I sanded down the areas where the paint had bubbled and applied the Weldbond. I allowed that to dry and then sprayed over it with the epoxy paint. While the paint did stick to the Weldbond (no bubbling), the surface isn’t smooth. So, I’ve got a couple uneven spots on the dryer.
Lesson 3: If you don’t need a second coat, avoid it.
Lesson 4: If you do get bubbling, don’t go wiping off the paint and trying to fix it right away. Let it dry completely (24+ hours), then sand, apply Weldbond, and repaint. I think wiping it down and trying to fix it in the moment attributed to the less-than-smooth surface I ended up with.
My husband and I got the dryer up the stairs and reattached the gas line and vent. Can I just say, I have never been so excited to do laundry!
Lesson 5: Laundry continues to pile up, even if your dryer is out of commission.
Here is what the washer and dryer look like now… the “after picture”:
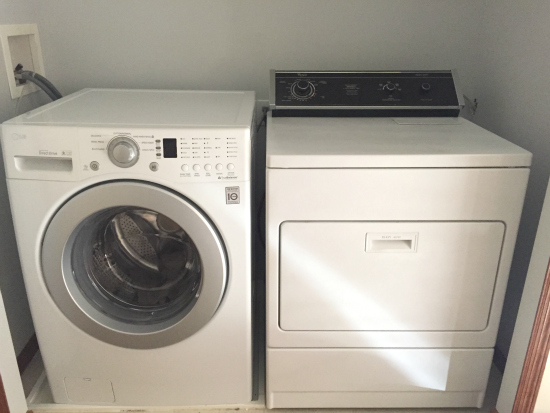
SO much better!!! And being that it’s a bright, sunny morning, I even got enough natural light to take this picture without the yellowy lighting!
My Review Of Appliance Paint
I would give this product 3 1/2 out of 5 stars.
Pros
- The cost of painting the dryer with 2 cans of paint and Weldbond cost me $9.51. This sure beats buying a new dryer.
- The white paint actually matches the washer. In the garage, it still looked a little creamy, but once upstairs next to the washer, I realized it was a great match.
- The total time I invested in painting was about 90 minutes (this included hauling it up and down the stairs, covering it with newspaper/tape, and painting). Super fast. Super easy.
Cons
- Not a fan of the paint splatter that happened from time to time.
- Hated that the second coat bubbled in some places, resulting in an uneven surface.
Overall, I would absolutely do this again, and with the lessons I learned the first time around, I think I would be able to avoid some of the “cons”.
The Budget So Far
- Appliance Paint (x2 Cans)- $7.52
- Weldbond– $1.99
Total So Far: $9.51
Wanna Catch Up or Jump Ahead?
Week 1 // Week 2 // Week 3 // Week 4 // Week 5 // Week 6
Love it? Pin it!
Just came across your post and I’m curious how well the paint job has upheld over time. Does it still look nice?
I am currently renting and my fridge looks like it has a virus. Was going to paint but since ventilation is an issue am not going to do it. However, did enjoy reading about experience and the tips and tricks. Never knew about Welbond, but do now. For my fridge that has the “virus” look. Gonna wallpaper instead. Just the bottom half of the fridge. Cheers.
Thank you !! My 12 yr. old microwave is definitely yellowing. One side faces the sun all day & the other isn’t great. I don’t fry food but we do smoke. I’m always aware of nicotine so I do wipe things down. Old things like mopping the floor after supper, putting trash out, etc. are things Mom did & now I do. She had a white fridge, harvest gold came in & had it professionally painted (try & find someone today). I wipe it every night, inside & out as well as the fridge & stove which are almond. It really hit me in the face the other day on how it had become. I tried everything – vinegar, homemade stuff from Pinterest (note I never found an answer to this), bleach, bathroom cleaner (it’s my go-to for lots of things) & it’s worse. Usually plastic will yellow – any plastic on mine is still white. I’m not a painter but ready to get some white spray. You just did it all for me. I would have gone for reg. spray. Now I know better. Warm weather and I’ll be out and cleaning up this mess. Thanks for the tips – I would have done the same thing lol…
Two things you did incorrectly, per my experience and technical advice given to me directly by
Rust-Oleum and is written on can if you look for it in the instructions:
First the splattering was caused by you painting too close to the appliance. The spray nozzle must be 12-16 inches from surface. You were spraying 3-6 inches which is way too close.
Second: The bubbling of paint after applying second coat was due to you not waiting the manufacturer recommended 7 days, YES 7 days before applying the second coat. If you do not initially apply a second coat within 30 minutes of first you have to wait a whopping 7 days to apply a second coat. If you sand the surface on day two then you have to count 7 days from the date you sand the surface. This has to do with the drying agents in the epoxy that are susceptable to shrinkage and if not properly dried properly will cause a second coat to bubble.
Thank you for taking the time to write this!
I loved your review about the dryer painting experience. I laught a lot… I’ve used that can of paint before on a dryer too, but it was just to cover over spots that had yellowish… Since I’ve tried to get away easy with this job, thinking it was only a very old dryer but in excellent condition, I didnt sand anything… Basically, just spray over some spots… It came out just like new… I was quite please….
Since I’m an old 73 years gramma, I went the easiest and cheapest way and luckily, it came out better than expected.. Have to say I haven’t repainted the whole dryer, but the match is perfect…
Here in New Brunswick, Canada the weather have been nasty and late…and I more feel like singing… Rain, rain…go away…. Leave my heart a sunny day…
Thanks again for the review,
Diane
thank you very much. I want to repaint only the front of my old white ‘fridge. your advice is excellent
Thanks for sharing your experience with Rustoleum Appliance Epoxy. I noticed it now states on the can that a second coat may be applied within 30 minutes or after 7 days.
January 2, 2019
Hi Erin,
I love your finished project, great job! You are a Pro with all the hard lessons and thank you for sharing your knowledge with others.
I will tackle my changing the color of my appliances in the laundry room soon because of a move, from a red to a grey color (not stainless).
Thanks for the inspiration.
Warm up the spray can to prevent splatter and bubbling. Put can in a bowl with warm water.
Paint will spray smooth and silky.
Cool post! I’m about to spray my microwave copper to match my kitchen 🙂 I got that bubbling too on the baker’s rack I did….going to sand it and repaint those spots, but I wanted to ask, what do you think would happen without the wellbond primer? There was a base layer of Zinsser primer sprayed on before the copper spray paint. Does it really make that much of a difference?
First off, love the idea of a copper microwave! Sounds like it’ll look amazing! Here’s the deal with the Weldbond. I would NEVER put it on the entire appliance. I would only use this in a spot that had bubbling. The issue with the bubbling comes from the paint not adhering well to the surface, and the Weldbond is going to create a better base for that paint to adhere. If you already put on a base of primer, I would think that would do the trick. However, IF you get bubbling, the Weldbond would help in that spot. Hope that answers your question.
I love this review! I have RED appliances — and since they’re not super old and still work fine… replacing them would be out of the question. Oh, and I’m redoing the laundry room… they are going to clash like nobody’s business! I’d like them to NOT be red so I did a little digging on maybe painting them. Still not sure but I think you’re right…for the investment (and, frankly, who’s going to get up in your business looking at your washer/dryer to see how expertly they’re finished? If they do that, they really need to find a new hobby, right? LOL) I think this is great — LOVE the tips… love the write up! Great job!
Thanks April! I completely agree. I don’t think one person has commented on the weird little blotches where the paint didn’t quite work. For the price, it definitely beats buying new appliances. Whatever you decide to do, good luck with your new laundry space!
I’m doing the same but I used duck egg blue chalk paint with a slightly darker blue for handle & trim. It’s under cover but outside ( I live in Spain) but the area does get a little damp on winter evenings. So far it look great. Two coats of chalk paint & im now thinking of putting a chalk varnish to finish – before I do, has anyone got any other suggestions on a finishing product? Many thanks. Kathy
Thanks for sharing your use of chalk paint. I’m so glad to hear it worked so well, and I love that you used fun colors. Sorry, I have no suggestions on finishing products though. I have yet to try chalk paint.
I’m about ready to do the same thing; I’ve already bought two cans of the same paint you used. Both our washer and dryer are already white and they still work fine, but they’re old and look dingy now that we’ve painted the utility room white and installed new white and gray laminate flooring. Your dryer looks just like ours. Question: the dryer door’s pull handle is quite yellowed and, I believe, is plastic. Your “before” picture looks the same as mine (yellowed). Did you use the same epoxy spray paint for the handle or buy another paint designed especially for plastic? Also, did you remove it or spray it in place? I’ve only given mine a quick once over and don’t see how it can be removed, but I’m curious. Like you, I also bought a sanding block (80 grit) to go over everything first because the paint manufacturer said to. After reading your blog, I think I’ll skip it except for areas showing minor rust damage on the sides of both units. I don’t believe we have any chips and I really want as glossy a finish as I can get because the back splash on an adjacent wall is a high-gloss white tile. I hope you can get back to me. I found your post most informative. Thank you.
Great questions! The handle on my dryer is, indeed, plastic, and I just used the same spray as I did on the rest of the dryer. We did move our dryer out to the garage for painting as ours is in a tight closet, and I wasn’t sure about spraying those fumes indoors. I would read through the instructions on the paint can to see what it says about spraying indoors.
Let me know how it goes without the sanding. I really wish I hadn’t done it, and hopefully you’ll get that good, glossy look by foregoing the sanding part.
Good luck!