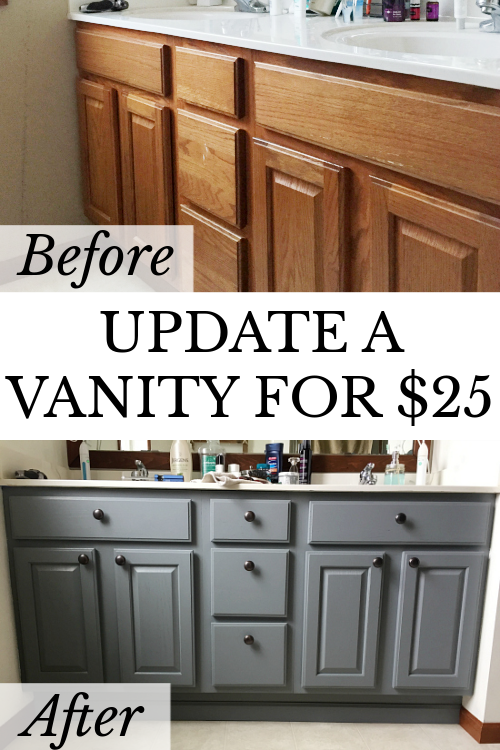
Outdated bathroom vanity? Check out exactly how I did a quick vanity makeover for less than $25.
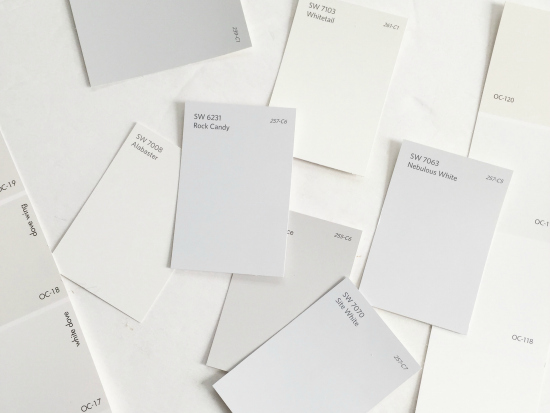
Last week, I shared my plans for our master bathroom, and this week I’m going to change those plans; not all of them, but some. I headed out to buy some satin enamel paint for our vanity makeover, and I literally stood in Hobby Lobby for about 45 minutes trying to figure out whether to go with “Dark Denim” or “Smoke Grey” My original plan was to go with a navy, but it was bluer than I wanted… so I went with gray. This, however, changes my wall paint plans. Originally I was going to use some free paint I had leftover from our master bedroom, but I don’t think the color is going to work with this new vanity color… plus, I now remember that it was a flat paint, which is no good in a bathroom anyway. So, now I’m shopping whites… Did you know there are, like, 7,148 different whites in the world of paint?
I have never painted a vanity. Never. I have never even painted a piece of furniture… except with spray paint 🙂 . So if I can do this, so can you. When we did the $100 Room Challenge in January, Meredith, from The Palette Muse, shared how she redid her vanity with satin enamel paint. It is cheap, and I’m thinkin’ I can probably handle this.
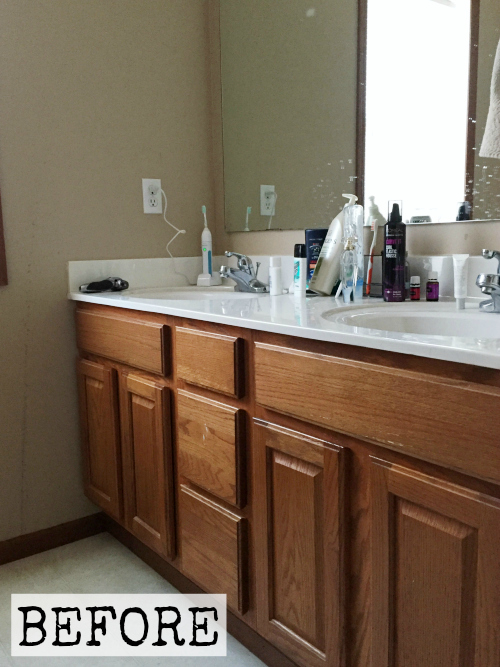
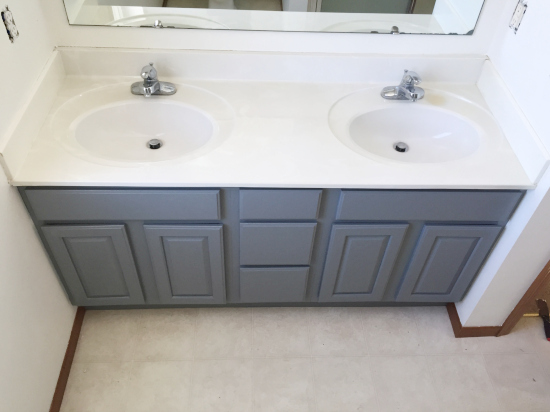
Let’s start by taking a look at where we started.
What You Need to Paint A Vanity
Affiliate links may be used. Please see our advertising disclosure for more information.
- Screwdriver
- TSP Cleaner
- Sponge
- Sandpaper
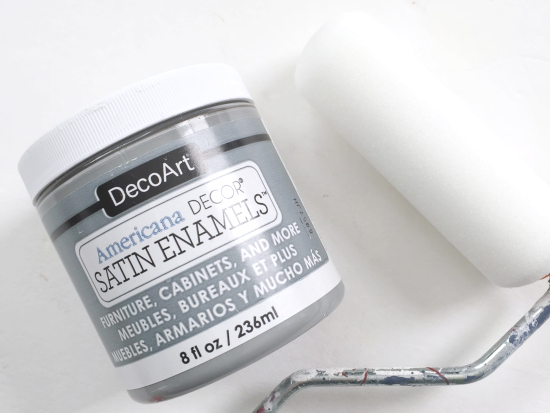
- DecoArt Satin Enamel Paint– I used Smoke Grey, but there are more colors to choose from.
- Small Foam Paint Roller
- Small Paint Brush… I stole one from my kids’ painting supplies
How to Paint a Bathroom Vanity
I am a person that likes a lot of pictures and details, so I’m going to walk you through the process, step by step.
IMPORTANT: If you are painting oak cabinets in a light color, and you do not want the wood grain to show through, follow this tutorial to learn how to hide the wood grain prior to painting.
Remove the Doors and Drawers
In order to get the best results, you need to remove the doors and drawer fronts on the vanity.
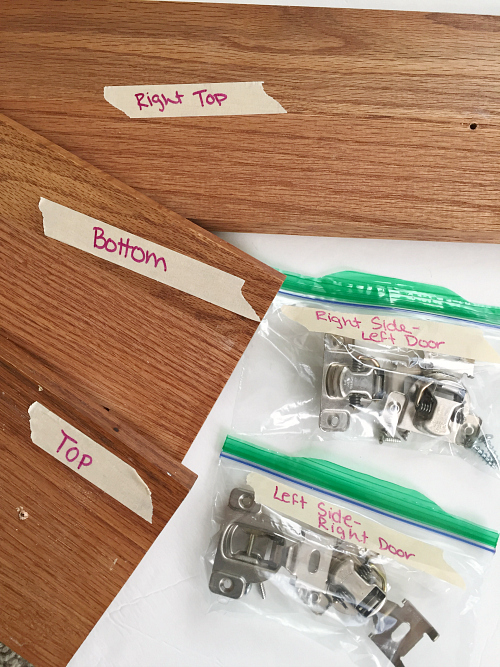
When doing this, remember to label every door and drawer with the correct location, and place the hardware into Ziploc bags, labeling them as well.
Clean the Vanity Prior to Painting
Once the doors and drawers have been removed, clean the areas you plan to paint. I had heard that TSP is the way to go when cleaning cabinets for painting, so that’s what I got.
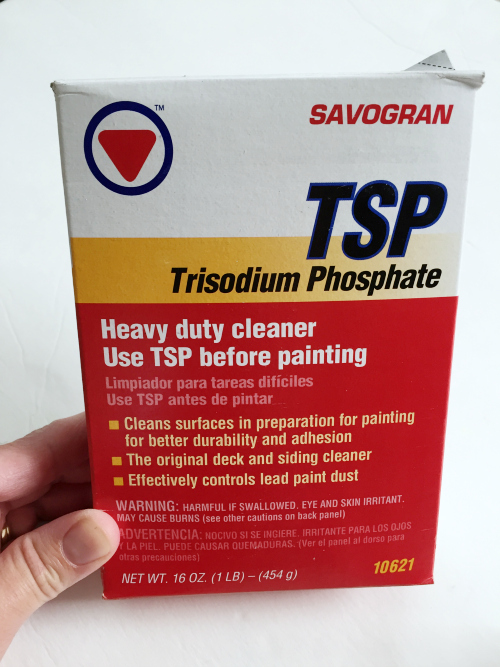
Following the directions on the package, I mixed 1/2 cup TSP with 2 gallons of hot water, allowing it to dissolve. It is recommended that you wear gloves, long sleeves, and eye protection… so, that’s what I did. (And by eye protection, I mean I wore sunglasses, ’cause I couldn’t find our real protection glasses. I’m sure I looked awesome 🙂 ) Simply wash everything with the TSP mixture, and then wipe it down with clean water.
Sand
The next step in the process is to lightly sand the vanity, along with the doors and drawer fronts. This allows for the paint to adhere better. After sanding, wipe everything down with a damp sponge to remove any dust, and make sure everything has dried before painting.
Paint
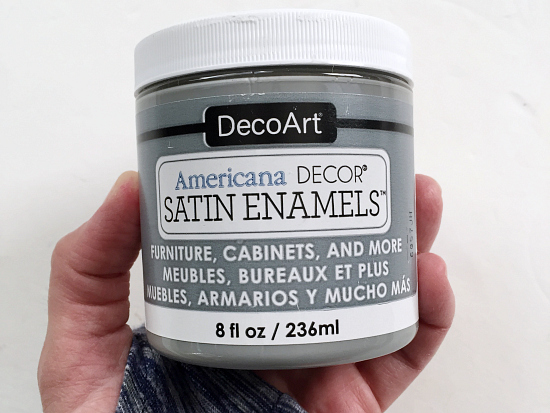
As mentioned above, I used satin enamel paint. Simply apply with a foam roller or paint brush. For the nooks and corners, use a small paintbrush. I ended up applying 2 coats of paint, allowing it to completely dry between applications. Prior to the second coat, lightly sand with a high-grit sandpaper to smooth out any rough areas. One thing to note is that if there’s too much paint on the roller, you get little bubbles. If this happens, gently roll the roller over the area. I when I say “gently”, I mean with the softest touch possible. Then allow everything to dry.
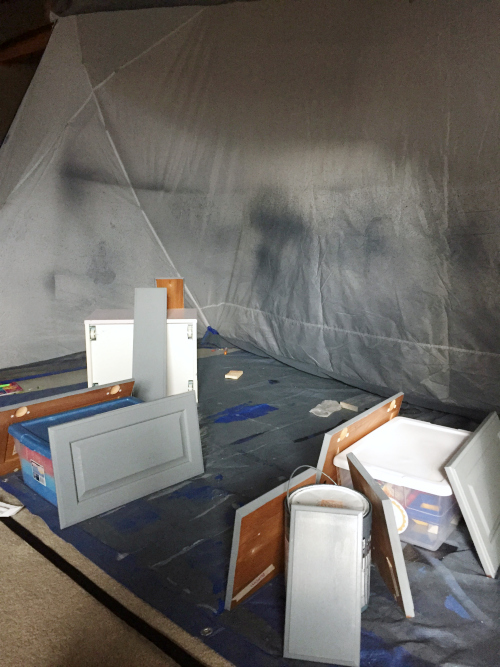
… here are the doors and drawer covers propped up on various totes full of toys, in our basement (where we have a spray shelter set up for the winter 🙂 ).
Here’s the vanity… and my “Budget-Friendly Bathroom Organization” 🙂
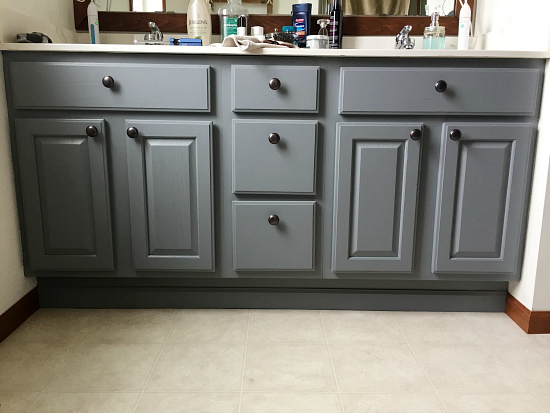
While this is where I left off in the original post, I do want to share what this vanity looks like all finished up… Ready?
Without knobs…
Finished… Just ignore the mess 🙂
For a girl that had never updated anything in her life, this feels good!
UPDATE: This vanity makeover sparked a joy for painting furniture. Check out all the furniture pieces I have updated since this post.
The Budget… So Far
- TSP- $3.84
- Small Paint Tray- $2.88
- Sandpaper & Other Paint Supplies- FREE (Already had 🙂 )
- Satin Enamel Paint- $5.39 (After applying a 40% discount coupon)
Total thus far: $12.11
Wanna Catch Up or Jump Ahead?
Week 1 | Week 2 | Week 3 | Week 4 | Week 5
We think you might also love these ideas!
Five Ways to Paint Furniture | $6 Vanity Makeover | My Favorite Bathroom Makeover For Less Than $100
Love it? Pin it!
Hi, what a beautiful remodel! Quick question: Maybe I missed it, but could you still see the wood grain lines after you were done? I know you said you lightly sanded but just wondering if that did the trick or not to remove wood grain lines? Or was the paint made to hide such things as that? Thanks!
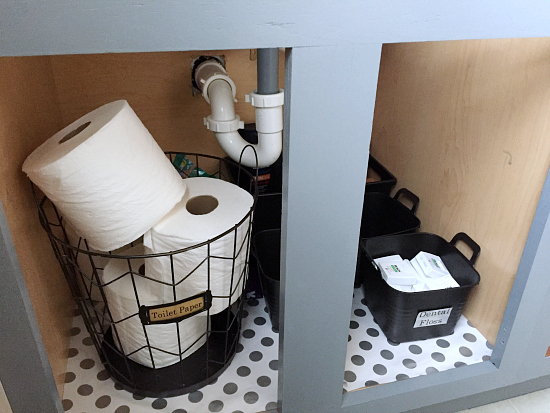
How did you do the polka dot lining on the inside? I read that you said it is wrapping paper. How did you attach it? And how did it hold up? I love the vanity! I am going to do something similar with ours.
You can find the tutorial for the drawer liners here. You actually put contact paper over it to protect it. The original drawer liners I did have been around for 5+ years. We moved a few years ago, so I didn’t take the ones with me from under the sink.
Could I use a regular paint roller or does it have to be a foam roller?
No a regular roller will leave a texture.
You really need a foam roller for a smooth finish.
Thank you for all of your tips! I am getting ready to paint my first vanity so your post helped a lot!
When I clicked on the page, it originally showed a blue color on your vanity. Is that the denim color you mentioned? That is very similar to the color I’m wanting for ours and wanted to make sure.
Thanks again for posting!
Hi Ri-Anna-
I think you are referencing a different vanity found in a different bathroom 🙂 Here’s the post to the vanity I think you’re looking for, and if true, the navy color is called Hale Navy. It’s a color from Benjamin Moore, but I typically color match in Behr as it’s half the price.
Looks great!
I would go with alibaster!
White Dove
Amazing makeover! Quick question about the vanity paint: how has it held up? I am going to paint my vanity (probably in the same color!), but worried about wear and tear and moisture/humidity. We have used Benjamin Moore before, but would much rather spend less than $10 versus $50! Thank you!
We ended up moving about 10 months after we worked on this bathroom, however, for all those months, the paint held up well 🙂
I really love all your $100 dollar makeovers. I have just one concern. In reading about all your $100.00 makeovers you all seam to have free things because you had it on hand. What if you don’t have all that stuff on hand. I would love to see a $100.00 room makeover done from scratch. Would that even be possible. I really do love all the rooms they are beautiful. Thank you so much. Hope your day is a happy one.
Hey Mary-
I can totally see where you’re coming from… you’re right, sometimes I do have things already lying around my house that I don’t count in my budget, and the reason I allow those free items to be used is because I think we ALL have “stuff” around our house that isn’t being used; or leftovers from a previous project. And often times we overlook those items when it comes to working on a space. Why not use up some leftover paint or grab an old pieces of cardboard in the garage and make a sign with it? We reduce the waste and put it to good use. While I think one could absolutely do a room (from scratch) with $100, I think using what you already have just gets you a little further 🙂
How many 8oz jars of the decoart satin enamel paint did you need for your vanity?
I only used one jar, which allowed me to apply two coats, but when I was done, the entire jar was used, so one jar just barely made it 🙂
Wow! That’s amazing!
Oooo, that cabinet color is so pretty! Which ever white you choose it’s going to be fabulous. I can’t wait to see how your space comes together!
Thank you so much Ashley! Now that the vanity is back together, I cannot wait to get the walls painted.
Wheee! Those polka dots are so fun! It’s going to be so cool!
Thanks! Wrapping paper liners 🙂
I’m LOVING how the vanity has turned out so far. And that polka dot paper in the bottom of your vanity is super fun! I might just have to do something similar… My vote for paint is the Alabaster, but they would both look fabulous. Thanks so much for hosting. I’m looking forward to seeing more of your bathroom transformation.
The polka dot paper is actually from the dollar sections at either Target or Michael’s (Can’t remember which one. It’s been there for months now, and I love the little added whimsy.
I like the White Dove. It pops a little bit more 🙂
I tend to agree. White Dove has definitely been the popular vote 🙂
The two whites are very similar, but I have to go with Alabaster as that is what I used in my kitchen and family room. Love it!
Always good to hear that people love a paint color they actually have in their home. Thanks for your input.
I can’t wait to see the vanity reveal next week. Love the color you used. I like the dove white ?
Thanks Linda! Got the vanity back together, but it definitely needs some knobs and pulls. On the list for this week.
White Dove definitely. Thanks for bringing all your work to us. I love following your progress! Good luck with the rest I’m sure it will be great.
Thanks Jeannette! So glad you enjoy these challenges. It’s been so fun having other bloggers join in to see what other come up with!
The DecoArt Satin Enamel paint is one of my favorites. I love love love it and have used it on so many projects! Looks awesome on the vanity!
Thanks Brittany! I am lovin’ this product. I’m seeing more makeovers in my future 🙂
Your vanity turned out great! I’ve never tried that paint before. My vote is for White Dove for the paint.
Thank you for your White Dove vote… That is definitely the majority (by 100%) 🙂
Very nice gray Erin! love it!
Thanks Natalie!
I like White Dove the best.
Thanks Karen. That is definitely the majority vote… by 100% 🙂
I prefer the White Dove! The vanity is going to be gorgeous!
Thanks Claudine! I actually got the vanity put back together today, and I love it! It does need some pulls and knobs though, so that’s on my to-do this week. Thanks for voting on your favorite white 🙂
Erin, this is looking good and thanks for the great tutorial. I just painted a room white dove and I love the color! I can’t wait to see your finished room! Thanks for setting this challenge up!
I’m so glad to hear you’re loving the White Dove… just bought a gallon today to get this bathroom painted. I’m so excited! And it is my pleasure to host this challenge. I absolutely love doing it!
They don’t look greatly different from the photos, but I’m leaning toward the white dove.
They really aren’t vastly different, but the Alabaster is a bit creamier. I am also leaning towards the White Dove. Thanks for your input 🙂
It’s looking great so far Erin! I love the color you chose for the cabinets, and I think I prefer the white dove for the walls. Can’t wait to see more!
I’m kinda likin’ the White Dove just a smidge more too. It a bit crisper… not quite as creamy. Thanks for your thoughts. Hopefully we’ll get this space all painted this week 🙂
It looks great! Good job letting the paint cure you wouldn’t want to smear it or anything. And also I agree whites are so hard. I know you’ll pick a good one for your space!
I typically rush through stuff ’cause I just want it DONE, but I kept telling myself that it’s best to just wait it out. It’ll get done, and be so much better without smudges 🙂 As for the white paint, I don’t think you can necessarily go wrong… right?
I prefer the white dove. In both photos it looks a bit crisper than the alabaster. By the way I’m really enjoying this series and I’ve read through all the archives ?
I’m feelin’ the White Dove just a bit more myself. You’re absolutely right; it’s crisper. I’m so glad you’re enjoying this series. So happy to have you following along!