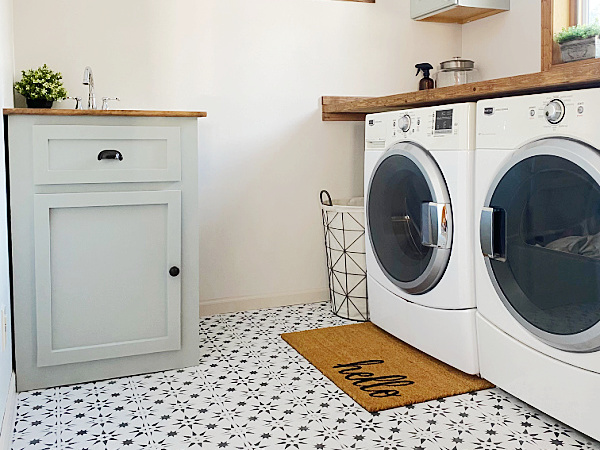
You may not think about cleaning your washing machine until you notice the dreaded “washing machine smell”, or get an error message saying there’s a problem. While cleaning a washing machine isn’t the most pleasant job, it’s fairly easy to do. This step-by-step tutorial will walk you through how to clean a washing machine; including how to clean the washing machine filter, drum and seal. All you need is vinegar and baking soda (plus a little all-purpose cleaner).
Why Does My Washing Machine Smell?
This question is probably the number one question I get asked. Washing machines (especially front loading washing machines) tend to smell bad. This “washing machine odor” comes from the fact that the washing machine has an extremely tight seal (which is good because you wouldn’t want water leaking all over the floor during your washing cycle). When you tightly enclose wet clothes in a space with no air flow, you are bound to experience the smells of mildew and mold.
The other reason washing machines can smell so bad is due to the build-up of lint, hair, and laundry soap residue that builds up on the door and in the rubber seal.
The way to get rid of the washing machine smell is to clean it. This job is not pleasant, but it’s easy and requires just a few simple ingredients you probably have on hand.
What You Need to Clean A Washing Machine
Affiliate links may be used. Please see our advertising disclosure for more information.
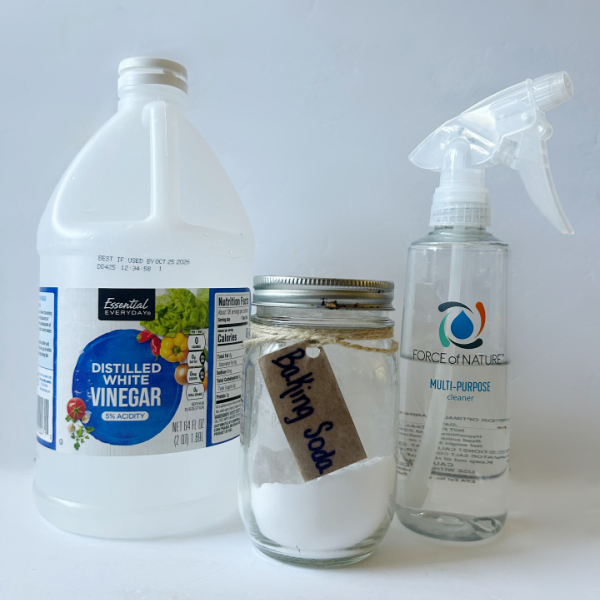
- Vinegar (or bleach)- Vinegar is a great natural cleaner. It works well to break down hard water deposits and works to kill mold. (If you want to see how well vinegar works on mineral deposits, check out our faucets or shower head!)
- Baking Soda– Baking soda is an amazing odor-absorber, which works well when trying to remove the washing machine smell
- All Purpose Cleaner– I highly recommend using Force of Nature Cleaner when cleaning a washing machine, especially if using vinegar (vs. bleach). Force of Nature is a hospital-grade disinfectant made with vinegar, salt, and water. I have a whole review of Force of Nature Cleaner if you want more information.
- Toothbrush– An old toothbrush, or one you only use for cleaning.
- Dish Soap or Sal Suds
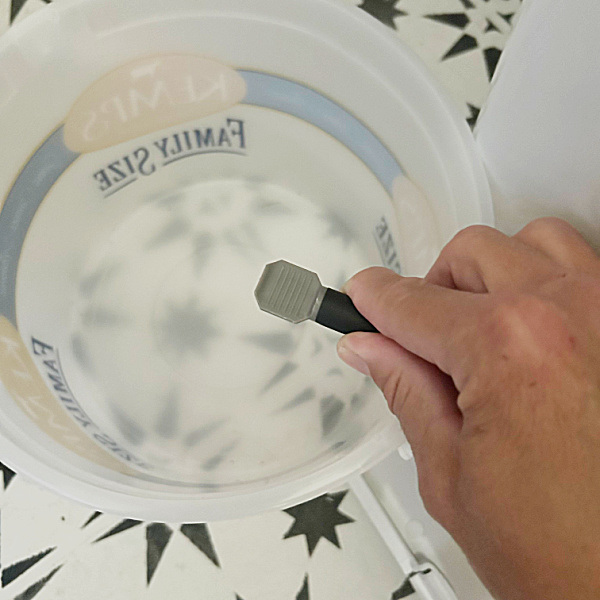
- Bucket– I always use an old ice cream bucket, but any gallon-size bucket will work.
- Old Towels
How to Deep Clean A Washing Machine
Prior to cleaning a washing machine, make sure there are no clothes in it.
How to Clean A Washing Machine Filter
The first step to deep cleaning a washing machine is to clean the washing machine filter.
Warning! This process is cringe-worthy! But do not skip this step! Wanna know why?
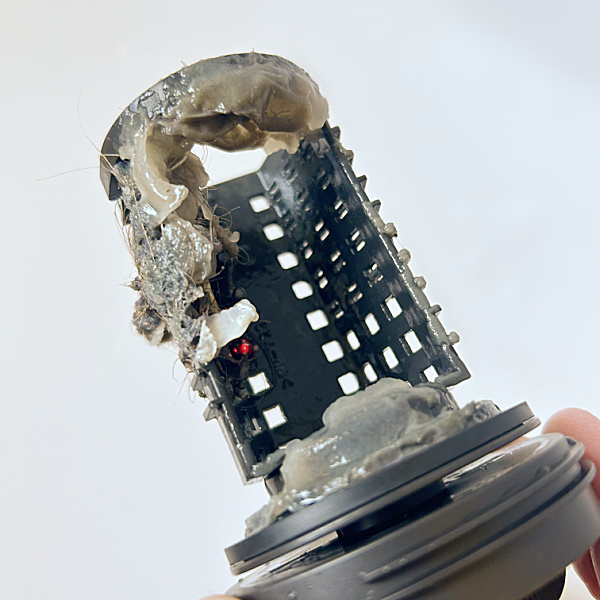
We moved into a new house with a new (to us) washing machine, and unlike the images below, the filter was not easy to identify and access. Read: I couldn’t find it, so I didn’t clean it. After years of living in the house, our washing machine started displaying error codes pertaining to the inability to drain properly. I ignored it until I could no longer open the door without water pouring out. I knew the washing machine filter was probably plugged up with gunk, so I figured out how to get to it (under the front panel) and look what I found in the filter!!!
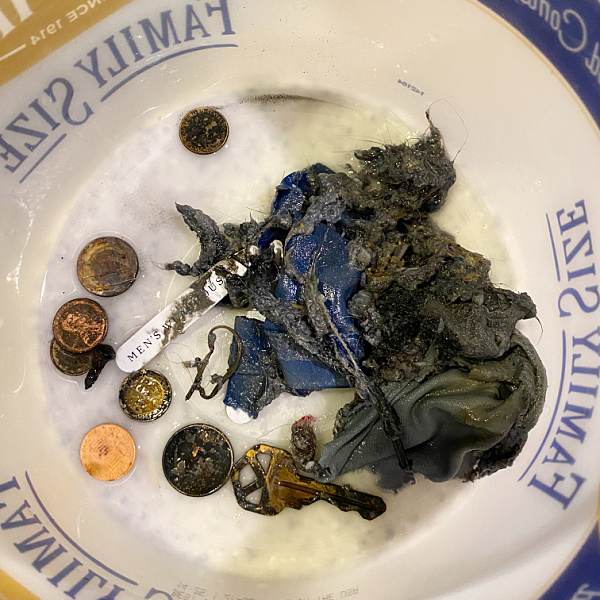
Huge pieces of fabric, seven coins, a key, screws, a safety pin… and more. Is this where all our lost socks end up?? No wonder my washing machine wasn’t draining!
Every washing machine is different, so the location of your filter may not be in the same place as you see in the images below, however, your instruction manual should be able to help you locate it.
Prior to starting this process it is recommended that you unplug your washing machine… just to be safe.
Of the three washing machines we’ve owned, two have a filter that looks like the one below, located in the lower left corner.
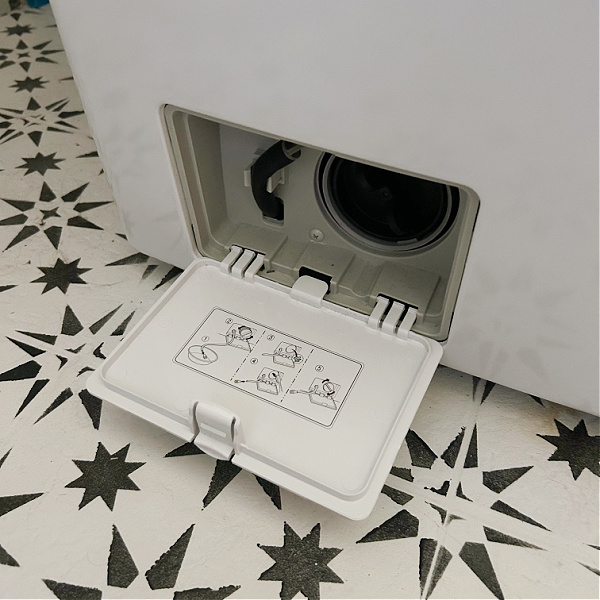
Some filters will have a hose to help drain the water prior to removing the filter, others do not. If you have a hose, secure it over a bucket (I used an ice cream bucket), remove the end-cap and allow all the water to drain. If a hose is not part of your system, you can skip this step.
The water that comes out of the hose is one of the worst smells ever! I choose to wear a mask because it is strong and indescribable. Once all the water has drained out of the hose, you can remove the filter. Place old towels underneath, because despite all the water you just drained, more may come out when removing the filter.
If you do not have a hose to drain, you can simply remove the filter. A lot of water is going to come out (and yes, it will smell awful). For the washing machine we had without the hose feature, I placed a paint tray under the filter to catch the water. I would strongly suggest placing old towels on the floor as well.
Below is the image of our washing machine filter after removal: full of hair and lint and unidentifiable globby gross stuff.
To clean the washing machine filter, use paper towels to remove all the objects and grime. (I suggest paper towels so you can simply throw it all in the trash.) Then, run the filter under warm water and scrub it with a squirt of dish soap or Sal Suds, and a toothbrush.
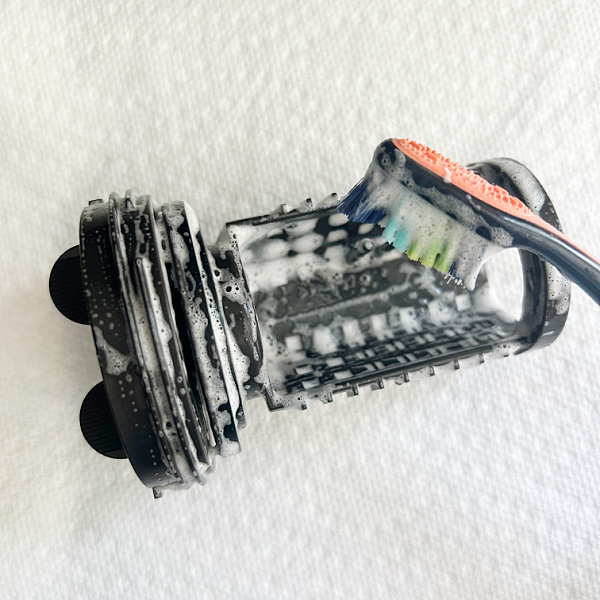
Once the filter has been thoroughly scrubbed, rinse and allow it to air dry; then return it to its proper place in the washing machine.
How to Clean A Washing Machine Drum
When I did my post on freshening the laundry, I discovered that vinegar and baking soda did an amazing job of ridding, not only my towels of musty odors, but the machine itself. I now use these two ingredients to clean our washing machine.
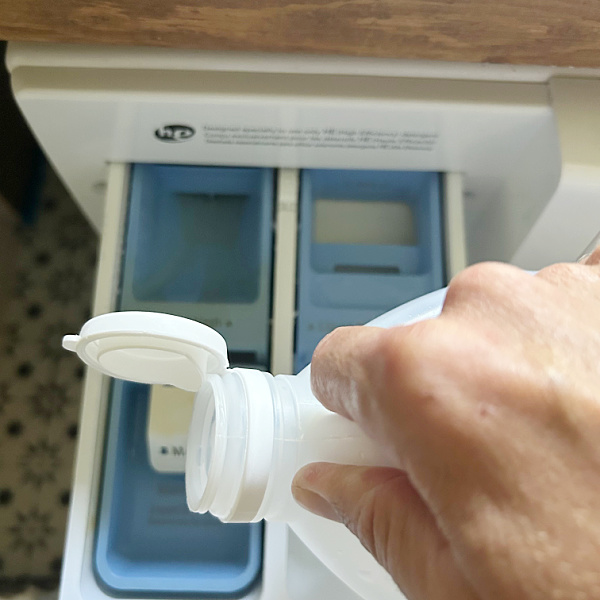
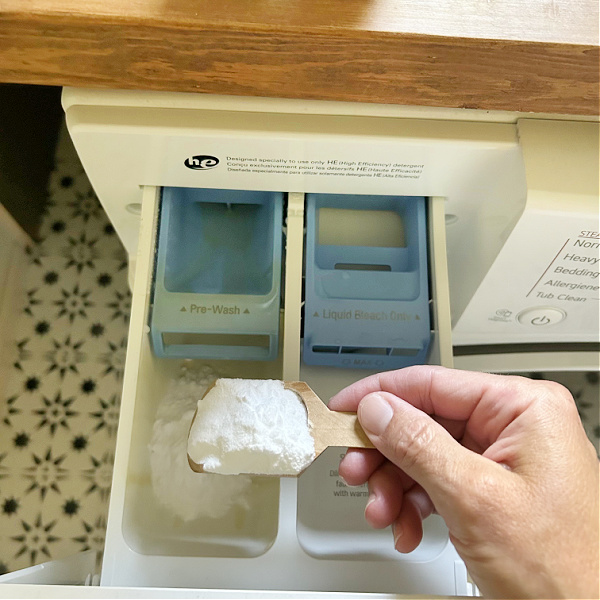
Start by filling the liquid detergent dispenser with vinegar. (Alternatively, you can use bleach, which is a stronger cleaner, however, DO NOT mix bleach and vinegar together!)
My washer has a setting called “Tub Clean”, so I just push the button and let the washing machine clean itself.
If you do not have a “Tub Clean” setting, run a normal cycle with hot water.

Once the cycle is complete, add baking soda to the powder soap dispenser and run a “quick clean cycle”.
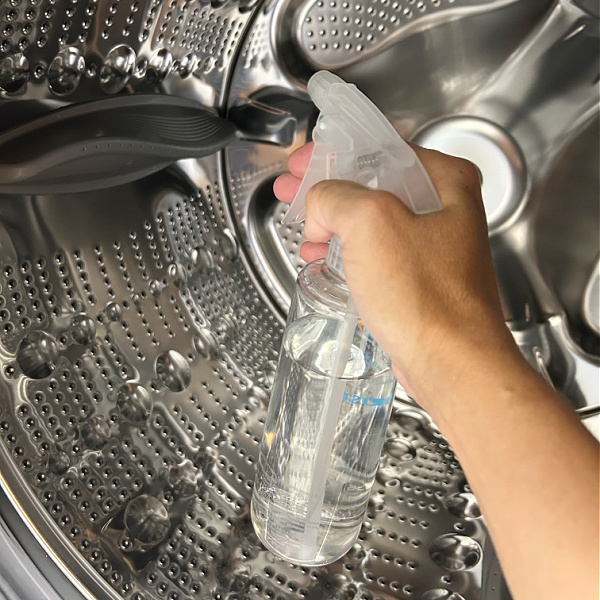
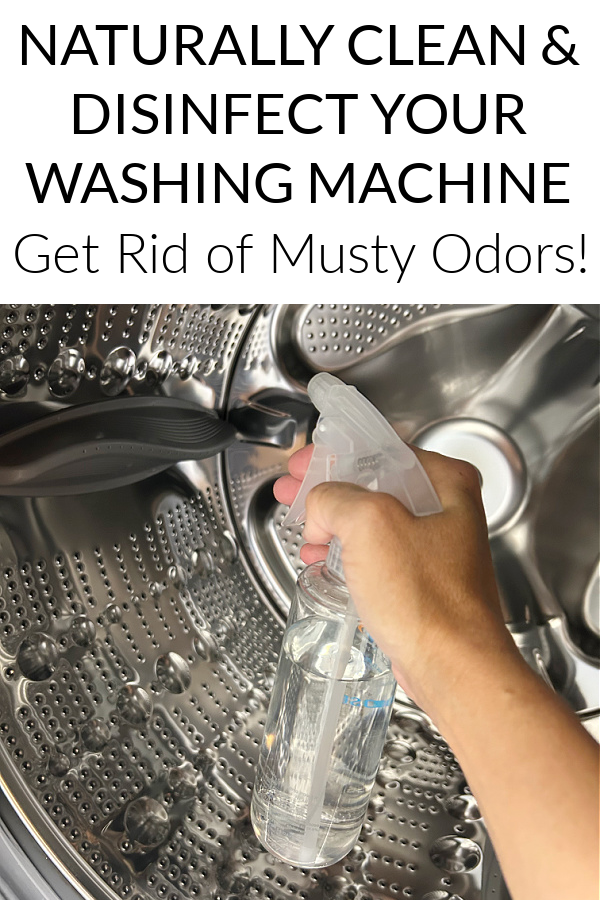
Once the cycle is complete, spray the washing machine drum with *Force of Nature Cleaner and allow to air dry.
*The reason I recommend Force of Nature over any other cleaner is due to its natural ingredients (water, salt and vinegar). Despite only using these 3 ingredients, it is powerful enough to be labeled as a hospital-grade disinfectant that kills mold, which you need in a washing machine that’s prone to odors! (You can read my full review of Force of Nature cleaner here.)
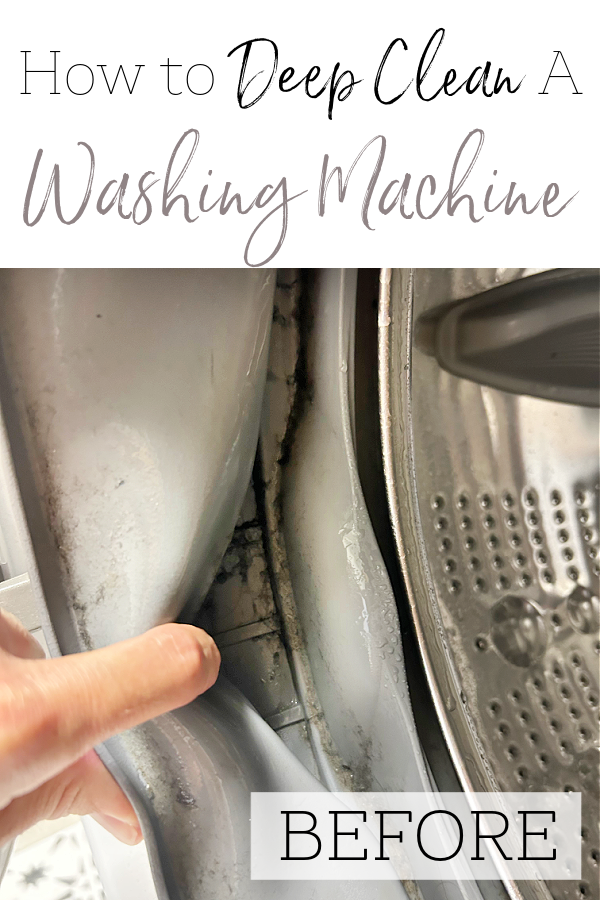
How to Clean A Washing Machine Seal & Door
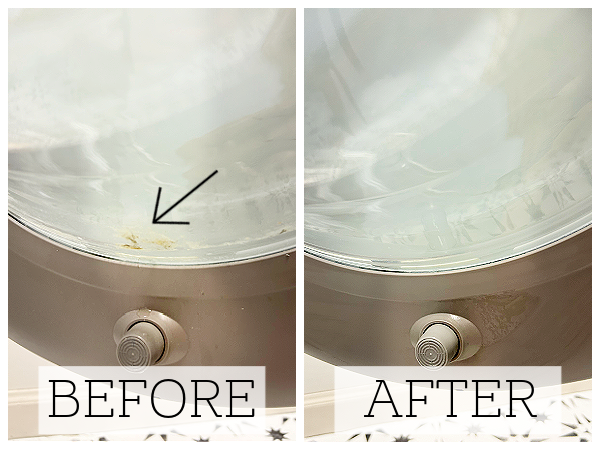
The last step in deep cleaning a washing machine is to clean the rubber seal and door. These two areas are most prone to mold and mildew. Not only that, they can trap soap residue, which attracts lint and hair. Over time this can impact the integrity of the seal. I (again) recommend using Force of Nature Cleaner for this job, but you can also use a DIY All Purpose Cleaner if you choose; just note that it will not disinfect or kill mold.
Grab your cleaner and spray down the rubber seal, using your fingers to pull the sides for a thorough cleaning. Then use paper towels to wipe the seal clean.
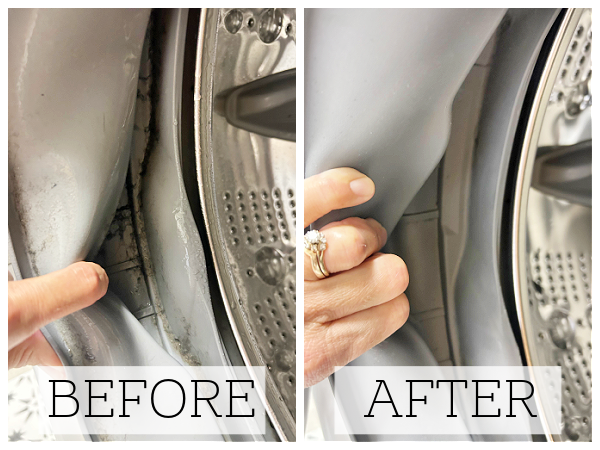
Repeat this same process for the washing machine door. Spray and wipe clean, paying particular attention to the bottom of the door that seems to be more prone to build-up.
You are done! Your washing machine is clean!
To reduce the potential for future mold and mildew smells, keep the washing machine door open when not in use. This helps dry things out, thus reducing moisture that mold and mildew love so much.
We think you might also love these ideas!
How to Clean A Dishwasher | How to Clean A Microwave | How to Clean A Dryer

Common Questions About How to Clean A Washing Machine
How Often Should I Clean My Washing Machine?
I recommend cleaning your washing machine every 3 months or so. This helps avoid a clogged filter and reduces the amount of lint and hair that get trapped in the rubber seal.
Is Bleach or Vinegar Better for Cleaning A Washing Machine?
As mentioned above, you can use either vinegar or bleach to clean a washing machine. Both have their pros and cons. Vinegar is a natural product that works well to break down hard water build-up, but it does not have the same disinfecting properties of bleach; however vinegar is better at killing mold. Bleach is a strong chemical cleaner that can actually disinfect your washing machine, which may help with washing machine odors. The choice is yours. If you are looking for more natural ways to clean and want to reduce mold spores, vinegar is a great option. If you are looking to disinfect the inner workings of your washer, bleach may be better for you.
Can I Clean My Washing Machine with Vinegar & Baking Soda At the Same Time?
It is interesting that so many people still recommend combining vinegar and baking soda together in order to clean. When vinegar and baking soda are combined, we know there’s a fun reaction (Yay for 4th grade volcano science projects!), but what is left behind is salt, water, and carbon dioxide. Everything that made these two products work as a cleaner are lost in that chemical reaction. Therefore, clean the washer with the vinegar first and then the baking soda; don’t combine them.
Love it? Pin it!
I learned how to do something similar to this severa years ago when I struggled with a musty or sometimes sour smell to my freshly washed laundry and the marketed product didn’t resolve the problem. Taking the time and effort was well worth it.My laundry smells clean and fresh every time. I now do a “maintainance” version on a regular basis and a thorugh cleaning once a year even though laundry demands are minimal with just my husband and I.
Hi. Just an FYI: bleach does NOT kill mold. Vinegar does. This is why the “Force of Nature” cleaner kills mold.