This post about How to Organize Under the Bathroom Sink with Dollar Store Items has been compensated by Collective Bias, Inc. and its advertiser. All opinions are mine alone.
The space under the bathroom sink tends to get messy. There are so many things we store in this area: extra toilet paper, hair supplies, and personal care items. I decided it was time for some “under the bathroom sink organization”, but I didn’t want to spend a lot of money. Let’s take a look at how to organize under the bathroom sink with dollar store items.
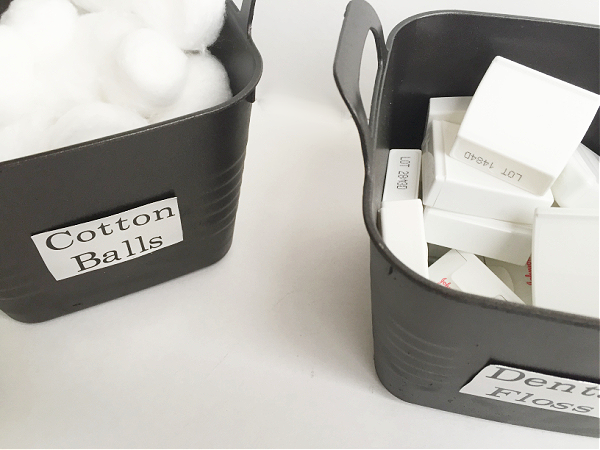
Under the bathroom sink. Need I say more? It’s a collection of crazy under there: hair dryers, bags of cotton balls, rolls of toilet paper… and so many “trial size” dental floss containers I could knit a floss blanket. If you struggle with under the bathroom sink organization, I’m here to offer you a little hope. You can easily, and affordably, organize under the bathroom sink.
What You Need to Organize Under The Bathroom Sink
Affiliate links may be used. Please see our advertising disclosure for more information.
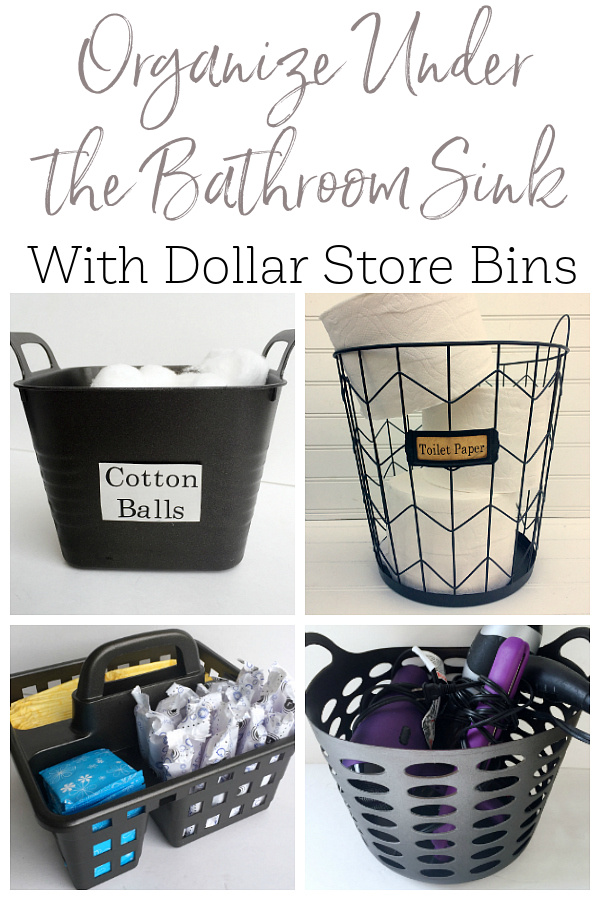
Dollar Store Storage for Under Bathroom Sink Organization
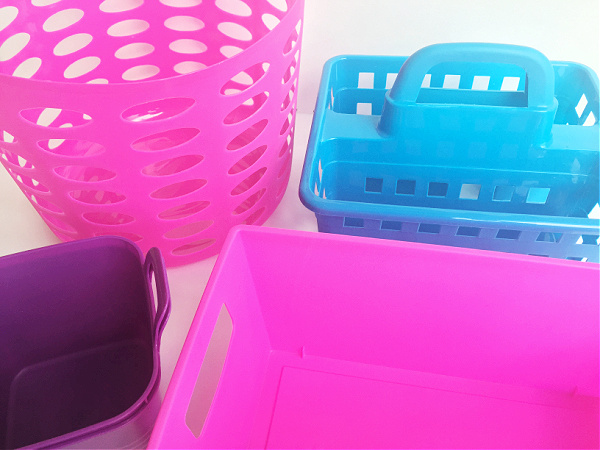
- Plastic Bins
- Wire Wastebasket (I found mine at Target’s “Hot Spot” for $3)
- Spray Paint (I used the colors Oil-Rubbed Bronze and Flat Chestnut)
Labels for Dollar Store Storage Bins
How to Organize Under A Bathroom Sink
Let me show you a few pictures of what my space looked like before this project got underway.
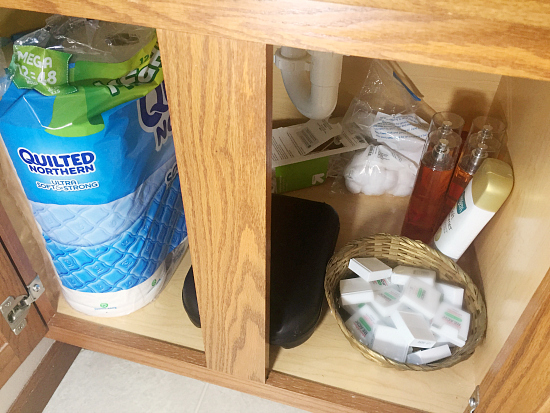
Left side of the sink
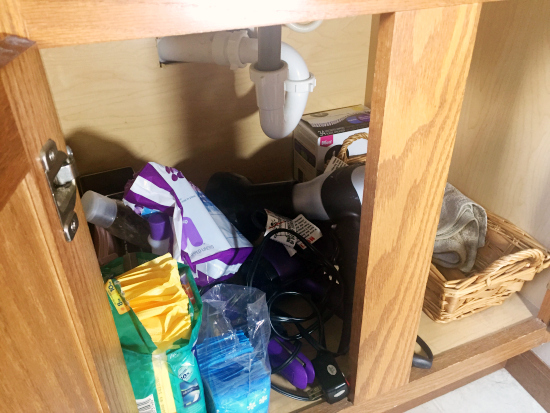
Right side of sink
Pretty bad, right? I believe bags and boxes make everything look cluttered, so removing items from their packaging and placing them into cohesive containers is a great option; and it doesn’t have to be expensive.
How to Spray Paint Dollar Store Storage Bins
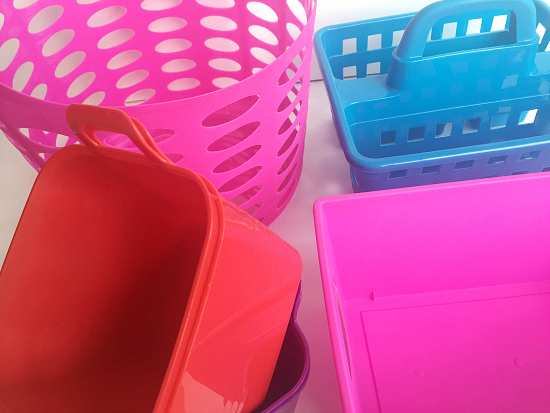
Start by creating a list of everything you need to organize under your bathroom sink. This makes it easy to figure out how many bins you need, as well as which sizes will work best. Once you have your list, head out to the dollar store, and look for bins to match your needs. Many places, like Target, have “Hot Spots” with affordably priced storage bins as well. Don’t worry about the colors because you’re going to spray paint them. I ended up with a rainbow of blue, purple, red, and pink.
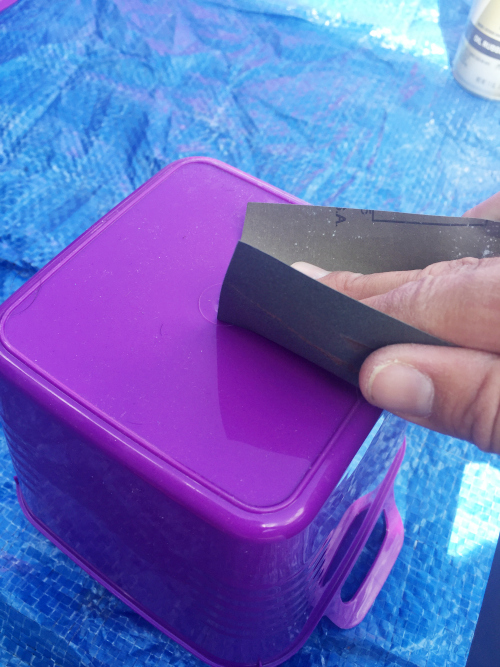
If you have a glossy plastic, it’s helpful to lightly sand it with a high grit sandpaper. This will help the spray paint adhere better. If the plastic has any texture to it, you don’t need to sand at all. (Check out this post for tips on spraying painting plastic bins.)
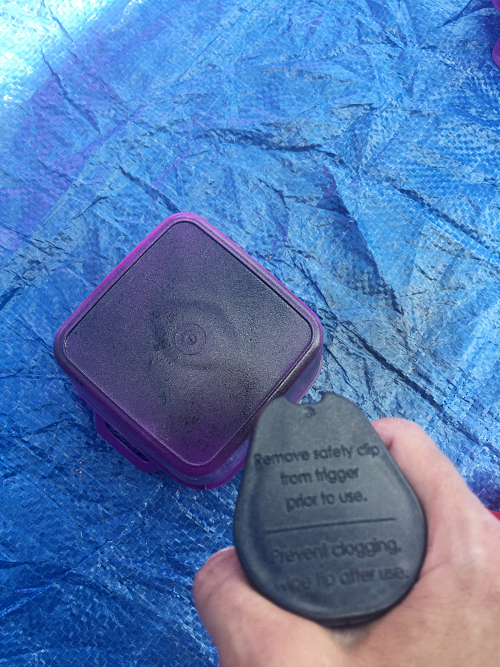
Spray paint one side of each dollar store bin, wait about an hour, then turn the piece over to spray paint the other side. I did a thorough coverage of Oil-Rubbed Bronze followed by a light spray of the Flat Chestnut. I like combining two “metal” spray paint colors in order to add a little texture.
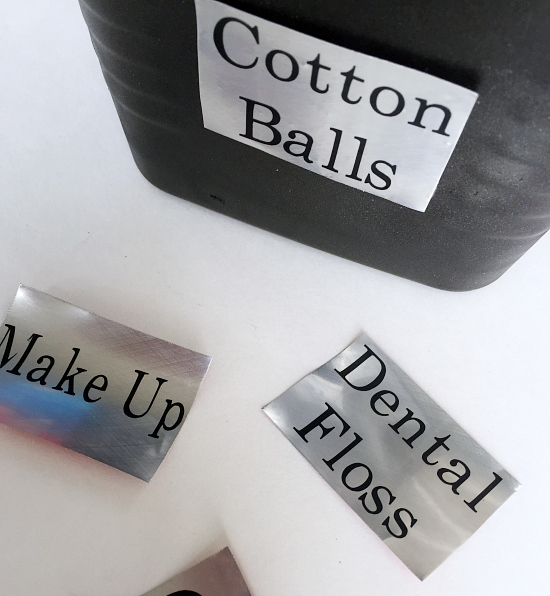
How to Make Storage Labels from A Soda Can
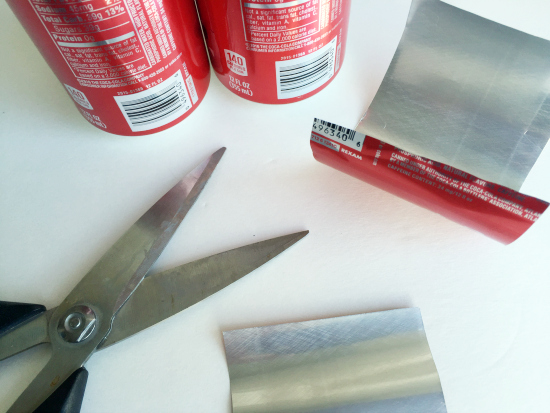
I am a label-lover, so I decided to add a few labels to my smaller bins. Believe it or not, I used a soda can. Start by carefully cutting off the top and bottom of can with a good scissors.
Obviously aluminum cans are sharp when cut, so please, please be careful! Wearing a pair of leather work gloves is advised.
If you want to avoid this step, you can purchase metal labels instead.
With the remaining piece of aluminum, cut out your shapes (I went with rectangles, but you could make squares, circles, etc.).
I used a vinyl cutting machine, black vinyl, and transfer tape to create the lettering for each label. Start by choosing a font, and size it to your labels. Cut it out of the vinyl, and use transfer tape to remove the label from the vinyl’s backing and adhere it to your labels.
If you don’t have a vinyl cutting machine, you can also purchase letter stickers online.
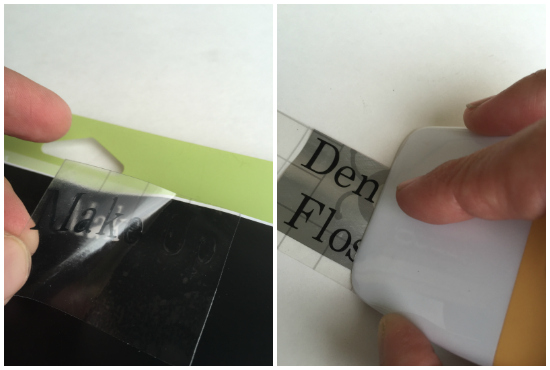
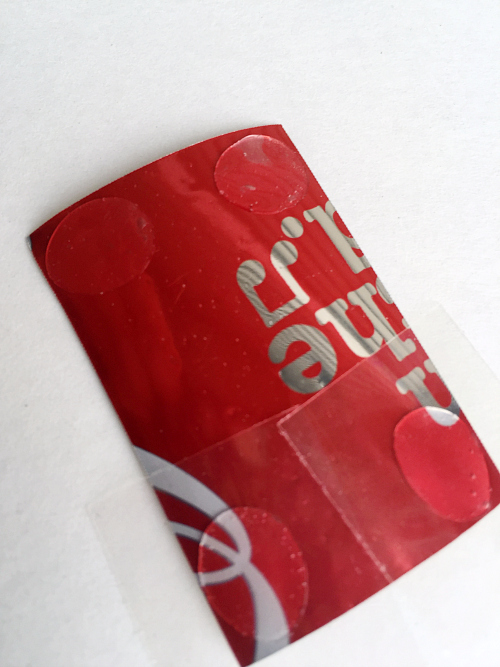
I then grabbed some adhesive dots and placed them in all four corners of the label, and stuck the labels onto the bins.
Here’s how they turned out…
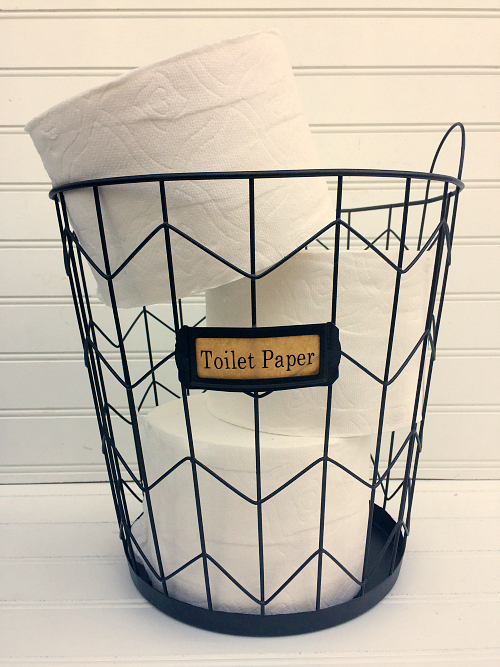
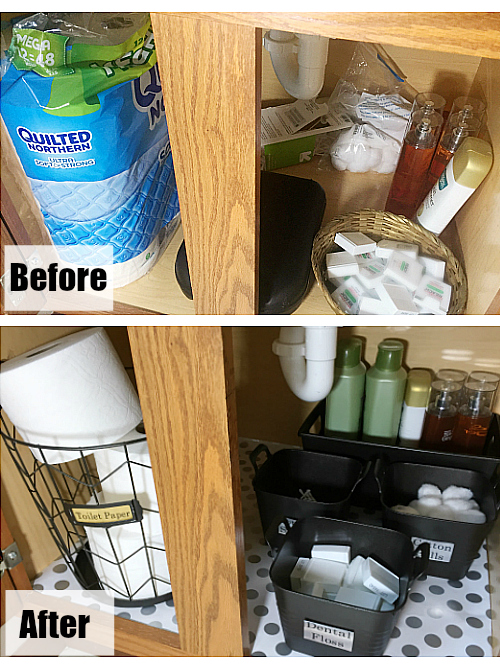
Next, I grabbed my wire wastebasket, which I used to store extra rolls of toilet paper in a more “stylish” manner.
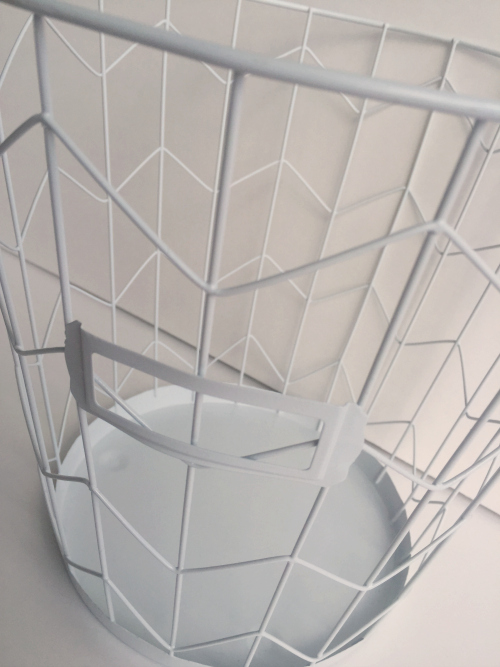
I spray painted it in the same way as the plastic bins, and, again, used my vinyl cutter to create a label on some wrapping paper I had on hand. Here’s how it turned out.
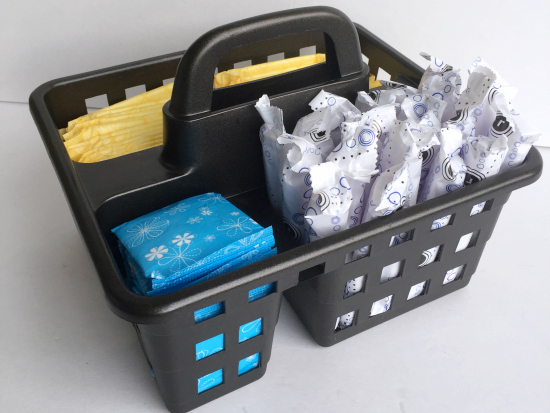
For “feminine hygiene products”, I spray painted a shower caddy with 3 sections… again, from the dollar store.
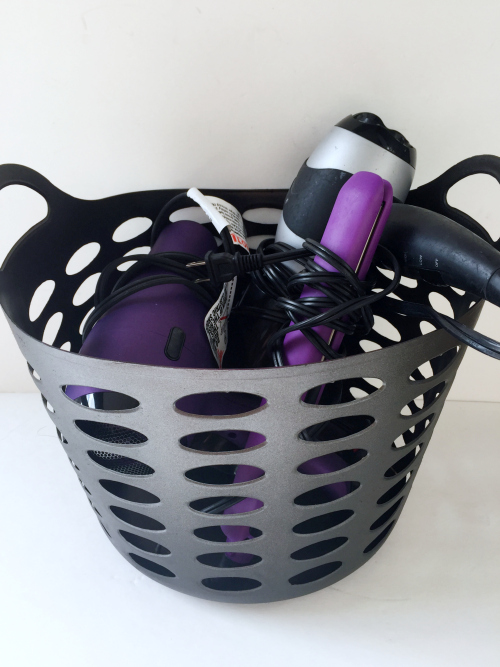
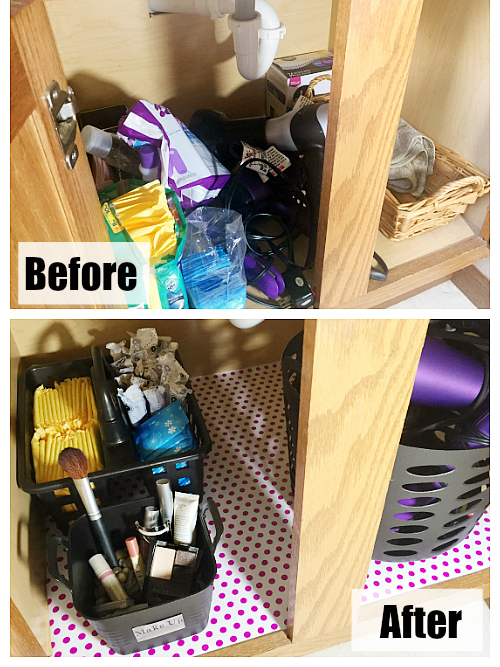
I spray painted a larger “laundry” basket from the dollar store to store hair accessories such as a flat iron and hair dryers.
Extra products, such as shampoos, lotions, etc, went into a small tote (the tote was also spray painted and from the dollar store).
The last step in the process was lying down a “wrapping paper shelf liner” to add a little color. (I used the same method as I did with these DIY Drawer Liners.) Here’s the finished space.
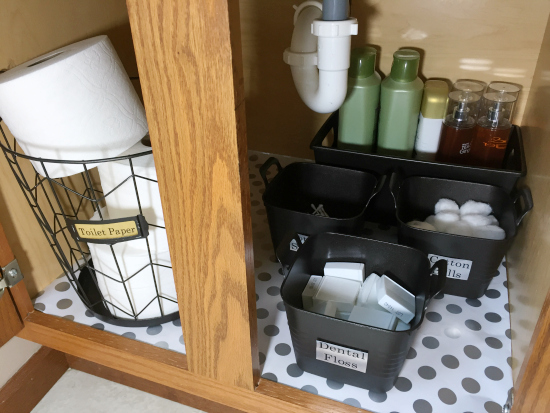
Left Side of the Sink
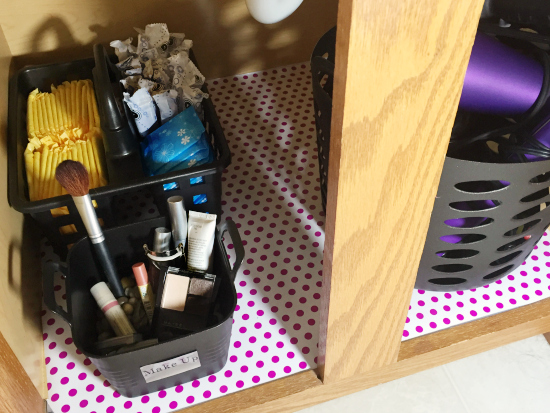
Right Side of Sink
It is so nice to have this space organized. Just one less obstacle to face each morning 🙂
We think you might also love these ideas!
Pantry Organization with Dollar Store Bins | Coat Closet Storage with Dollar Store Bins | Ways to Organize with Dollar Store Bins
Love it? Pin it!
I thought I had lots of dental floss but you have me beat by a long shot. Thanks for the tips. I keep trying to figure out without asking hubby to put a shelve in under my sink.
You went from a 12 package of toilet paper to 3 in the basket. what did you do with the rest of the toilet paper?
You have a good eye 🙂 Here’s the deal: As you can see in the images of my cabinets, there is a piece of wood that separates the two sides. This only gives me a 9 inch opening. I actually bought about half-a-dozen different containers (which were bigger and would have held more rolls), but none fit through the opening. I finally went with the trash can, but you’re right, it only holds the 3 rolls. I store the rest of the TP behind it… although I may remove the trash can next to the toilet for easy access to extra rolls if one happens to run out at an inconvenient time 🙂
Hi Erin
I live in South Africa. I have been to the USA once to LA. I couldn’t get over the top quality and thick toilet paper and kitchen paper rolls. The quality of ours is absolutely awful in comparison. They are very expensive and even the best brands are poor in comparison to yours. I was wondering if we could import your products or maybe one of the larger chain stores could export to SA. Thanks
Michelle
Wonderful idea thanks for sharing will give it a go for sure.
It is so amazing what some spray paint can accomplish!
True
Do you have more idea’s for different label’s?
I have used a paper grocery bag and covered it in tape to label items in my cleaning closet. You can see that here: https://www.lemonslavenderandlaundry.com/100-room-challenge-cleaning-closet-reveal/
In both my laundry room and coat closet, I used little round wood labels with chalkboard paint. I actually found them in the Target Hot Spot section ($1 for 6), but you could easily make them too. Here’s a link so you can see what I’m talking about (just scroll until you see baskets with labels 🙂 ): https://www.lemonslavenderandlaundry.com/100-one-room-challenge-the-laundry-room-reveal/
I have also created my own labels using sticker labels, like you see here: https://www.lemonslavenderandlaundry.com/cleaning-caddy-printables/
… and here: https://www.lemonslavenderandlaundry.com/homemade-bath-salts/
And, if you search Pinterest, you can find some as well. You can always print them onto paper/cardstock and cut them out, which I did here, (but the edges aren’t as clean): https://www.lemonslavenderandlaundry.com/organizing-toys/
Hope those ideas help. Enjoy your weekend!
Thanks so much for taking the time to respond. All very helpful.
Great idea! I love the power of spray paint!! 🙂
Me too! It’s the best!
What a fun tutorial! I love the labels, and can’t wait to try this technique in the future. Thanks for sharing! #client
Absolutely… Amazing what you can do with your recycled items 🙂
I’ve always wondered how spray painted plastic stands up to continued use. How has this (or other spray painted plastic containers) held up in your home?
This is a great question, and many ask about it. When I used plastic bins in my pantry, they were really glossy plastic (almost slippery). I noticed the spray paint starting to chip right away, so I covered it in a layer of Mod Podge in order to seal the paint. It has worked really well, and I haven’t noticed any further chipping. In my coat closet, I also sprayed plastic bins, but these had a very fine texture to the plastic, and the spray paint has held up incredibly well (no Mod Podge needed). For this post, I chose to try lightly sanding those glossier bins. The paint has adhered really nicely and I don’t expect any chipping. One thing I did differently with these bins and those in my closet (vs. the pantry) was I used a spray paint that actually stated it adhered to plastic. The paint I used in the pantry didn’t say this, and that may have been the reason for the chipping. Here are the posts I’m referencing in case it would be helpful:
Pantry Storage Bins: https://www.lemonslavenderandlaundry.com/100-room-challenge-mudroompantry-food-storage/
Coat Closet Bins: https://www.lemonslavenderandlaundry.com/100-room-challenge-creating-storage-solutions/